War Plans have completely changed the way Diablo 4's endgame is played. Introduced with the Lord of Hatred expansion and continuing into Season 13, this system gives players a structured command table where they choose a sequence of five endgame activities to complete in order — earning upgraded loot, XP, boss materials, Horadric Cube crafting materials, and gold along the way. Each activity has its own skill tree that levels from 1 to 7, and the nodes you invest in dramatically affect what drops, what spawns, and how rewarding each run becomes. However, with respec costs reaching upwards of 50 million gold at higher ranks, you want to invest your points wisely from the start.
This guide goes over how the War Plans system works, how to access it, how co-op play it (and its current limitations), how to minmax in the endgame, what activity to choose, how can you get the most out of this new system, and then ranks every War Plans activity skill tree from best to worst with full setup recommendations for both party and solo play.
Updated on May 15th for the Diablo 4 Patch 3.0.2.
Diablo 4 War Plans Guide (Lord of Hatred & Season 13)
How Does The War Plans Endgame Activity Work?
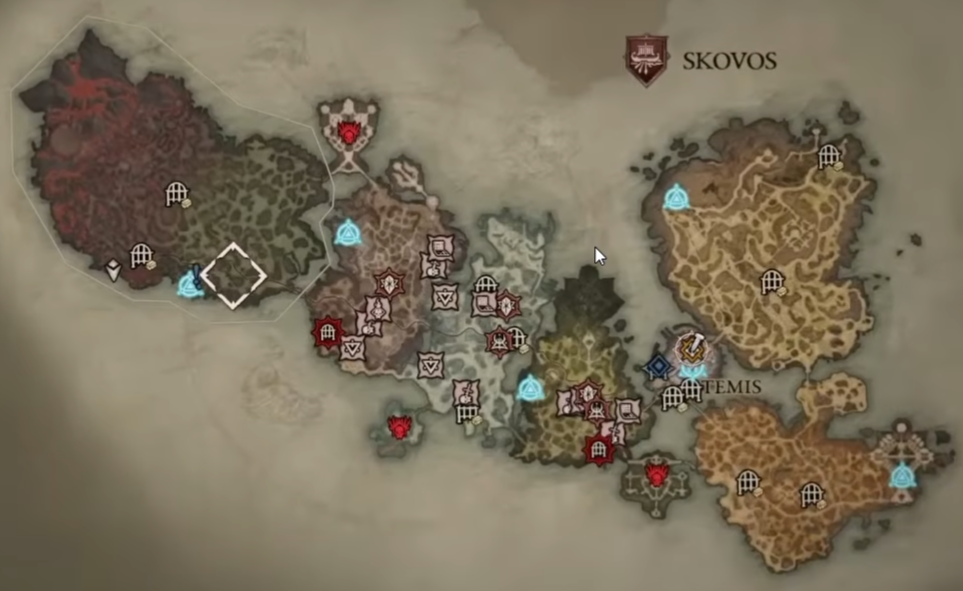
War Plans operate through a command table located in Tyrial, the new expansion city. At this table, you select a path of five endgame activities to complete in a specific order from top to bottom.
Choosing Your Path
Each time you approach the table, you're presented with a branching path with multiple rows you can pick one node from. You pick your route based on two factors: the activities themselves and the rewards attached to each node. Rewards come in different rarities — magic (blue), rare, and legendary (orange). Orange rewards are the rarest and most valuable. Some special rewards can be massive - players have reported seeing rewards as large as 5 billion gold and even mythics on certain paths, so always scan for a node worth going out of your way for.
A useful tip: try to pick paths where the same activity repeats two or three times in a row. For example, three Hell Tide nodes in sequence lets you stay in one tide for ~10 minutes and open every chest, while three Nightmare Dungeons in a row lets you complete an entire Escalation key in a single chained run.
Activity Experience & Skill Tree Leveling
As you complete War Plans, you earn activity experience toward each activity's skill tree. These trees level from 1 to 7, and each level gives you points to spend on nodes that add mechanics, loot, and difficulty to that activity. Leveling these trees outside of War Plans is nearly impossible, going from zero to the first threshold on Lair Bosses would require roughly 125 boss kills done independently, versus a single War Plan completion granting equivalent progress.
Rerolling Plans
You get three free rerolls per plan if you don't like your options. After those three, you must complete whatever plan you have. Once you commit and hit start, a new icon appears on your map, and you can teleport directly to each activity in sequence. You don't have to commit to all five activities every time, you can path past Infernal Hordes or anything else you want to skip.
The General Routing Strategy
The rule of thumb is to pick activities that take the least amount of time but offer the greatest reward, both from the base activity and from the war plan completion bonuses. Avoid Infernal Hordes when possible (they can take as long as an entire war plan by themselves). The Pit is fast. Nightmare Dungeons are low-investment. Undercity runs take about a minute. Helltides are slightly longer but offer enormous XP returns with the right nodes.
When choosing path rewards, prioritize dungeon keys, obols, experience, and Horadric Cube upgrade materials. Everything else you pick up between those is a nice bonus.
War Plans Activities
Every major endgame activity is part of the War Plans system. The activities you can include in your War Plan are:
Nightmare Dungeons
Helltides
The Pit
Lair Bosses
Kurast Undercity
Infernal Hordes
Tree of Whispers
The one exception is Echoing Hatred, a new horde mode that functions as a rare ticket-based reward from doing other content and sits outside the War Plans framework.
How To Unlock War Plans?
War Plans are only available if you own the Lord of Hatred expansion. They become accessible after you complete the expansion campaign. Once you finish the final campaign quest, you can head to Tyrial and interact with the War Plans command table to begin.
When you first approach the table, your options will be limited, only a few activity choices with basic rewards. As you complete more plans and level your skill trees, the branching paths grow larger, more activities become available, and the rewards improve substantially. The system starts small but scales into a massive progression framework over time.
How Does War Plans Co-Op (Party Play) Work in Diablo 4 Season 13 LoH?
Current State of Co-Op
Each player has their own individual War Plans progression and their own randomized playlist. If you're in a party, you can complete activities together, but only the party leader's war plan advances through their specific sequence. Other party members get some rewards for participating:
They receive loot at the end of each completed activity
They earn some XP toward their various War Plans skill trees
If they happen to have the same activity as their next task, it counts for their plan too
However, party members who don't share the same next activity in their own plan will not make progress toward their personal War Plan sequence.
The Current Frustration
Because war plan paths are randomized independently for each player, they almost never line up between friends. When you're not the party leader, it feels like wasted time since your own plan isn't advancing. When you are the leader, you feel guilty that your friends aren't progressing. This effectively disincentivizes co-op play for war plans, since running your own playlist solo is more efficient.
The Workaround for Now
The best approach currently is to rotate who is party leader. Some players have reported that after completing initial plans, subsequent war plan paths sometimes generate similar activity layouts for party members, though the rewards may differ. You can also coordinate around shared activities like Undercity runs, where everyone brings one tribute and gets four runs total, walking out with significantly more loot than solo.
Confirmed Fix Coming in Season 14
Blizzard has announced that War Plans updates for co-op/party play are planned for Season 14. Details are still being sorted out, but the general direction involves making it so party members can share or align their war plan paths more easily. This is not a hotfix, it requires deeper system changes that won't arrive until next season.
War Plans Co-Op (Party Play) or Solo (Single-Play)?
When to Play Solo
Solo is currently the most efficient way to progress your own War Plans board. You move through your five activities at your own pace, every completion counts, and you never waste time on someone else's tasks. If your primary goal is leveling skill trees and earning war plan completion rewards, solo is the optimal choice right now.
When to Play Party
Party play shines in specific activities where group scaling makes the content dramatically more rewarding. Undercity runs in particular are far better with friends - each player brings one tribute, giving the group four runs total. Players report walking out with 15+ mythics across those runs compared to 3-4 solo. Lair Boss Nemesis portals also benefit from calling friends in (though everyone needs the relevant node to receive loot).
For Infernal Hordes, an interesting duo interaction exists: if one player specs into the Method of Madness/Black Pact line and another player specs into the Infernal Horde chest line, both effects can apply simultaneously. This only works reliably with two players, adding a third reportedly causes bugs.
The Practical Strategy
Most experienced players use a hybrid method. They run their war plans solo for maximum progression efficiency, then group up specifically for Undercity mythic tribute runs and Nemesis portal fights. This gives you the best of both worlds until the Season 14 co-op improvements arrive.
Important Party Node Interaction
For Lair Boss Nemesis portals: call your friends before entering the red portal. Everyone in the party must have the Nemesis node in their own skill tree or they will not receive loot from the encounter. This is a hard requirement, not a suggestion.
Diablo 4 Best War Plans Skill Tree Builds & Upgrades for Each Activity
Now that you know how the system works and how co-op fits in, let's rank every War Plans skill tree from the strongest to the weakest and cover exactly how to set each one up for maximum returns. Below is the updated ranking and full setup for each War Plans tree, incorporating the latest testing.
1. Undercity War Plans Skill Tree Setup & Upgrade (Best for Mythic Farming & Forgotten Souls)
The Undercity tree is the single most powerful war plan investment in Season 13. The left-side path centered around Portal Pranksters has become the primary method for reliably farming mythic items in the game. When running mythic tributes at Torment 8 or above, players consistently report getting multiple mythics per run — sometimes up to four from a single Undercity completion. The activity itself takes about one minute to complete, giving it an unmatched time-to-reward ratio.
How to Set Up the Skill Tree
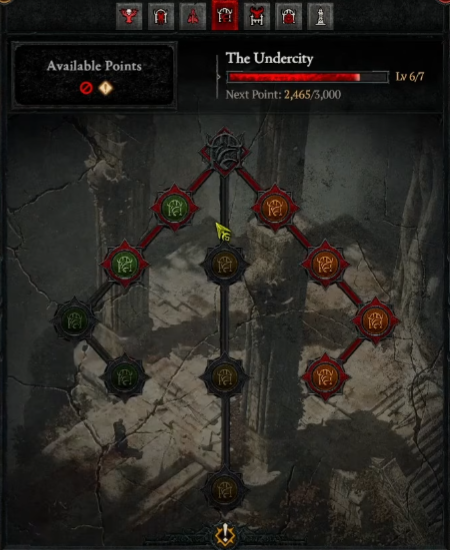
Start with the Invasion Portals node (top) for extra attunement from emerging enemies, then go down the right side for the most universally valuable rewards:
Jade Epiphany (XP Orbs) - Massive paragon experience that applies across all your characters. With paragon leveling slower this season, this is one of the best passive XP boosts in the game.
Tuning Prism Tributes - Fuels your unique-item crafting pipeline. Players regularly stockpile 1,000+ tuning prisms primarily through Undercity farming.
Initiative (Bottom Node) - This is the standout. By beating the boss within the time limit, your maximum reward bar extends from 4 to 6, granting roughly 50% extra rewards per run. As long as your build clears at appropriate Torment, hitting Initiative is essentially free juice on every Undercity. This is what makes mythic legendary armament tributes so insane — more bars = more mythics.
After securing the right path, move to the left side for the Portal Pranksters chain. Goal: invest 4 points to reach Trials and Tributes:
Gutterfilth - Activating beacons can summon Portal Pranksters (goblin-type enemies).
Trials and Tributes - Each Prankster killed adds an additional tribute chest after the district boss. At Torment 8+ with mythic tributes, each chest is nearly guaranteed to drop a mythic. Many of these chests now auto-open, awarding additional mythics passively.
Unfortunate Souls (Wisps) - Wisps that survive grant Forgotten Souls and crafting materials at the end. Very hard to farm elsewhere.
Skip in the middle path: the time-extension node is rarely needed, and the rune merchant's prices aren't great. The "final floor shortcut" still doesn't synergize with the Prankster strategy — you want to hit every beacon on every floor.
Rewards & Loot
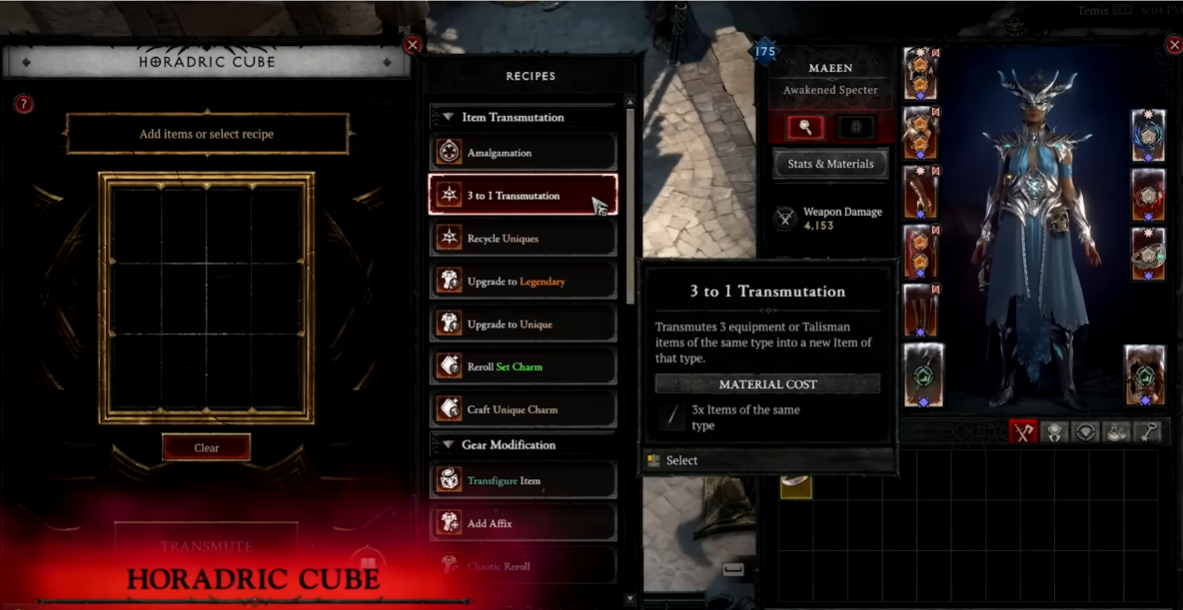
Mythic items (2-4 per run with pranksters at T8+), forgotten souls from wisps (very hard to farm elsewhere), runes, Horadric Cube materials, and whatever your selected tribute type provides. You can also upgrade 5 lesser tributes into 1 higher-rarity tribute through the cube.
Best Builds for This Tree
Any fast-clearing build works here since Undercity runs take about a minute. Sorcerer builds with high mobility (like Ball Lightning) or Spiritborn speed builds are ideal. The key is activating every beacon on every floor to maximize Portal Prankster spawn chances — don't skip any, even if you're trying to rush.
Tips
You need to actually kill the Portal Pranksters that emerge from portals near beacons. It's annoying to backtrack for them, but you absolutely need to do it for the extra chest spawns. Also, the "final floor shortcut" node that makes an exit portal appear when you reach max atunement doesn't synergize well with this setup - you still want to go through all floors and activate all beacons to spawn as many pranksters as possible.
Party & Solo Viability
This tree is strong both solo and in groups. Solo players can farm tributes, use the 5:1 amalgamation recipe at the Horadric Cube to upgrade legendary armament tributes into mythic ones, and run them independently. In groups, the payoff is even larger - each player brings one tribute, giving the party four runs. Groups regularly walk out with 15+ mythics across those four runs.
2. Helltides War Plans Skill Tree Setup & Upgrade (Best for Paragfon XP, Lair Boss Keys & Boss Trophies)
Helltides are likely the single best activity for gaining paragon experience in Season 13. The middle path focused on Hellmouth maggots provides an absurd amount of XP orbs, players report gaining 20-30 million XP from a single hellworm spawn at Torment 12, which can translate to 20-30% of a paragon level even at high levels. On top of that, the maggot line generates massive quantities of boss trophies, lair boss keys, and cinders simultaneously.
How to Set Up the Skill Tree
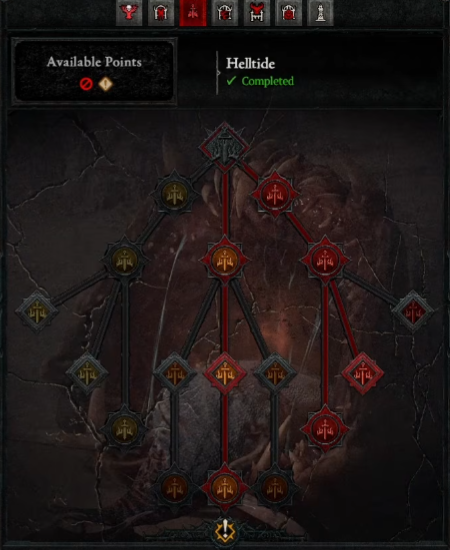
Take Hellmouth and Wretched Vermin as your first two points, then commit to Maggots in the middle:
Maggots - When the hellworm emerges, it produces maggots instead of rifts/blood seekers. Maggots provide enormous XP, players gain 20-30 million XP from a single hellworm at high Torment.
Bursting Brood - Maggots and Pangs of Dural explode and drop boss trophies in absurd quantities. Players have accumulated nearly a thousand exquisite blood passively this way.
Wretched Vermin - Rats that drop massive amounts of cinders, ensuring you never run out of currency for chests.
Hellworm Alternatives Worth Knowing
Chaos option drops a wide spread of normal extra loot, pick this if you don't care about XP and just want item volume.
Blood Seekers are also juiced with extra loot, making the whole tide more rewarding to walk through.
The Maggots branch is still the king for paragon farming.
Right Side (Chest Farmers)
If you spend lots of time inside the tide opening every chest, the right side is excellent. You unlock more cinders and a bonus oversized chest at the end if you spend most of your cinders. This path is also where lair boss keys (including the Crux of Mephisto) drop most reliably — players regularly accumulate 15+ keys in a single session.
Left Side (Threat & Hellborn)
Hellborn Butchers - Spawn at maximum threat level and drop Profane Mine Cages, which boost monster power across all overworld content (stacks up to 3x). A returning mechanic from earlier seasons, mine cages multiply XP and loot until you die.
The left side also boosts Hellborn appearance rates inside Nightmare Dungeons.
Pro Tip - Roots Synergy: If you've taken the Ka Roots node from the Tree of Whispers tree (see below), drop them at Soul Spires inside Hell Tides. They attract monsters and dramatically multiply your cinder gain. Players have gone from 170 cinders to 600+ cinders during a single Soul Spire event using this combo.
Skip: The 666-cinder Hell's Prize chest still drops poorly relative to standard 250-cinder chests. Avoid it until buffed.
Rewards & Loot
Enormous XP (best paragon farm in the game), boss trophies in massive quantities, lair keys and greater lair keys from Pang of Dural, cinders for opening all types of chests, and Profane Mine Cages for further difficulty scaling. With three mine cages stacked, players at level 240-250 report gaining three to five full paragon levels in a single Hell Tide session.
Best Builds for This Tree
Builds with strong AoE and good survivability thrive here. You need to reach the second threat level for hellworms to start appearing consistently, and you need to handle Hellborn enemies and butchers at increased monster power. Any build running Torment 10+ comfortably will benefit enormously.
Tips
The Hell's Prize chest (666 cinders) has been tested and drops very little compared to standard 250-cinder chests, skip it for now unless it gets buffed. Focus instead on reaching threat level 2 as fast as possible, then farm the worm spawns. Note that dying removes your stacked Profane Mine Cages, so play carefully once you have them active.
Party & Solo Viability
Helltides work well both solo and in groups. In a group, threat levels rise faster, meaning hellworms spawn sooner and more frequently. Solo players can still reach the second threat level reliably — it just takes slightly longer. The XP gains are personal, so grouping doesn't dilute the experience rewards. One full Hell Tide with Profane Mine Cages active can yield three to five paragon levels for players in the 230-250 range.
3. The Pit War Plans Skill Tree Setup & Upgrade (Best for Glyph Upgrades & Consistent XP)
The Pit remains the premier activity for leveling glyphs in Season 13, and with the right war plan nodes, you can earn up to 4 additional glyph upgrade chances beyond the base reward every single run. Once your glyphs are maxed at 150, the Pit also converts into a solid XP dump. Fast builds can clear in two to three minutes, which makes this one of the most time-efficient war plan activities to select repeatedly.
How to Set Up the Skill Tree
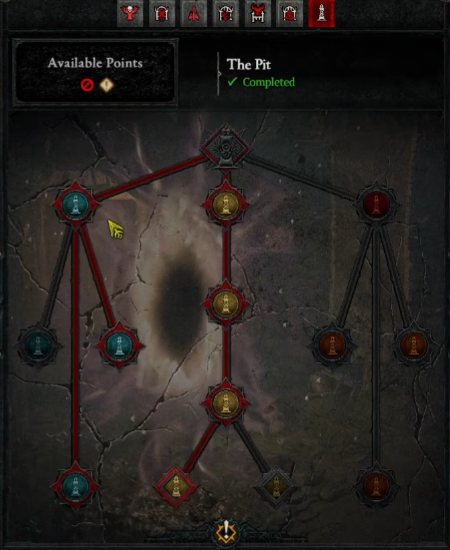
Every build, on every character, should grab these two immediately:
Chronos' Haste - +1 glyph upgrade per 5 minutes left on the timer. Easy +2 per run for any reasonable speed build.
Heart of Stone - Pick up the item at the start; while carrying it, monsters drop progress orbs that shave 20-30 seconds off your run. Deposit at the Chrono Pedestal at the end for +1 more upgrade.
Middle Path (XP Conversion)
Chronos' Soul / Shant Soul - All progress orbs grant XP. Once your glyphs are maxed, sacrifice unused upgrade chances at the end pedestal for ~10 million XP per run. There's also an alternate deposit option that converts upgrades into extra loot — useful if you intend to farm the Pit forever.
Pit Butcher - A ~1 in 30 chance for the Butcher to spawn. Killing him ends the run with full rewards. Mostly a travel node to Chronos' Favor.
Right Side (Reassessed - Now Worth Considering)
Newer testing has changed the verdict on the right side. While it's still unsuitable for pure speed farmers, it's genuinely strong if you slow down:
Cursed Rituals - Click flowers, rocks, and ritual sites for extra loot. Decent if you keep farming the Pit after completion rather than leaving immediately.
Artificer Stones / Cursed Merchant - Stones drop from various Pit activities; a vendor occasionally appears selling items that almost always carry greater affixes. Items are pricey, but the quality is consistently high.
Cursed Offerings - Extremely rare (~1 in 10-20 runs) but extremely rewarding when found. They reportedly drop Trace of Echoes very frequently or every time, which is the key material for Echoing Hatred. If you're chasing Echoing Hatred entries, this is one of the best sources.
Skip: Orb Thieves still leave annoying trap trails. Most testers regret investing in them.
Rewards & Loot
Glyph upgrades (up to +4 additional per run), 5+ million XP per run from clearing, another 10 million XP from converting upgrades when glyphs are maxed, and faster pit tier progression from Heart of Stone orbs.
Best Builds for This Tree
Speed-focused builds that can clear Pit 110+ in under 5 minutes are ideal. Ball Lightning Sorcerer, Spiritborn speed builds, and any class with strong mobility and AoE clear speed work well. The key is fast, consistent clears rather than pushing maximum difficulty. Note that highly mobile builds (like perma-teleport Sorcerer) may skip over progress orbs from Heart of Stone, making the node slightly less effective for them.
Tips
The right side of the Pit tree (Chaon's Wager, cursed rituals, artificer stones, cursed merchant) has been tested by multiple players and feels like absolute trash. Events spawn extremely rarely, they're hard to notice while speed-clearing, and the loot doesn't justify the investment. Stick to the middle and left paths. Orb Thieves (another right-side option) are annoying to kill and leave irritating trap trails, most players who tried them regretted the investment.
Party & Solo Viability
The Pit is primarily a solo activity in Season 13's war plan context. You complete it on your own board, and the speed makes it ideal for solo progression. There's no meaningful party benefit for pit runs within the war plan structure, though the glyph upgrades you earn benefit your character regardless of how you play afterward.
4. Nightmare Dungeons War Plans Skill Tree Setup & Upgrade (Best for Gold, Escalation Sigils & Primordial Dust)
Nightmare Dungeons have become significantly more rewarding than first impressions suggested, with the left-side shrine + respawn synergy being the standout discovery. Nightmare Dungeons offer several viable paths with different strengths. The middle path provides Escalation sigils for farming Asteroth (who drops 10,000 Obdessite on Torment 12 along with massive loot). The right path chases treasure goblins and the extremely rare Goblin's Retreat portal. The left path provides Attuned Primordial Dust, one of the rarest materials in the game used for rerolling unique item powers, and this tree is one of the only sources for it.
How to Set Up the Skill Tree
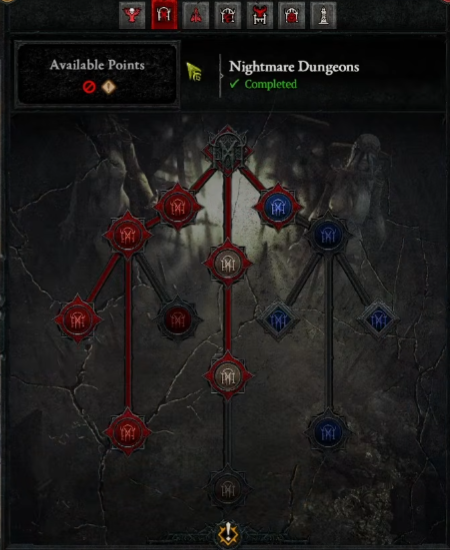
Most players go down the middle path first, then branch right for goblins or left for Primordial Dust depending on their needs.
Left Path (Hidden Powerhouse):
Soul Shrine (Gauntlet) - Click the shrine; every monster you kill during its buff gets stored and respawns later. The respawn carries between shrines, stacking massive monster pools.
Nemesis Bracer Effect - When picked up, can spawn up to 7 elites at once. Pairs perfectly with the shrine respawn - click a shrine, kill packs, walk to next shrine, click it, monsters respawn AND elites surge.
Conviction Chest - A buff stacks as you kill elites and pick up globes; don't take hits and you keep the buff for a much larger end-of-dungeon chest.
War Bounty Chest - Extra chest at completion on top of the standard reward.
Primordial Dust Chest - A green chest at the end with ~50% chance to drop Attuned Primordial Dust (one of the only farmable sources for unique-power rerolls).
This left-side combo turns standard Nightmare Dungeons into loot piñatas, players regularly fill an entire inventory with ancestral legendaries and uniques in a single run.
Middle Path (Escalation Pipeline):
Boss Revive - Bosses have a chance to revive when slain, giving you a second round of loot. This procs fairly often and dumps tons of gold and items.
Monster Power - Nightmare Dungeon bosses gain +1 monster power, meaning harder fights but more experience and loot drops.
Escalation Sigils - Bosses have a chance to drop Escalation Nightmare Dungeon sigils. Note: you can also convert 5 regular nightmare sigils into 1 escalation sigil at the Horadric Cube (5:1 recipe), which makes this node slightly less impactful than it first appears.
Branching Pathways - When advancing in escalation dungeons, two additional Horadric portals appear. You can hover these to see their affixes (Vile Splendor, Gold Reserve, Gem Reserve, Material Reserve, Horadric Cube Reserve). The gold and Vile Splendor options produce hundreds of millions of gold from a single escalation run. The material options drop tons of unique tuning prisms. When fighting Asteroth at the end, you get to choose between portals offering more layer keys, more uniques, or more legendaries.
Patch Note Update: Branching Pathways previously had a bug that kicked players out when it rolled stronghold dungeons they hadn't completed. This is being fixed in the Wednesday patch, after which the node becomes reliably top-tier.
Right Path (Goblins):
Goblin Fall - Treasure goblins can drop Treasure Breach nightmare dungeon sigils.
Greed is Good - After killing 30 elites across all dungeons, you trigger a random event (summon goblins, summon the butcher, gain riches, or terrible misfortune).
Goblin's Retreat - Killing goblins in a nightmare dungeon has a small chance to spawn a portal to a room overflowing with treasure. Extremely rare but incredibly rewarding when it happens.
Tip: Always check for the Soul Shrine on entry. If you see it, slow down and clear monsters along the way; the end-of-dungeon respawn wave will be huge.
Rewards & Loot
Escalation sigils, gold (hundreds of millions from Vile Splendor escalation runs), 10,000 Obdessite from Asteroth on T12, Attuned Primordial Dust (extremely rare reroll material), Treasure Breach sigils, and general loot from boss revives.
Best Builds for This Tree
Speed-clear builds work best since nightmare dungeons are a low time investment in war plans. Rush to the boss, collect loot, move on. Ball Lightning Sorcerer handles both clear speed and Asteroth's boss fight effectively. If you're specifically farming escalations, single-target damage matters for the final encounter.
Tips
When doing nightmare dungeons in your war plan, rush straight to the boss unless you see the soul-storing shrine, in which case, kill as many monsters as possible on the way for a bigger payoff at the end. Also, the Branching Pathways node is considered by many players to be the single best node on the entire Nightmare Dungeon tree because of how many options it opens up during escalation runs.
Party & Solo Viability
Nightmare Dungeons are fast both solo and in groups. In war plans specifically, they're a low time-investment activity that helps you power through your plan quickly. The escalation sigil path benefits from group play since escalation dungeons scale well with parties. Solo players still clear them rapidly. If you stack multiple nightmare dungeon tasks in a row on your war plan, you can complete two or three within a single escalation run.
5. Lair Bosses War Plans Skill Tree Setup & Upgrade (Best for Massive Loot Explosions, Mythic Drops & Build-Specific Targeting)
The Lair Bosses tree's middle path, the Nemesis portal chain, produces some of the largest single loot explosions in the entire game. When a Nemesis portal procs, you fight two lair bosses simultaneously for free (no materials spent), and they drop roughly 30 bosses' worth of loot. Players report getting mythics from Nemesis lairs nine out of ten times, sometimes multiple. The downside is that procs have a low chance, so this tree rewards patience and high-volume boss farming.
How to Set Up the Skill Tree
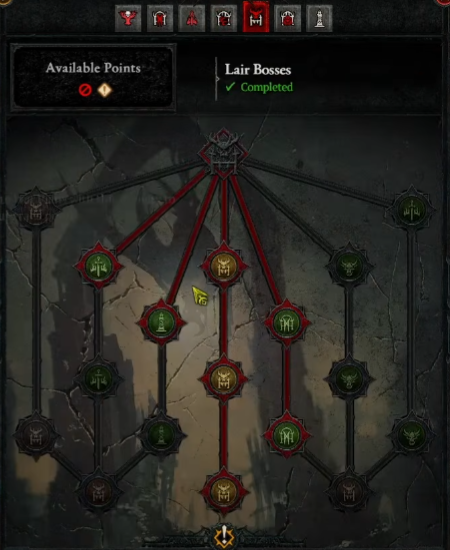
Rush straight down the middle path for the Nemesis chain.
Nemesis Lair (2x2) - After opening a horde chest while fighting a lair boss, there is a low chance for a red portal to appear (usually spawns slightly north of your character on screen). Enter it to fight two initiate lair bosses (Lord Zir, Baron, Beast in the Ice, Ivar, or Gregoire). The loot is enormous. Mythic drop rate is roughly 9 out of 10 procs, sometimes with double or triple drops in a single lair.
Greater Nemesis - Upon completing a Nemesis lair, there is a small chance for another portal leading to a Greater Nemesis lair. Here you fight two greater lair bosses (Duriel, Balile, etc.). Even more loot.
Ultimate Nemesis Lair - After defeating bosses in the Greater Nemesis, a book appears that accepts five Betrayer Husks (material from killing Balile, who spawns randomly when you open boss chests). Multiple players report this node may be bugged, the loot from Ultimate Nemesis is currently less than regular Nemesis for some reason. Consider skipping this until it gets patched or confirmed fixed.
For the remaining points, customize which bosses spawn in other activities based on your build's loot needs. Check the community loot table to see which bosses drop items you want, then spec accordingly. For example, Asteroth drops both Winter Glass and Tyrant's Grasp, so Sorcerer players often target him through Nightmare Dungeon spawns.
Build-Specific Targeting (The Real Sleeper Power)
The outer nodes let you choose which bosses spawn in other activities based on your build's loot needs:
Greekwall / Lunatic Warlock farmer? Set Lair Bosses to spawn from Hell Tides and pick the boss whose loot table contains Greekwall.
Sorcerer hunting Beast in the Ice loot? Send him into Nightmare Dungeons.
Asteroth shortcut — His normal access is through Escalation NMDs or Infernal Hordes (~10 minutes). However, Balile can drop loot from Asteroth's table, so spawning Balile saves enormous time.
Other targets like Andariel-in-Pit, Vashan, and Beto loot all become accessible without farming dedicated keys.
This makes Lair Bosses the most build-customizable tree in the system.
Pro tip: Asteroth's normal access method is through Escalation Nightmare Dungeons or Infernal Hordes (which takes nearly 10 minutes). But you can get his loot table drops from Balile encounters instead - Balile can drop loot from Asteroth or BK, saving you enormous time.
Skip / Optional: Lair of Plenty (2x horde chests) — the second chest reportedly doesn't proc Nemesis or Balile, so most players still skip it. Only useful if you have huge key surplus.
Rewards & Loot
Massive loot explosions (roughly 30 bosses' worth from a single Nemesis proc), mythic items (9/10 proc rate reported), unique items, runes from the Lair Runes node, boss-specific target drops, and gold. The outer path also offers a node that converts all non-unique/non-mythic equipment from horde chests into gold.
Best Builds for This Tree
You need to handle two lair bosses simultaneously, so builds with strong single-target damage and survivability work best. If you struggle, consider dropping one torment level specifically for Nemesis encounters. Builds that farm bosses quickly get more proc chances over time through sheer volume.
Tips
Always keep five Betrayer Husks on you in case the Ultimate Nemesis book appears (even if the node is currently underperforming). The Lair of Plenty node (two chests at bosses) is debated — the second chest reportedly doesn't proc Nemesis portals or Balile spawns, so many players skip it and only open one chest for the proc chance. Don't waste keys on the second chest unless you don't care about triggering Nemesis.
Party & Solo Viability
This tree works in both contexts but has a specific party requirement. When a Nemesis portal spawns after opening a boss chest, you can call friends in before entering. However, every player who wants loot from the encounter must have the Nemesis node in their own skill tree, this is mandatory, not optional. In groups where everyone has the node, Nemesis portals become shared jackpots. Solo players benefit equally from the proc itself; they just can't share the encounter.
6. Tree of Whispers War Plans Skill Tree Setup & Upgrade (Best for Passive Gains & Early Sparks)
The Tree of Whispers levels naturally as you complete other war plan activities, since whispers overlap with helltides, dungeons, and most other content. This makes it the tree most players max out first without even trying. The big prize at the bottom of either path is a chance at Resplendent Sparks from whisper caches, helpful for crafting your first mythic. However, late-season players with abundant mythics from Undercity farming may find the spark node less relevant.
The new MVP combination is Tree of Plenty (4th cache option) + Whisper Ambushes for ambush bosses, plus the underrated Ka Roots for Hell Tide synergy.
How to Set Up the Skill Tree
There's no single "correct" path here. Your choice depends on whether you want materials, XP, or ambush loot.
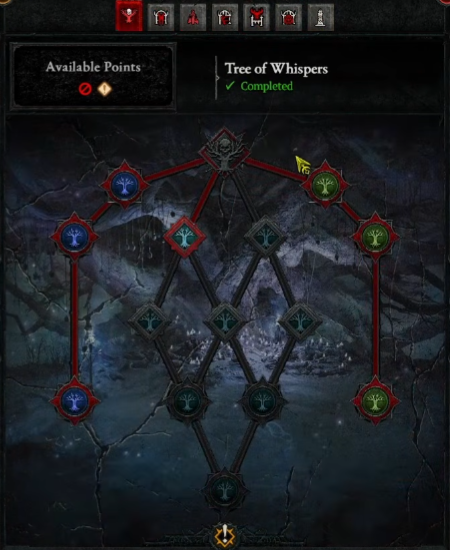
Top Pick - Always Take First
Tree of Plenty (Spin and Spark) - Adds a 4th cache option on every turn-in. With four choices, there's almost always something you actually want, and ancestral/greater collection caches show up much more often.
Right Path - Whisper Ambushes (Strongly Recommended)
Whisper Ambushes - Ambush events appear when completing whispers, anywhere — Pit, Undercity, open world. Drops Collections of Chaos.
Greater Collection Chaos - Stronger ambushers, better loot.
Baron Ambush - Whispers can trigger a Baron ambush, with a chance for bosses including Vyr to spawn during your Hell Tide or other content. Baron drops ancestral collections with greater affixes - incredibly valuable, especially in lower Torment tiers.
Left Path - Ka Roots (Hidden Gem)
Ka Roots - You receive lures you can drop on the ground. Roots aggressively attract monsters to your location. Combined with Hell Tide Soul Spires, they massively multiply your throughput - testing shows 170 cinders → 600+ cinders during a single Soul Spire. They also pair with the Nightmare Dungeon respawn shrine for absurd density.
Middle Path Cache Upgrades
Wisdom of Whispers - Extra XP orbs in caches. Quietly accounts for surprising paragon levels over time.
Chaotic Favor - Chance for free Collections of Chaos on whisper completion.
Resplendent Spark - Bottom node, small chance for a spark from caches. Honest reassessment: between season journey rewards and mythic crafting from Undercity, most experienced players don't actually need this node. Skip it unless you're early-season and craving your first mythic.
Right-Side Cache Materials Path
Material caches (forgotten souls, gold, crafting mats) - useful late-season when crafting resources matter more than item rolls.
Rewards & Loot
Resplendent Sparks (early game value), greater affix items from Baron ambushes, Collections of Chaos, experience orbs, forgotten souls (material path), and general cache rewards that improve with the fourth option node.
Best Builds for This Tree
Any build works, whispers complete passively. Pair with Hell Tide farming for maximum overlap, as hell tides frequently count toward whisper progress.
Tips
If you're late season with abundant sparks (players running Undercity prankster builds report having 70+ sparks with nothing to spend them on), consider stopping at the XP orb node (Wisdom of Whispers) and skipping the spark entirely. The ambush line provides more consistent value through frequent Baron drops with greater affixes. Early-season players should still rush the spark path to craft their first mythic.
Party & Solo Viability
Whispers complete passively regardless of play mode. They happen naturally during hell tides, nightmare dungeons, and general open-world play. There's no meaningful difference between solo and party for this tree, you'll progress it at roughly the same rate either way.
7. Infernal Hordes War Plans Skill Tree Setup & Upgrade
Infernal Hordes remain the weakest activity for War Plan progression - a 10-wave run can take 6-10 minutes, longer than completing an entire War Plan of other activities. However, the tree itself contains some genuinely excellent nodes if you choose to engage. Updated testing has revealed Method of Madness as one of the most reliable strategy-locking tools in the entire War Plans system.
How to Set Up the Skill Tree
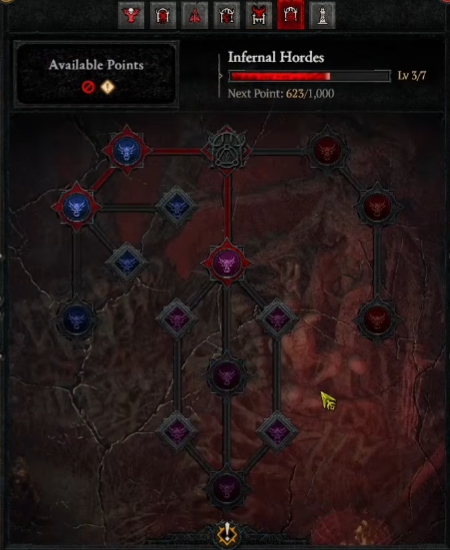
If you're just doing the default 6-wave runs to clear your war plan quickly, grab Devil's Steel for a guaranteed 200 Aether and move on. If you're doing full 10-wave runs, invest in the middle path.
Middle Path - The Real Reason to Spec This Tree
Method of Madness - Your offering choices are weighted toward whatever category you previously picked. Tested results: with this node, you can reliably build a single strategy (Soulspire, Aether Lords, Masses, Hellborn) every single run. Confirmed Aether income at 10 waves is 1,200-1,800 Aether per run without chaos waves.
Black Pact - Adds an additional offering choice (a 4th option) that matches your previous category. Acts as a backup when the regular offerings don't roll what you want.
Impending Doom - In the last 10 seconds of a wave, all spawn slots fill. Camping one spot generates hundreds of bonus Aether per wave when paired with juiced mechanics like Aether Lords or Masses.
Chaos Wave Options - Either suppress chaos waves entirely (4 choices per wave, full strategy control) or amplify them (more frequent chaos waves with potential goblin jackpots). Both are valid; suppress is more consistent.
Left Path - Chest of Talismans (Hidden MVP)
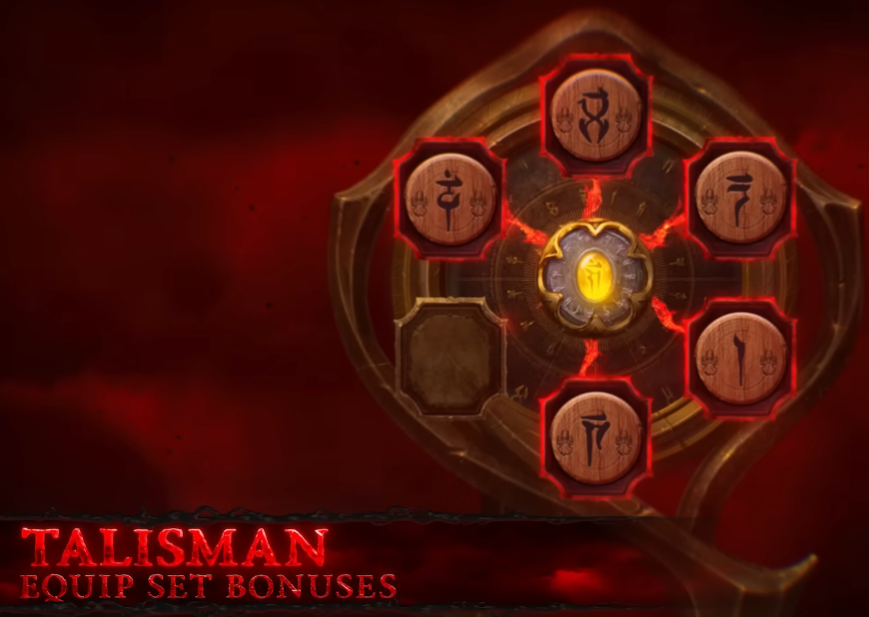
The Chest of Talismans is one of the best single-node values in the entire game right now: it costs only 100 Aether and drops a mix of seals and charms — including the chance for mythic seals. This is one of the few reliable late-game minmaxing tools in the season. Always take it.
Right Path - Mixed Bag
Doomsayers - Big AoE casters that drop bonus Aether (must dodge their attacks).
Scaled Toughness - Cleanses an entire wave instantly. Can solo-handle a Butcher if one spawns.
+200 Flat Aether Challenge - Sounds good, but requires a category upgrade you don't always have. Inconsistent.
The right side overall is less impressive than the left and middle.
The Practical Approach
If your only goal is clearing the War Plan task, use the map teleport for the 6-wave version and grab Devil's Steel (guaranteed 200 Aether) to leave quickly. If you genuinely enjoy hordes, the middle + Chest of Talismans combo is genuinely strong.
Rewards & Loot
Aether (for end-of-horde cache choices), gem fragments (highly sought after this season), Obdessite, boss materials from chaos wave bosses, talisman chests, and general loot. The thousand-cost chest that spawns with certain nodes reportedly drops nice loot in duo party setups.
Best Builds for This Tree
Builds with strong AoE and fast kill speed handle Infernal Hordes best. You want to clear waves instantly to keep Aether flowing and maximize Impending Doom's final-seconds mechanic. Speed-focused builds that can one-shot packs are ideal.
Tips
If your only goal is clearing the war plan task as fast as possible, use the map teleport option to get the 6-wave version instead of using an Infernal Hordes compass (which gives 10 waves). You could complete an entire war plan in the time it takes to finish a single 10-wave horde. The activity is simply not time-efficient compared to everything else available. Level this tree last unless you genuinely enjoy the content.
Party & Solo Viability
Infernal Hordes function in both party and solo, but the party interaction with skill tree nodes is inconsistent and possibly bugged. An interesting duo interaction exists: if one player specs into Method of Madness/Black Pact and another player specs into the Infernal Horde thousand-cost chest line, both effects can apply simultaneously when there are only two players. Adding a third player reportedly causes this interaction to break. Nobody fully understands how party trees interact with Infernal Hordes yet, sometimes the game seems to use everyone's tree, and sometimes it uses only one person's and removes mechanics that others don't have.
Recommended Overall War Plan Route (Updated)
With all trees ranked and explained, here's the optimal approach when selecting your five activities:
Always include The Pit - Fast (2-3 minutes), universal glyph value, now also a Trace of Echoes source via cursed offerings.
Take Hell Tides when available - Maggot XP + Lair Boss keys + Profane Mine Cages stack into the season's best paragon farm.
Nightmare Dungeons as quick filler - Soul Shrine + respawn synergy makes them surprisingly loot-dense, plus Branching Pathways becomes truly reliable after the Wednesday patch.
Undercity whenever possible - One-minute runs, Initiative for 50% extra rewards, and 2-4 mythics per Prankster-juiced T8+ run.
Lair Bosses for build-specific farming - Set spawn locations to target uniques you actually need.
Tree of Whispers passively - Levels itself, and Ka Roots + Whisper Ambushes are sleeper picks.
Avoid Infernal Hordes unless you specifically want Talisman Chests — they consume far more time than alternatives.
The War Plans system in its current state already supports a huge variety of farming strategies, and Blizzard has confirmed deeper updates (especially co-op alignment) are coming in Season 14. Until then, the most efficient farmers solo their plans, group only for Undercity tribute runs and Nemesis portals, and keep their skill point allocations focused on the highest-value nodes per tree.
3.0.2 Patch Reminder: The Branching Pathways stronghold bug in Nightmare Dungeons is being fixed Wednesday, after which the node returns to top-tier status. If you're respeccing soon, account for that.
Apply this routing philosophy - minimum time, maximum reward - and you'll see your character's power and wealth grow rapidly throughout Season 13.