


Path of Exile 3.29: Curse of the Allflame arrives on July 24, 2026 (PDT), bringing two major systems to Wraeclast: the Voyage league mechanic and a brand-new crafting layer. While the previous 3.28 patch reworked the endgame Atlas, this expansion turns its attention toward the core moment-to-moment gameplay, refreshing older league mechanics and giving each its own identifiable rewards again. Part of that direction pulls back the "everything drops everywhere" loot design that spread after Legion: Abyss now produces Abyss-specific rewards, Legion gets a full rework with its own loot, and Voyages sit alongside them as a fresh dedicated system.
The centerpiece of the league is the Voyage system, a repeatable seafloor expedition that mixes elements of Heist, Delve, and Synthesis into one connected activity. Players collect Charts across the campaign and endgame, then plan out routes on a Voyage Board to scale rewards, monster density, and drop identity in a controlled way. With so many moving pieces at once, knowing how each part works before jumping in will save time, currency, and Charts you might otherwise waste. So here we've sorted out the PoE 3.29 Voyage Plan Guide for you!
PoE 3.29 Voyage Guide (Charts, Area Mods, Rewards & Plan Strats)
Below, we cover the crew and setting, how the Voyage mechanic operates, how the Voyage Board and Charts function together, where to source Charts, why border modifiers matter, what loot you can actually expect, and how to build a Voyage plan that rewards your effort rather than punishing it.
With patch 3.29.0b already live and making major tweaks to how the mechanic rewards players, we update the guide from Chart running to Voyage board planning, Lantern management, the new Ducat crafting system, and the latest balance changes.
Where & How To Access the Voyage?
The Voyage mechanic centers on The Sovereign, a ship crewed by three characters you interact with throughout the league:
Val / Valerie – the NPC aboard The Sovereign who hands you your first Chart in Act 1 and later helps you plan Voyages on the Voyage Board.
Vesper – located below decks, Vesper runs the new Allflame crafting system using Dead Man's Sulphur.
The Sovereign crew – helps you pile up loot from your seafloor runs.
The vessel you actually dive in is the bathysphere, a submersible bubble you jump into before descending to Wraeclast's ocean floor.
Quick Access Tip (Post-Patch)
After patch 3.29.0b, you can launch Charts directly from the bathysphere rather than needing to speak with Valerie every time. This is a quality-of-life change added shortly after launch.
How Does the Voyage Mechanic Work?
Before you plan anything on the Voyage Board, you need to complete the individual Chart expeditions that feed into it. Here's the loop in plain terms.
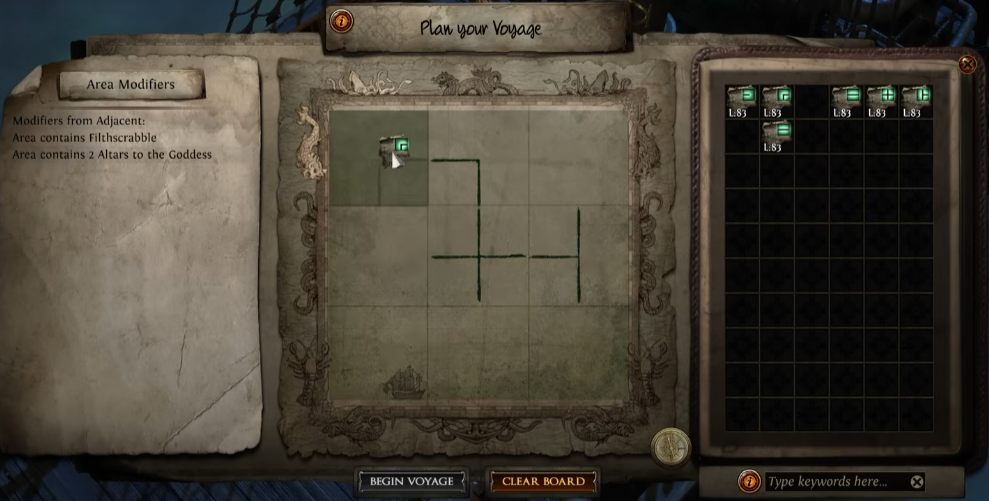
The Basic Loop
Find and complete individual Chart expeditions across the campaign or endgame.
Return to The Sovereign and speak to Val to open the Voyage Board.
Inspect each Chart modifier before placing it in a layout.
Check the current border modifiers (Corruption Currents) around the board.
Connect compatible Charts, using up to nine in one Voyage.
Run the combined seafloor excursion and clear the connected Chart content.
Extract with the loot you can safely reach.
Charting the Ocean Floor
Each Chart drops you into a small seafloor area from the safety of the bathysphere. You're given a limited number of Allflame Lanterns to plant in the water just outside your current bubble. Each lantern creates a new safe zone. Step outside a bubble without one nearby and you'll drown in about five seconds, similar to how the drowning orb mechanic behaves elsewhere.
There's no time pressure until you place the final lantern. Once the last one is set, the bubbles begin collapsing from newest to oldest, pushing you back toward the bathysphere to extract.
Chart Lantern Placement Controls
The lantern system is more flexible than it first appears:
Hotkey placement - Manually drop a lantern with a keybind for precise positioning.
Autoplace mode - Enable this and lanterns drop automatically as you leave the bubble edge.
Movement skill placement - Even if you dash or blink out of a bubble, the lantern will be placed behind you rather than lost.
This flexibility lets you keep momentum during a Chart rather than stopping to line up every drop by hand.
Two Ways to Play a Chart
You can approach Charts in two very different ways:
Speedrun: Slam lanterns down in a tight ring around the bathysphere, place the last one close to your extraction point, and leave.
Loot run: Follow the ghost flame arrows that lanterns emit when a special reward (like a chest) is within roughly two screens. Play a hot-and-cold game to sniff out treasure before triggering the collapse.
The Loot Vacuum and Extraction Devices
When you place the last lantern, all dropped loot on the ground gets vacuumed up and spirals out on the boat after you leave. Loot also travels back to the surface through extraction devices during the run, letting you send piles of treasure up while you keep clearing. This makes intentional "leave stuff for the way back" runs viable and turns extraction into something more active than a simple exit portal.
One thing to note: if you don't kill or loot anything, there won't be a loot spiral at all. The vacuum only carries what you actually created during the Chart.
The Voyage Board (Core Mechanic) & Charts
Once you have at least nine different Charts scouted, you can begin planning a Voyage aboard The Sovereign. This is where the mechanic gets genuinely deep.
What the Board Looks Like
The Voyage Board is a grid where each Chart occupies a square. Every Chart has an implicit modifier that gets revealed once it's charted. These modifiers apply in one of two scopes:
Adjacent Charts: The effect only impacts squares directly connected to it.
Voyage-wide: The effect applies to every relevant area in the entire Voyage.
For example, one Chart might spawn three Diviner's Strongboxes in each adjacent area, meaning if you place it in the center of the board where it touches four other squares, you've suddenly generated twelve total Diviner's Strongboxes to open.
Chart Mods and Anchor Pieces
A normal Chart introduces one area with one reward. Some Charts, marked with gold text under their name, come with bonus encounters or extra monsters. Rarer still are anchor fields, harder maps with better general rewards and exclusive loot options.
| Modifier Type | What It Affects | Placement Approach |
|---|---|---|
| Adjacent Chart modifier | Only Charts directly connected to it | Place beside the destination or reward Chart you want to improve |
| Voyage-wide modifier | Every relevant area in the Voyage | Reserve premium adjacency spots for local effects instead |
| Reward conversion | Changes a specified category of drops | Pair it with Charts that produce the named category |
| Monster empowerment | Raises encounter pressure and reward potential | Add only after checking build survivability |
| Extra encounter | Adds another event, enemy type, or destination | Value based on clear speed and reward demand |
Building Outward From the Reward
Rather than filling every slot with the strongest options, plan from the reward target outward:
Pick the Chart you most want to revisit.
Identify every adjacent or global effect that supports it.
Only then add optional difficulty.
A visually full board packed with conflicting modifiers is almost always worse than a lean layout built around one clear goal.
How To Get Charts
Charts are the currency of the Voyage system, and thankfully they're not scarce.
Sources in the Campaign
Every zone contains at least one Chart, and sometimes two.
You'll receive your first Chart from Valerie shortly after boarding The Sovereign, meaning access to the mechanic begins in Act 1.
Charts scale to your level in a way similar to the Temple of Atzoatl, boosting weaker ones up within a certain range so they stay relevant.
Endgame Sources
At endgame, Charts continue to drop from regular content encounters. The mechanic is designed to be genuinely accessible: you can do a little bit during leveling to power through zones faster, or save Charts in batches and hit them all at once between acts.
A Note on Pacing
You don't need to run every Chart the moment you find it. Batching them near the end of an act is often more efficient because you'll have around ten ready to go, letting you plan a proper Voyage rather than one-off Chart runs. Getting overly invested during the campaign could easily double or triple your run time.
Area Modifiers (Very Important)
Border area modifiers, sometimes called Corruption Currents, are properties of the edges of the Voyage Board itself, not the Charts. They affect Charts placed adjacent to them and are randomized each time you run a Voyage.
Why Area Modifiers Matter More Than You Think
Border modifiers can be extremely powerful. For example, one might cause all rare monsters in the adjacent area to drop an additional Exalted Orb. That's already strong, but the real payoff comes from stacking:
Place a Chart that increases the number of rare monsters in adjacent areas next to that border.
Add another Chart that spawns powerful rare Starfish monsters in adjacent areas.
Now you have three overlapping effects producing a massive Exalted Orb payout from a single edge.
How to Read the Currents
Because they shift every Voyage, a layout that worked yesterday might be suboptimal today. Always:
Read every border modifier before placing a single Chart.
Identify which board positions each one reaches.
Place your rarest or most valuable interactions in the strongest current zones first.
Wasting a strong adjacency spot on a mediocre Chart is one of the most common planning errors.
Voyage Chart Loot Types & Rewards
The Voyage mechanic offers a mix of general loot, category-focused chests, unique drops, and mechanic-exclusive rewards. Exact values are still being tuned right up to release, so treat pre-launch profit claims cautiously.
General Chart Loot
Charts contain a range of chests that drop specific categories:
Chests full of rare boots, jewelry, or armor.
Chests specialized in wands, bows, or melee weapons.
Chests weighted toward currency drops.
Unique versions of those chests, which produce specific unique item types.
Special Voyage Rewards
Beyond category chests, some Charts and destinations produce mechanic-exclusive rewards, including:
Ducats, the special resource that fuels the new 3.29 crafting system. This new crafting layer works on limited-use potential (similar to Last Epoch's crafting potential), letting you apply a small number of powerful crafts before the item locks out further ones. Ducats sourced through Voyages are one of the direct feeders into that system.
Diviner's Strongboxes from Chart modifiers.
Massive amounts of experience, enough that many players will use Charts to power-level between acts.
Rewards from Special Destinations
| Destination | What Is Known | Planning Priority |
|---|---|---|
| Abandoned anchor field | A special location tied to hidden treasure | Inspect reward modifiers before surrounding it with adjacent effects |
| Lost Kalguuran shipment | A recoverable shipment found through a special Chart | Anchor a layout around it when its rewards match your farming goal |
| Sunken Abyssal pit | An Abyss-themed underwater destination | Prepare for the encounter type before stacking difficulty |
| Other unique destinations | Additional special areas exist in the pool | Always read the live tooltip since exact rewards vary |
League Exclusivity
Voyages belong to the 3.29 challenge league only. According to the official Curse of the Allflame FAQ, its mechanics, content, rewards, and bosses are exclusive to the challenge league during its active period. Standard characters do not have access to the live Voyage system.
Easy Basic Voyage Plan & Chart Build Strategy
Planning a good Voyage is less about finding a single "best" combo and more about building consistent, repeatable boards that match your character.
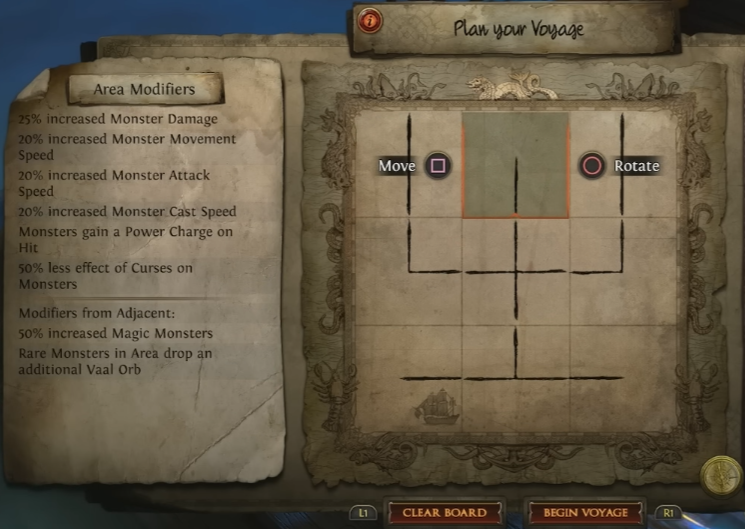
1. Pick One Reward Plan First
Decide what the board is trying to produce before arranging any Charts. Effects can convert equipment into Gold, summon friendly jellyfish, empower monsters with Wildwood Wisps, release Tormented Spirits, or add new encounters entirely. Trying to hit all of these at once wastes strong Charts.
Start with the effect that determines the reward you want.
Add adjacent bonuses that directly support it.
Fill flexible spaces with Voyage-wide modifiers.
If a conversion names a category, connect it to content that actually produces that category.
2. Separate Rewards From Danger
Reward modifiers and difficulty modifiers should be judged independently:
First ask: does this modifier support the anchor Chart's rewards?
Then ask: can my build handle the added monster pressure?
Do not stack multiple untested empowerment effects on your first attempt. Add one, run the Voyage, and note clear time, deaths, and missed objectives before layering more.
3. Scale Consistency Before Difficulty
A layout you clear reliably beats an ambitious one that ends before its premium encounters. A defensive upgrade that turns failed Voyages into completed ones almost always outperforms another small damage increase.
Your character should:
Cap elemental resistances.
Have dependable life or energy shield recovery.
Move at practical speeds with reliable mobility.
Carry answers to ailments and disabling effects.
Retain enough single-target damage to finish resistant rare monsters.
4. A Practical Board-Building Sequence
Select the highest-value special destination or reward Chart in your pool.
Use that Chart as the anchor.
Place compatible adjacent modifiers next to the anchor.
Fit Voyage-wide modifiers into spots that don't consume valuable local connections.
Compare total monster pressure with your defenses.
Remove the least useful danger modifier when threats overlap.
Recheck every connection and border modifier before starting.
5. Common Voyage Planning Mistakes
Most Voyage failures come from the same handful of errors. Avoid these:
Filling every position without checking what each modifier affects.
Placing an adjacent bonus where it touches the wrong Chart.
Using a conversion beside content that produces few matching drops.
Stacking Wildwood Wisps, Tormented Spirits, and other pressure before testing separately.
Copying yesterday's board without rereading the border modifiers.
Risking a rare destination on a build that struggled with easier Charts.
Treating pre-launch profit estimates as guaranteed.
A Voyage can hold up to nine Charts, but maximum capacity is not maximum efficiency. Leaving a low-impact Chart out is often better than including one that adds danger without improving your reward target.
Low Investment Voyage Plan & Chart Setup Strategy for Mageblood Farm
This strategy flips traditional Voyage planning on its head by completely ignoring Chart modifiers, adjacency bonuses, and board optimization in favor of pure throughput. It works because a huge portion of a Voyage's real income comes from the random events scattered across the seafloor, specifically Operative Strongboxes, Waterlogged Scarab Chests, Messages in Bottles, and Stacked Decks from Augur chests, rather than from the modifier stacking most guides push. By stopping to read every Chart and re-rolling for perfect adjacencies, you burn far more time than the marginal gains are worth. Skipping all that reading, focusing on chart quantity, and building layouts that minimize travel distance produces a smoother, less frustrating experience while pumping out 15-25 divines per hour, more than enough to bankroll a Mageblood without touching a spreadsheet.
1. Chart Acquisition & Rolling
Chart type: Buy (or self-farm via Alch-and-Go) Sandy Seabed Charts with the Abyssal Depths destination. They're cheap, the tileset is open and easy to move through, and testing shows they roll significantly more Operative Strongboxes than Diviner's Strongboxes compared to other Chart types.
Rolling: Push each Chart to 100% quantity or higher. Quantity directly scales the little chests and Operative Strongboxes, which are your primary reward. PoE Wiki regex works for this (note: it does not currently work for Dead Man's Sulphur rolling).
Priority: If you can accept more mods, push quantity even higher. Just be prepared for annoying roll sessions.
2. Running the Chart (Seafloor)
Focus on speed above all else, more Charts per hour equals more strongboxes per hour.
Bring Alchemy Orbs and Exalted Orbs into the run to upgrade Operative Strongboxes on the fly. Alching Operatives gives massive value.
Follow the lantern for Operative Strongboxes and Waterlogged Scarab Chests, but don't chase every faint glow. Grab the obvious stuff and extract.
Dump loot into the Allflame Capsule frequently so you don't lose progress if you die.
Skip Encrusted chests (they drop almost nothing) but always hit Arcanist boxes when they're right in front of you.
3. Voyage Board Setup (The Anti-Optimization Layout)
Only read one thing on the Voyage Board: the border modifiers. If you see "rare monsters drop a Divine Orb," abandon this strategy for that Voyage and juice normally. Otherwise, ignore every modifier and use one of these three layouts:
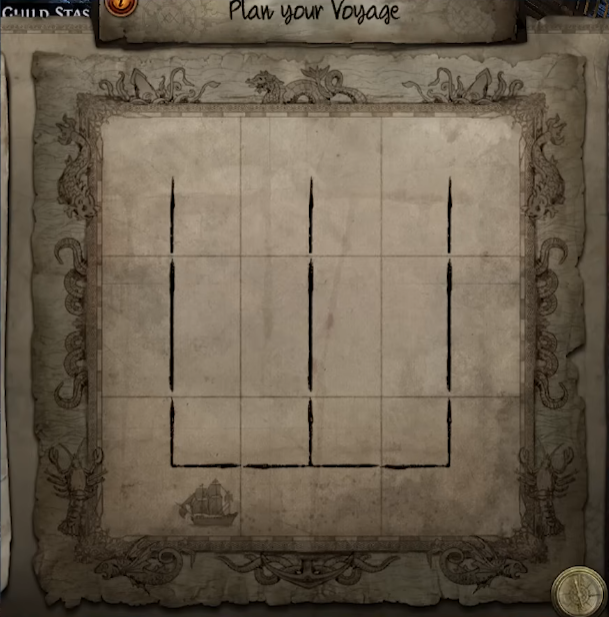
Primary layout - Three Parallel Lines: Place Charts in three separate straight lines with no adjacency between them. This condenses the seafloor into narrow strips, forcing all random loot spawns (chests, strongboxes, sunken loot) to cluster tightly together. The lantern picks up nearby loot far more reliably, and you burn fewer Allflame Lanterns because you're moving in straight paths instead of crisscrossing the map.
Secondary layout - Line + Side Pieces: When you run out of straight line pieces, use side/corner pieces to extend lines, as long as they don't connect. Same principle: create linear paths.
Fallback layout: Whatever line-shaped configuration you can build with leftover pieces. This is also great for using up your Voyage parts efficiently.
4. In-Voyage Movement Pattern
Aim for the middle of each column/line first, this maximizes lantern detection range.
When the lantern points at something, track it down, then return to center and continue.
Push to the end of the line, then run back through the same corridor in a W-shaped pattern to catch anything you missed.
Movement skills like Whirling Blades work great in Abyssal Depths because the tileset is wide and open.
When you're near the end and have leftover lanterns, spam-place them, no reason to save them.
5. Selling & Cashing Out
Sell Dead Man's Sulphur raw. Not re-rolling Voyages means all Sulphur is pure profit (roughly 100-300+ chaos per stack depending on market).
Sell Messages in Bottles for consistent income rather than gambling on openings. You can gamble if you want, but bulk selling gives you predictable divine-per-hour numbers.
Bulk-sell Scarabs, this strategy prints so many scarabs that bulk buyers become your fastest cash-out method.
Save Stacked Decks for div card gambling or sell in bulk depending on market prices.
You never re-roll a Voyage (saving Sulphur), you never spend 5 minutes reading Chart tooltips (saving time), and you use Voyage parts efficiently (line pieces and corners get consumed evenly). The result is more Voyages per hour, more Charts per hour, and more Operative Strongboxes per hour, which is where 80% of the currency actually comes from. Enjoyment stays high because you're constantly seeing loot instead of standing on the deck reading modifiers, and that sustainability is what carries you from league start to Mageblood.
Easiest Voyage Plan & Chart Setup Strategy for Scarabs Farm
This strategy is purpose-built for newer players, weaker characters, and league-poor budgets who can't afford high-difficulty juicing setups yet. Instead of trying to master the full Voyage adjacency puzzle, it focuses entirely on tile loot (chest and strongbox drops) rather than ground loot (monster drops), because tile loot doesn't require heavy build investment to scale. The core insight is that most Chart implicit modifiers are "valueless" for ground-loot juicing, but they can still be funneled into a single center-piece adjacency that multiplies Operative Strongboxes, Diviner's Strongboxes, or Messages in Bottles across four adjacent maps at once, printing scarabs by the stack. You get roughly 10 divines/hour running raw Charts and 20-30 divines/hour running the assembled Voyages, while still banking your rare "juicing-worthy" Charts for a bigger payoff later once your character comes online.
1. Chart Farming Phase (≈10 div/hr)
Enable Auto Lantern by talking to Valerie before you start, this drastically improves mapping speed.
Roll Charts with Chaos Orbs to 150%+ item quantity. Charts can only be modified before they're charted, so roll them now. Push to 200%+ if you want max juicing potential, but 150% is the practical standard.
Bring stacks of Chaos, Alchemy, and Exalted Orbs into every Chart, you'll need them to roll strongboxes on the fly.
Chart type: Doesn't matter much for this strategy, pick whatever's cheapest or drops most in your current mapping.
2. Inside the Chart, Only Two Priorities
Priority 1 - Strongboxes on the minimap: Beeline every Diviner's Strongbox and Operative Strongbox. Alch + Exalt spam them before opening.
Priority 2 - Green lantern light direction: The lantern's glow points to special objects (chests, sunken loot, Waterlogged Scarab Chests). Follow it and grab whatever's there.
Skip everything else. Run as fast as possible until your Charts are ready.
3. Sort Charted Maps With Regex
Once a Chart is completed, its implicit modifier is revealed. Paste MilkyBK's Voyage regex into the search bar.
Highlighted (valuable) Charts → save these for future high-investment Voyages (ground-loot juicing later).
Non-highlighted (valueless) Charts → these are what you use today for the scarab farm setup below.
4. The Simple Voyage Board Setup (Center-Anchor Method)
Before placing anything, reroll the Voyage's adjacent modifiers up to 2 times (cost doubles each reroll) and check for:
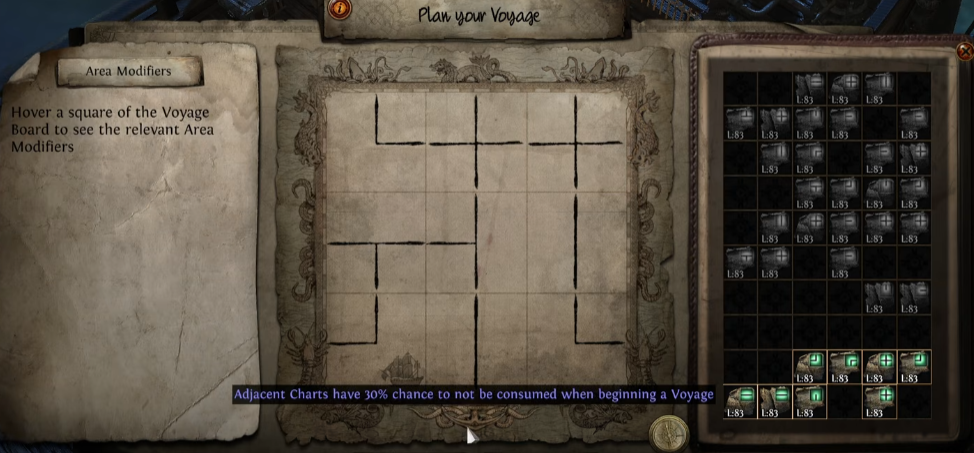
"Rare monsters in adjacent areas drop an additional Divine Orb" → STOP, this is a juicing modifier. Save the board and watch a dedicated juicing guide instead of running this simple strat.
"Basic currencies drop as stacks" → also stop and juice properly.
If neither shows up, proceed with the easy scarab setup:
Center square: Place a Chart whose implicit modifier reads something like "Adjacent areas contain 2 additional Operative Strongboxes" (or Diviner's Strongboxes, Arcanist's Strongboxes, or Messages in Bottles). This is your anchor, it multiplies tile loot across the four connected squares.
Four adjacent squares (touching the anchor): Place your highest quantity Charts here (180-215%+). These are the maps that will actually receive the strongbox bonus, so you want them juiced.
Four outer/corner squares: Place your lowest quantity valueless Charts (~110%). They contribute almost nothing to the payout, so don't waste rolls on them.
Follow the red-line connection rules on the board (you'll pick them up intuitively after one or two boards).
5. Running the Big Voyage
Start from the bottom-left corner and work systematically.
Skip strongboxes with worthless mods (e.g. an "all Scarabs are Domination" mod on a map with no Domination scarabs), don't waste currency rolling everything.
Use Allflame Capsules frequently to send loot to the surface, don't hoard in your inventory in case you die.
In the four buffed adjacent areas, hit every Operative Strongbox with Alch + Exalt before opening, this is where your scarab profit lives.
Ignore Arcanist boxes unless they're on the path; they're weaker than Operative/Diviner's.
6. Cashing Out
Scarabs: Bulk-sell to buyers, you'll produce enough volume to move them by the stack easily.
Dead Man's Sulphur: Sell raw for chaos, not re-rolling Voyages means it's pure profit.
Messages in Bottles: Sell on TFT/bulk for 50k+ gold each, or gamble-open them if you enjoy variance. Consistent players should sell.
Saved valuable Charts: Stockpile in a dedicated tab for when your build is strong enough to run the juiced ground-loot version.
Realistic Profit Expectations
Chart-only phase: ~10 divines/hour.
Voyage phase (once you have 9 Charts saved): 20-30 divines/hour on average, with recorded runs hitting up to ~33 div/hr under normal conditions and closer to 50 div/hr for very fast solo players.
Blended long-term average for a weak character: 10-20 divines/hour, plus the extra value banked in your saved high-tier Charts for later. Very solid income for a budget or league-start build.
Voyage planning should adapt to the board in front of you, not follow a rigid template. Save premium adjacency slots for effects that support your chosen destination, place global bonuses where they don't block those key connections, and only raise danger once your current setup runs smoothly.
During the opening days of 3.29, keep notes on which combinations you complete, how long they take, and what they actually return. That personal record will serve you far better than copying a high-risk layout designed for a different character or a different market state. Once the league economy settles and the community identifies the strongest Chart interactions, you can refine your approach with real data rather than pre-launch guesses. Good sailing, and enjoy the loot spiral.