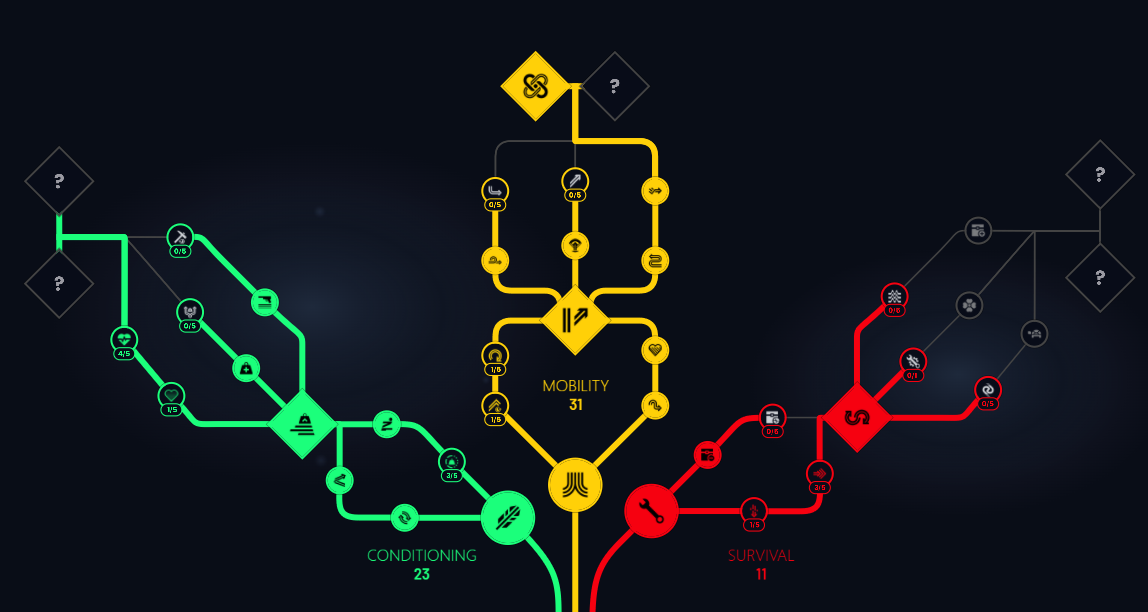



The Frozen Trail 2.0 update rebuilt the Arc Raiders skill tree from the ground up, and nearly every build guide written before October 2026 now describes a tree that no longer exists. Thirteen perks were removed, sixteen new ones arrived, and eleven more swapped branches. With only around 76 base skill points to spend across 48 perks, every point you commit shuts a door somewhere else. This guide ranks every single perk in the new skill tree, from the ones you should grab on every build to the ones that deserve to be ignored, and finishes with a few sample builds you can copy straight into the game. Each rating comes from side-by-side gameplay testing rather than a read of tooltip text, so the numbers and the verdicts both come from the field.
How the Skill Tree Works After Frozen Trail 2.0?
The three branches survived the rework: Conditioning (the green tree), Mobility (the yellow tree), and Survival (the red tree). What changed is the shape of each branch and how the big nodes work.
The new node structure
Each branch starts with a single root perk and splits into two short paths.
At 10 points invested in a branch, you hit a binary choice node where you pick one of two perks. The choice is locked until you reset the tree.
Three more pairs of perks follow in the middle of the branch.
At 30 points, the first end-of-branch diamond opens, and at 40 points, the second one does. Those two slots share a pool of three capstone perks, so nobody gets all three in one branch.
Why planning matters more than before
Under the old tree, deep investment eventually bought you everything in a branch. Now, reaching a capstone forces you to take some filler perks along the way, and the 30-point gate means you can realistically reach the end of two branches at most. Knowing which perks carry real weight and which ones are dead points is the whole point of a tier list, so let's get into it.
Related Read: ARC Raiders Best New Skill Tree Builds for PvPvE (Solo & Squad)
Arc Raiders 2.0 New Best Skill Tree Perks Tier List
Every perk below was tested with side-by-side gameplay comparisons rather than just read off the tooltip. Rankings weigh three things: how noticeable the effect is in a real raid, how cheap the perk is to pick up, and how often you will actually trigger it.
S Tier: Take These on Every Build
1. Sprinting on Fumes (S Tier)
Branch: Mobility capstone. Cost: 1 point at 30 or 40 Mobility points.
This is the best perk in the game right now. Once your stamina would normally run dry mid-sprint, a new icon appears on your HUD, and as long as it stays lit you can keep running forever. Any action or incoming damage cancels the effect, and the recovery delay scales with how long you ran: roughly 36 seconds of sprinting cost about 5 seconds of recovery, while a 72-second run cost around 14 seconds. That is a tiny price for crossing an entire map in one go, outrunning ARC, or beating other squads to a loot zone. There is also a hidden trick: while Sprinting on Fumes is active, opening a door mid-sprint re-triggers Swift Start without interrupting your run, giving you a fresh speed burst on the move.
2. Swift Start (S Tier)
Branch: Mobility, middle of the tree. Cost: up to 5 points.
Swift Start extends the high-speed burst at the start of every sprint. While the HUD icon is active you are moving noticeably faster than normal, and veteran players can feel the difference immediately. In practice this is free movement speed for a few seconds every time you start running, and it pairs with Sprinting on Fumes for the door-reproc tech mentioned above. Hard recommend for any build that touches the yellow tree.
3. Youthful Lungs (S Tier)
Branch: Mobility root perk. Cost: 1 point.
More maximum stamina for a single point, sitting at the base of the Mobility tree. In a side-by-side you can flatly see the Raider with Youthful Lungs run farther before gassing out. Stamina is the resource everything else in Arc Raiders depends on, and there is no reasonable argument for skipping this on any character.
4. In-Round Crafting (S Tier)
Branch: Survival root perk. Cost: 1 point.
This root perk lets you field craft a starter list of ARC Raiders items topside: Flame Spray, the Shaker, Little Smoke Grenade, Light Impact Grenade, Fruit Mix, Shield Recharger, Adrenaline Shot, Agave Juice, Bandage, and the White Flag. The Little Smoke Grenade, Shield Recharger, Adrenaline Shot, and Bandage are the standouts from that list and will bail you out of plenty of bad situations. One point for all of that belongs on literally every player's build.
With the automatic picks settled, the next tier covers perks that are strong but situational, or that require a real investment to reach.
A Tier: Strong Picks Worth Building Around
5. Bull Rush (A Tier)
Branch: Conditioning capstone. Cost: 1 point at 30 or 40 Conditioning points.
A brand-new perk that lets you shove players and ARC while sprinting with your weapon stowed. Against ARC it does very little, since they barely move and are not interrupted. Against other Raiders, though, it knocks them back and stuns them for a moment, which the community is already using for surprise PvP openers and, less nobly, for pushing friendlies off ledges. Interesting, strong, and something you need to be aware of even if you never take it.
6. Vaults on Vaults on Vaults (A Tier)
Branch: Mobility 10-point choice node (versus Vault Spring). Cost: 1 point.
Vaulting and climbing no longer cost stamina. Period. Watch the stamina bar during a climb-up animation with this active and it simply does not move. This is a no-brainer choice over Vault Spring every single time.
7. Marathon Runner (A Tier)
Branch: Mobility, middle of the tree. Cost: up to 5 points.
Moving around costs less stamina, exactly as it did in the 1.0 tree. Nothing flashy, no special animation, just a steady reduction in stamina drain that adds up over a whole raid. Thumbs up.
8. Loaded Arms (A Tier)
Branch: Conditioning, middle of the tree. Cost: 1 point.
Your equipped weapon counts for far less toward encumbrance. A Jupiter at 9 lbs and a Bobcat at 9.5 lbs normally add 18.5 lbs to your inventory; with Loaded Arms switched on, that total dropped to 9.2 lbs. Cutting equipped weapon weight roughly in half for a single point is an easy inclusion.
9. Broad Shoulders (A Tier)
Branch: Conditioning, middle of the tree. Cost: up to 5 points.
Formerly a red tree perk, now in green. Whatever augment you are wearing, Broad Shoulders adds 10 lbs to your carry capacity; a Mk. III Cautious looting augment goes from 70 lbs to 80 lbs. Loot goblins and anyone running Queen or Matriarch farms will love it.
10. Security Breach (A Tier)
Branch: Conditioning capstone. Cost: 1 point at 30 or 40 Conditioning points.
Another red-to-green transplant. Security Breach lets you open the security lockers scattered at fixed points around each map. It was nerfed from its launch-day loot bonanza, but each locker still guarantees a free weapon to use or sell and occasionally coughs up a Wolfpack. It still feels like cracking open a loot pinata.
11. Fight or Flight (A Tier)
Branch: Mobility, early path. Cost: up to 5 points.
Whenever you take damage in combat, you regain a fixed chunk of stamina, with a cooldown between triggers. Fall off a ledge and snap a few bones, and a free stamina refill appears instantly. Embark buffed the stamina gain by roughly 25% per rank in the 2.0 rework, and free stamina for taking hits is exactly what you want in a fight.
12. Effortless Roll (A Tier)
Branch: Mobility, middle of the tree. Cost: up to 5 points.
Dodge rolls cost less stamina. Spam the roll button with this maxed and the savings are obvious. Another straightforward stamina perk in a game where stamina decides fights.
13. Three Deep Breaths (A Tier)
Branch: Conditioning, early path. Cost: up to 5 points.
The tooltip says you recover faster after an ability drains your stamina, but what it really does is shorten the time you spend exhausted. Roll until your stamina bar flashes, and the Raider with this perk stops flashing earlier and regains full control sooner. It pairs very well with the yellow tree stamina perks.
14. Nomadic Crafting (A Tier)
Branch: Survival capstone. Cost: 1 point at 30 or 40 Survival points.
Expands field crafting to heavy, light, medium, and shotgun ammo, the Shrapnel Grenade, the Defibrillator, and the Zipline. Every item on that list is useful and the Defibrillator in particular is a lifesaver. If you want to fully lean into mid-raid crafting, this is a must-have.
15. Road Warrior (A Tier)
Branch: Survival capstone. Cost: 1 point at 30 or 40 Survival points.
Downed ARC drop extra ammo and an additional ARC Powercell, and you can recycle items at full efficiency during a raid instead of the usual half value you get outside Speranza. One note: the recycling bonus was bugged for some players and required a game restart after taking the perk. Once working, it is excellent for crafters and ARC farmers.
16. Field Repair (A Tier)
Branch: Survival capstone. Cost: 1 point at 30 or 40 Survival points.
Repair weapons, shields, and gadgets up to 30% durability while topside. You will always get better value repairing back at Speranza, but a broken shield no longer ends your raid, and patching a gun on the fly during a long run is a genuine quality of life boost.
17. Traveling Tinkerer (A Tier)
Branch: Survival, middle of the tree. Cost: 1 point.
Adds the Noisemaker, Blaze Grenade Trap, Smoke Grenade Trap, Lure Grenade Trap, Gas Grenade Trap, Herbal Bandage, and a Raider Hatch Key to your field crafting list. The Herbal Bandage is a solid heal, and being able to craft a Raider Hatch Key mid-match is undeniably great for a single point.
18. Downed but Determined (A Tier)
Branch: Conditioning, middle of the tree. Cost: up to 5 points.
When downed, you take longer to bleed out. In a side-by-side, the Raider with five points invested still had roughly 25% of their downed health left when the unperked Raider had already died. More time for a teammate to reach you is valuable, especially for PvP-focused squads.
19. Looter's Luck (A Tier)
Branch: Survival, middle of the tree. Cost: up to 5 points.
While a container is revealing its contents, there is a chance that two items appear at once, effectively doubling your looting speed whenever it procs. Nothing dramatic, but it triggers constantly across a raid.
20. Turtle Crawl (A Tier)
Branch: Survival, middle of the tree. Cost: up to 5 points.
Take less damage while downed. In testing, a Ferro pistol needed four shots to finish a downed Raider normally and six shots with Turtle Crawl active. For PvP players crawling toward cover while an enemy squad tries to finish them, that extra margin matters.
21. In the Flow (A Tier)
Branch: Mobility capstone. Cost: 1 point at 30 or 40 Mobility points.
After each mobility move while sprinting, such as a vault, an icon appears briefly, and while it is lit you move a little faster and burn slightly less stamina. Chain moves together and you keep refreshing it. A cool perk and a fine second Mobility capstone, though it cannot hold a candle to Sprinting on Fumes.
22. Vigorous Vaulter (A Tier)
Branch: Conditioning, early path. Cost: 1 point.
Vaulting and climbing are no longer slowed while you are exhausted. You may need to slow the footage down to spot it, but the penalty really is gone. Not flashy, but anything that keeps you moving while winded is worth a single point.
23. Used to the Weight (A Tier)
Branch: Conditioning root perk. Cost: 1 point.
Wearing a shield slows you down less. With light shields the effect is effectively zero, but with medium or heavy shields you can see a small but real speed gain in side-by-side footage. Since it is a one-point root perk you must pass through anyway, it is a free bonus for medium shield users.
Dropping down a notch, the next group of perks all work as advertised but either fill a narrow niche or deliver a modest effect for the points required.
B Tier: Solid but Situational
24. Mule's Gallop (B Tier)
Branch: Conditioning 10-point choice node (versus Back on Your Feet). Cost: 1 point.
Lets you sprint while over-encumbered, and the movement difference is clearly visible. Being overweight is something you should avoid when possible, but anyone looting the Queen or the Matriarch gets heavy fast, so there is real appeal. It also stacks with Speedy Mule for a noticeable combined boost. Between the two choice options, this is the pick for loot hoarders.
25. Back on Your Feet (B Tier)
Branch: Conditioning 10-point choice node (versus Mule's Gallop). Cost: 1 point.
When badly hurt, your health slowly regenerates up to a cap. Embark buffed the heal from 30 to 40, so you now recover roughly 35% to 40% of your maximum health instead of the old quarter. The catch is a 30-second wait before the regen begins. It can absolutely save a life, but bandages or In-Round Crafting handle the same job without the delay.
26. Crawl Before You Walk (B Tier)
Branch: Conditioning, middle of the tree. Cost: 1 point.
Crawl faster while downed, roughly 25% quicker at full value. You hope never to need it, but when you do, dragging yourself behind cover a little faster can be the difference between a revive and a death screen.
27. Proficient Pryer (B Tier)
Branch: Conditioning, middle of the tree. Cost: up to 5 points (5% to 30% faster breaching).
Breaching doors and containers takes less time. Nothing incredible, but most players breach constantly during a raid, and shaving seconds off each one adds up over a session.
28. Nimble Climber (B Tier)
Branch: Mobility, early path. Cost: up to 5 points.
Climb and vault slightly faster. You need slowed footage to really see the improvement, but it is a far better path toward Fight or Flight than the alternative route through Sure-Footed Scrambler.
29. Slip and Slide (B Tier)
Branch: Mobility, middle of the tree. Cost: up to 5 points.
Slide farther and faster. Fully maxed, you travel noticeably further on each slide. PvP enjoyers who fight around cover should max it; everyone else can treat it as a fun optional pick.
30. Looter's Instinct (B Tier)
Branch: Survival, early path. Cost: up to 5 points.
Loot icons reveal faster when you open a container. The speedup is modest, but given how much of every raid is spent looting, it earns a half thumbs up.
31. Minesweeper (B Tier)
Branch: Survival 10-point choice node (versus Quick Roll). Cost: 1 point.
Buffed since 1.0, Minesweeper now disarms Jolt Mines and explosive mines in addition to grenade traps. Clever Raiders still hide their traps in hard-to-reach spots, but the ability to defuse mines at all is a huge glow-up and arguably the better choice at this node.
32. Gentle Pressure (B Tier)
Branch: Survival, middle of the tree. Cost: up to 5 points.
Breaching is extremely loud, and this perk audibly quiets it down. Unlike its looting counterpart Silent Scavenger, the use case here is clear: if you play stealthy, quieter breaching keeps nearby squads off your trail.
The following group contains perks that are not broken, just hard to justify when points are scarce.
C Tier: Filler You Take on the Way to Something Better
33. Speedy Mule (C Tier)
Branch: Conditioning, middle of the tree. Cost: up to 5 points.
Reduces the speed penalty when severely over-encumbered. Loaded up with over 200 lbs, you do lumber around faster, and stacking it with Mule's Gallop produces a very visible gain. The problem is the keyword "severely": you should be avoiding that state in the first place.
34. Stubborn Mule (C Tier)
Branch: Conditioning, early path. Cost: up to 5 points.
Stamina regen is less affected by being over-encumbered. Even after a roughly 33% buff to its values, the benefit is barely visible without slowing the footage. You will likely take some ranks to progress the green tree, which is annoying.
35. Wall Run (C Tier)
Branch: Mobility capstone. Cost: 1 point at 30 or 40 Mobility points.
Sprint at a wall and run up it for a few steps, grabbing a ledge if one is in reach. A fun idea that deserves credit, but outside of one wall in the practice area there are very few spots where it has a practical use right now. Maybe the community finds routes for it later.
36. Sturdy Ankles (C Tier)
Branch: Survival, early path. Cost: up to 5 points.
Less fall damage from non-lethal heights. Jumping off a tall ledge in the practice area showed only a marginal improvement in a zoomed-in comparison. It could save a life once in a while, but the payoff is small.
37. Agile Croucher (C Tier)
Branch: Survival, early path. Cost: up to 5 points.
Crouch-walk noticeably faster. The effect is real and clearly visible, but it is hard to pinpoint when you would lean on it. High-level PvP clips are mostly Raiders flying at each other with Bobcats, not sneaking. Good for dedicated stealth players, skippable for everyone else.
38. Silent Scavenger (C Tier)
Branch: Survival, early path. Cost: up to 5 points.
Less noise while looting. The trouble is that nobody hunts a player based on looting sounds; breaching and footsteps give you away long before a container does. Meh.
39. Quick Roll (C Tier)
Branch: Survival 10-point choice node (versus Minesweeper). Cost: 1 point.
A shorter, faster dodge roll at reduced stamina cost. It works exactly as described and some players will enjoy the snappier feel, but the standard roll is perfectly fine and Minesweeper offers more utility at this node.
40. A Little Extra (C Tier)
Branch: Survival, middle of the tree. Cost: 1 point.
Every container you breach spawns a base-level resource on the floor. It triggers reliably, so dedicated crafters short on materials may like it, but for most players it is a wasted point.
41. Right Back at It (C Tier)
Branch: Mobility, middle of the tree. Cost: 1 point.
Get up faster after a heavy landing. It does work, but barely. Only take it if you are pushing toward 40 Mobility points for a second capstone.
Now we reach the perks that actively drain your point budget.
D Tier: Avoid Unless Forced
42. Vault Spring (D Tier)
Branch: Mobility 10-point choice node (versus Vaults on Vaults on Vaults). Cost: 1 point.
Jump at the end of a vault. The input window is tight and easy to miss, and the payoff rarely matters in a real raid. There is no world where this beats free vaulting.
43. Ready to Roll (D Tier)
Branch: Mobility, early path. Cost: 1 point.
Widens the timing window for a recovery roll when falling. The default window is already generous, and most players never struggle with it. Only take it as a connector toward Fight or Flight if you go down the left side.
44. Stylish Landing (D Tier)
Branch: Survival, middle of the tree. Cost: up to 5 points.
Lets you recovery roll from greater heights. Testing put the normal threshold around 10 meters and the perked threshold around 11, perhaps 12 at a stretch. Five points for a single extra meter is a terrible deal.
45. Sure-Footed Scrambler (D Tier)
Branch: Mobility, early path. Cost: up to 5 points.
While sprinting, you can scramble up steep slopes for longer. Scrambling is a mechanic half the player base does not know exists, and there are very few spots on any map where it applies. Route through Nimble Climber instead.
46. Vault 'N' Carry (D Tier)
Branch: Conditioning, early path. Cost: 1 point.
Vault while holding a carryable item such as a battery pack. With so few carryables in the game, this does nothing for the vast majority of raids. Unfortunately, you may need to take it to reach the Conditioning capstones.
And finally, the two perks that should never see a point.
F Tier: Do Not Take These
47. Off the Wall (F Tier)
Branch: Mobility, middle of the tree. Cost: up to 5 points.
Wall leap farther, meaning you can shimmy-jump a little further sideways from a ledge hang. This serves almost no in-game purpose, and it is baffling that it survived the 2.0 rework.
48. Weapon Bash (F Tier)
Branch: Conditioning capstone. Cost: 1 point at 30 or 40 Conditioning points.
Perform a melee swing with your gun. In testing it took eight hits to down a friendly Raider, and ARC are far too dangerous up close to ever justify smacking them instead of shooting. Taking this over Security Breach or Bull Rush at the capstone node is an act of pure self-sabotage.
With all 48 perks ranked, the natural question is how to string the good ones together within the point budget.
Sample Skill Tree Builds for Frozen Trail 2.0
The tier list above points toward a few clear builds. Every one of them starts the same way: Youthful Lungs and In-Round Crafting as cheap root picks, then 30 points into Mobility for Sprinting on Fumes.
Loadout A: Mobility plus Green Capstone (All-Rounder)
Mobility (31 points): Youthful Lungs, Nimble Climber, Fight or Flight, Vaults on Vaults on Vaults, Effortless Roll, Marathon Runner, Swift Start, Slip and Slide as filler, then Sprinting on Fumes at 30.
Conditioning (31 points): Used to the Weight, Three Deep Breaths, Vigorous Vaulter, Mule's Gallop, Loaded Arms, Broad Shoulders, Downed but Determined, Proficient Pryer, whatever filler the paths require, then Bull Rush or Security Breach at 30.
Survival (remaining points): In-Round Crafting and a point or two toward Looter's Instinct.
This route skips Sure-Footed Scrambler, Ready to Roll, Off the Wall, and Right Back at It entirely, which is exactly what you want.
Loadout B: Mobility plus Red Capstone (In-Raid Crafter)
Mobility (31 points): Same opener as above, finishing with Sprinting on Fumes.
Survival (31 points): In-Round Crafting, Looter's Instinct, Minesweeper, Traveling Tinkerer, Looter's Luck, Turtle Crawl, Gentle Pressure, then Nomadic Crafting at 30. Push to 40 for Road Warrior or Field Repair if your point total allows it.
Conditioning (remaining points): Used to the Weight, Vigorous Vaulter, Loaded Arms.
With this setup you can drop into a raid nearly naked and craft an entire loadout on the fly, from ammo to a Defibrillator.
Loadout C: Double Green Capstone (Loot Hoarder)
Conditioning (41 points): Go deep enough to pick up both Security Breach and Bull Rush, accepting some weak filler like Vault 'N' Carry along the way.
Mobility (31 points): The standard Sprinting on Fumes route.
Survival: In-Round Crafting only.
This is the build for players who do Queen and Matriarch runs, want locker loot, and still want to shove rival Raiders for fun. It is point-hungry and only works with a near-maxed character, but it is a blast.
The Frozen Trail 2.0 skill tree finally forces real decisions, and the results are clear: stamina perks win, movement perks win, and the handful of utility capstones in the red tree reward anyone willing to go deep on crafting. Embark has already said more tweaks are coming as they watch how players engage with the new tree, so reset and revisit your build when the next balance pass lands. Happy raiding.