With the recent changes, many players are re-examining how to approach Vaal Temple farming in Path of Exile 2 0.4 Last of the Druids. The latest round of hotfixes in patch 0.4.0C has stirred up discussions, but after countless hours of testing and community feedback, there are new layouts and strategies that help you get the most from your temple runs. With this new PoE 2 Temple Build Guide, we are going to update the latest information on Vaal Temple layouts, farming efficiency, and practical planning for patch 0.4.0C. Also, we will recommend the best Temple planners at the end of the guide!
PoE 2 Vaal Temple 0.4.0c Patches: What Changed?
The temple meta has seen turbulent times recently. Hotfix 13 brought a controversial shift, making it much harder to build effective temples by altering how the coveted Duatalotl medallion (the “lock”) worked. For a while, the community was overwhelmed with frustration as this change threatened the entire snake-chain strategy, one of the most efficient ways to farm temples. However, Hotfix 15 reversed these restrictions, allowing players to once again build extended chains and sustain their layouts, while Hotfix 14 reduced the number of rooms destabilized after each run, providing a slightly more forgiving experience.
Although loot was toned down and building temples now requires more planning due to diminishing returns on some rooms, the ability to create long, stable chains is back. The current landscape rewards those who can adapt, incorporate new techs, and leverage medallion management. As a result, both casual and dedicated players have returned to temple farming in droves.
PoE 2 0.5 Release Date & Next Season Leaks
When is the PoE 2 next league season in 2026? What new content and changes will refresh our gameplay in the coming PoE 2 0.5 update? And is there any new class to expect? This guide draws from recent community discussions, developer statements, and early access patterns to give you a clear view of what to expect from the PoE 2 0.5 league update in 2026.
Is Temple Farming Worth It Again in PoE 2 After 0.4.0c Hotfix 15?
Absolutely! It’s not just viable, it’s thriving. Despite loot adjustments, the temple remains the single most scalable source of endgame currency and rare finds. Players have reported that even unfinished temples can deliver hundreds of divines, and with the right setup, it’s possible to chase high-value uniques, including headhunters, or simply accumulate more wealth than any other activity. The design of the mechanic means your investment of time and effort directly translates into better rewards as your temple grows.
Many players now consider temple building one of the most enjoyable and rewarding systems in PoE 2. The progression system constantly gives you something to work on, and each improvement is reflected in better loot drops. For some, building the temple feels like an ARPG within the ARPG—a unique experience where you’re always working towards that next big upgrade, with the satisfaction of seeing your “print” increase run by run.
PoE 2 New Best Vaal Temple Layouts After 0.4.0c Hotfix 13/14/15
Vaal Temple farming in PoE 2 after the 0.4.0c hotfix cycle is more engaging and rewarding than ever. The snake method remains the core, but now, with the right combination of Spy Masters, Golems, Commanders, and smart medallion management, you can build enormous chains that deliver unmatched loot. For those aiming to push even further, advanced techniques like the Russian tech open up new possibilities for optimization. Below, we explain each of the best new Temple layouts in steps to help you build easily and quickly!
1. Easy Temple Layout - How To Build Vaal Temple After Patch 0.4.0C in PoE 2?
First of all, let's sort out the Atziri Temple guide for beginners by going over how to build the Vaal Temple from the beginning, then you can easily set up the best endgame temple farm.
Resetting Your Vaal Temple
Getting started often means clearing out your current layout. If your temple is in bad shape, or you want a clean slate, it’s best to work your way straight toward Aziri. Creating a direct path to the boss will reset your temple. After defeating Aziri, you might lose some rooms, but this is expected. Avoid placing any unnecessary rooms right after the reset. Instead, focus on repeatedly defeating the architect so most of your temple is emptied and ready for a new setup.
Quickest Way to Get Crystals
To gather energy crystals quickly, run tier 15 maps with six modifiers. Each time you finish one, you’ll earn two crystals. There’s no need to defeat the map boss; simply enter, find the temple, clear monsters, grab the crystals, and exit. This method allows fast crystal farming, which you’ll need for consistent temple runs. Aim for at least 40 crystals before committing to building, as this will keep your progress smooth and uninterrupted.
Starting Your Temple Build
At the beginning, don’t worry if your temple looks empty. Your main aim is to defeat the architect repeatedly to gain medallions, which are necessary for securing your rooms and for maximizing your crystal income. Try to collect six medallions early, which will be enough to carry you through the initial construction phase.
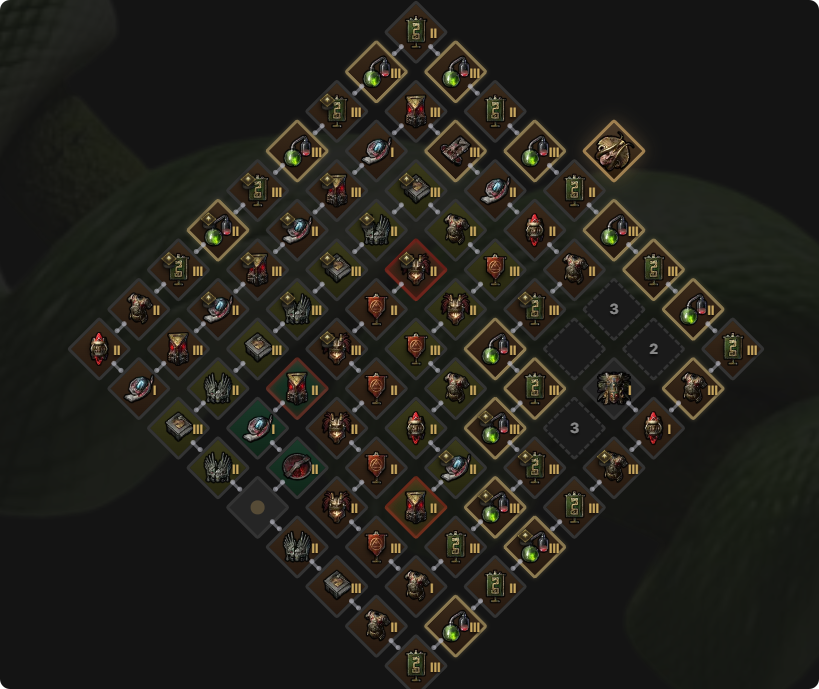
Beginner-Friendly and Easy Temple Layout
For those new to temple building or seeking a less complicated structure, focus on a triple-Golem layout. Place a Golem at the start of your main chain, another in the middle, and a third in a spot where you can rotate a lock. This arrangement avoids complicated tricks and is straightforward to maintain. You may need to sacrifice a room here and there to prevent loops and ensure the chain remains stable. This triple-Golem setup is simple, reliable, and doesn’t require any advanced or time-consuming strategies.
Why This Temple Structure Excels After the Patch
With the patch introducing diminishing returns for repeating certain rooms, the old approach of stacking many Spy Masters is no longer effective. Now, rooms like Golems, which boost the effects of garrison, commander, armory, smithy, and legion barracks, have become much more valuable. Adding Commanders for their monster effectiveness also increases loot. This current structure stands out because it emphasizes Commanders and Golems throughout, rather than relying on one room type. The rest of the process remains familiar, and you’ll still want a generator to further improve your Golems.
Building Process: Practical Steps
When putting your temple together, follow a specific order for your rooms. Begin with a Generator, as its buff to your Golems is especially important with the new room scaling. After the Generator, add rooms like armory, alchemy, and legion barracks. Continue placing rooms in the order suggested by your preferred layout. Any rooms you do not need for your main chain should be placed in the center area as “filler.” These rooms act as a barrier, so if your temple destabilizes, you’ll only lose these extras rather than key parts of your main chain.
How Lock Medallions Work
Medallions, which appear in the temple, are used to prevent a room from destabilizing. When you’ve built a long chain, place a lock on the last room—this protects the entire chain. For example, if you lock the Chamber of Souls at the end, the whole sequence is safe from destabilization. At first, you’ll need to use all your locks on the main chain. Once you have enough medallions coming in, you can protect a second chain as well. Spy Master rooms are your main source of locks, so be sure to include them in your setup. Always keep at least one lock reserved for the main chain to avoid losing progress.
When to Build a Second Chain
Don’t start a second chain immediately. Focus on your main chain, and keep it protected with your locks. Only when your main chain is nearly complete and you have a steady supply of medallions should you begin constructing a second chain. At this point, you’ll usually have enough resources to secure both chains with locks. Make certain that random rooms or secondary chain rooms never connect to your main chain, as this can create loops and jeopardize your entire setup.
Recognizing Good and Bad Medallions
Since your medallion capacity is limited, avoid picking up ones that don’t improve your progress. Prioritize medallions that level up rooms or provide locks, as well as those that let you build valuable rooms like garrisons or armories. Medallions that don’t contribute to your key goals can be ignored.
How to Level Up Spymaster Rooms
Spymaster rooms can't reach level three through normal means. To level them up, place an unprotected Spy Master somewhere in the temple—ideally in the center, away from your main chain. When this room is lost to destabilization, it will upgrade one of your protected Spy Master rooms on the chain. Keep this strategy in mind and continue placing extra Spy Masters in the center until your main chain’s Spy Masters are all at the maximum level. After this, you won’t need to use this technique anymore, especially since the second chain shouldn’t include any Spy Masters.
Advanced: Challenging Temple Build Techniques
For those seeking to push their temple to its limits, the Russian method offers a complex but rewarding path. This approach involves carefully combining smithies, golems, and other high-value rooms, then using multiple locks to protect crucial parts. By doing so, you can remove unnecessary rooms from your chain and create a structure like smithy-golem-smithy-golem without fillers. However, this method is risky and requires perfect room rolls. Mistakes can cost you key rooms or even force you to restart, so it’s best reserved for those who have already built several successful temples.
2. Spymaster Snake Temple Layout (Still King, Standard Setup)
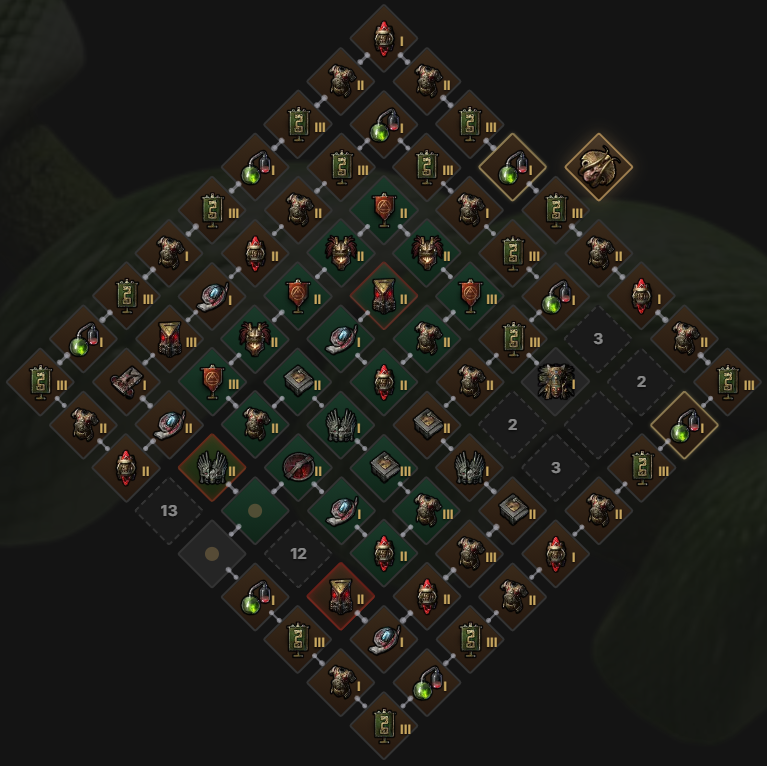
After the patch reversals, the snake method - a long, single chain of rooms where every room has exactly one connection in and one out - remains the standard. By locking the end room of the chain, you can make sure destabilization never touches your main rooms, guaranteeing your progress is preserved. The approach is simple: snake your way around the temple’s perimeter, building outwards before looping back in, and always lock the head of your chain after each run.
This chain not only keeps your rooms safe, but also scales your rewards sky-high as more rooms stack modifiers. Players have seen temples reach 1,900% increased effectiveness, with thousands of percent item quantity and rarity. The “snake” isn’t just about protection; it’s about multiplying loot to levels no other content matches.
1. Start With the Architect Room
Your first goal is to unlock the architect, as defeating him enables medallion drops. Once he’s in place, medallion farming can begin. You’ll want to path directly to the architect’s chamber, clear it, and then focus on expanding outwards.
2. Medallion Management
At the start, medallions are rare. You’ll need to use the Spy Master room, which has the best chance to drop the crucial Duatalotl lock medallion. The chain should alternate between garrisons, armories, and spy masters, with legion barracks boosting your chances for advanced medallions.
3. Bait Rooms and Filler
Until you have enough medallions to reliably lock your chain, use the temple’s middle as bait. Place random rooms you don’t need in the center so that if rooms are destabilized, your main chain is left untouched. Only when you have sufficient locks should you consider starting a second chain.
4. Leveling Up Spymasters
Getting your Spy Masters to level three is vital because that’s when they provide a high chance to drop lock medallions. This is done by placing an unprotected Spy Master room in the middle, letting it be consumed, and thus leveling up your main chain Spy Master. You can also use certain medallions to manually level up rooms.
5. Looping and Turning Back
When you reach a corner or need to turn the chain back on itself, use rooms like the Sacrificial Chamber to “push” the chain forward by one, preventing accidental connections that could break the snake layout. Always mirror your connections so you never have three room connections at a single tile.
6. Starting the Second Chain
Only begin your second chain when you consistently get two lock medallions per run. This usually happens once you have six or seven level-3 Spy Masters. Until then, focus on making your main chain as long and effective as possible.
3. Russian Tech Temple Layout (Advanced Hard Temple Setup)
For advanced players, new technology has emerged, the so-called Russian tech, named after its creators. This approach uses smart room placements and locking strategies to achieve things the normal snake can't, such as skipping required fillers or looping chains to maximize high-value rooms (like Golem Works and Commanders). The method involves building a “bridge” of rooms, then locking what you want to keep and letting the unwanted ones destabilize. This allows for even greater optimization, but it’s both risky and time-consuming, as a single misstep can mean losing key rooms or even the whole temple’s progress.

Generator First Approach
With room effectiveness now having diminishing returns, starting your temple with a Generator room is recommended. The Generator boosts Golem Works, which in turn multiplies the effectiveness of Commanders and Armories. The best meta layouts now incorporate more Golems and Commanders, since stacking Spy Masters alone is less rewarding.
Practical Layout Example
A beginner-friendly plan: build a perimeter chain of alternating garrisons, armories, and spy masters, with legion barracks sprinkled in to boost medallion drops. Add golems and commanders for increased monster effectiveness and loot. Lock the end of your chain after every run. Use the center for bait and medallion farming until you’re ready to fill it with optimized rooms.
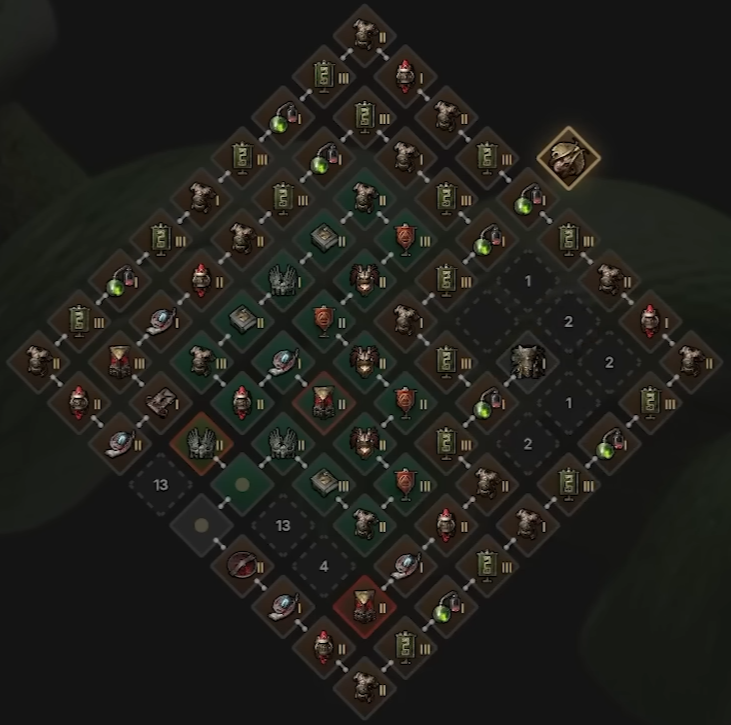
4. Most Unethical Min/Max Temple Layout
The most unethical min/max temple layout in PoE 2, described as the best in the game at present, is the result of relentless trial and error, deep community collaboration, and a passion for pushing mechanics to their limits. This design, with the architect front and center and highly specialized room chains, requires a demanding setup process but delivers extraordinary loot potential. While time-consuming and difficult, the payoff is a temple that leverages advanced tech and room combinations most players never attempt.
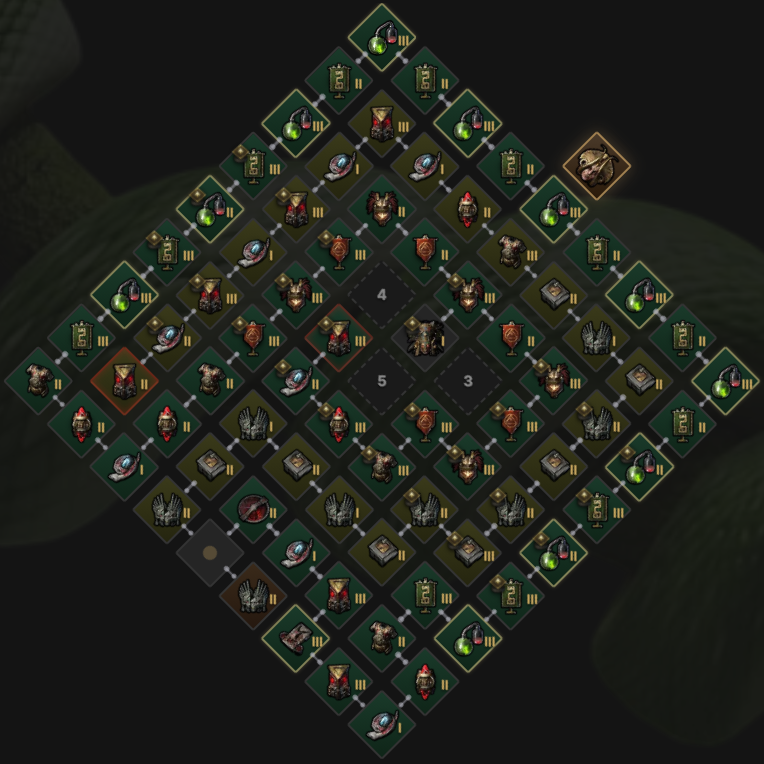
Central Architect Placement and Empty Room Setup
Start by positioning the architect in the center, with three empty slots around it. This arrangement is mandatory, with at least three empty rooms next to the architect, connected by one path, since any more increases the risk of bricking the temple. Setting up the room links from this hub forms the foundation of the layout.
Laying Out the Primary Chains
Establish a single pathway with two main "snakes" or chains. One runs along the outside, forming the spy master chain that converts into the champion chain towards its end. The other chain starts as a golem works line, which then merges into the corruption chamber path for boosting rare map modifiers. Each chain should end with a corruption chamber, described as usually the best room to finish on.
Advanced Room Linking Techniques
Apply specialized tech to combine spy masters, golem works, and smithies, even though these normally require armories in between. The setup involves using sacrificial chambers to get off typical ABA patterns and creative use of room cards and sacrificial cards to delete unwanted rooms at the right time. The approach allows combining corruption chambers and thurges, an arrangement not normally possible.
Managing Locks and Medallions
Early on, avoid worrying about locks before spy masters are available. As you progress, save spy master medallions for tricky spots, especially corners, and use garrison medallions or sacrificial cards to delete armories when needed. For the most challenging moments, such as triple-lock situations, accumulating enough spy masters and locks is necessary to maintain progress.
Building Out Golem Works and Smithy Paths
When constructing the golem works chain, use precise pathing to connect two golem works with a single pathway, reducing the number of smithies, which do not provide meaningful temple stats. The layout strives to have the fewest smithies per golem works chain, opening opportunities for more valuable rooms.
Completing the Layout and Final Steps
Once the major chains are secure and the sacrificial chamber is used to close the loop, rely on locks to finish out the remaining rooms. It may take several cycles of room additions and deletions, using sacrificial and room cards that do not compete with one another for maximum efficiency. After placing the last rooms and ensuring all primary chains are intact, the temple reaches its finished state - a structure built for the highest possible loot returns.
Results and Continuing the Grind
The very first run with this fully upgraded temple yielded 59 divine orbs, a headhunter, and other valuable drops, confirming the effectiveness of the method. Even with a very low area rarity number, the loot exceeded previous results. For those willing to dedicate the effort, building this temple provides both a rewarding challenge and a shot at the best rewards available right now in PoE 2.
PoE 2 Temple Planners
For anyone looking to quickly design and optimize their Vaal Temple layouts, two community-made planners stand out for their ease of use and time-saving features. These tools let you experiment with room placement, test different chains, and plan your upgrades before committing in-game—saving you both resources and frustration.
1. Atziri Temple Planner by Sulo
Sulo’s PoE Tools site includes a streamlined temple planner that makes it easy to visualize your entire temple. The interface is simple and responsive, allowing you to drag and drop rooms and preview your layout. Use this planner to sketch out chains, test ideas, and ensure your build won’t run into unwanted loops or dead ends.
2. Atziris Temple Planner by Tetriszocker
Tetriszocker’s Atziri Temple Editor offers both an “ingame” and a manual mode. The ingame mode follows PoE 2’s in-game placement rules, while manual mode lets you build without restrictions for creative or experimental layouts. Features include a clear placement guide, easy resetting, and the ability to save and share layouts. It’s the perfect way to plan high-efficiency chains or practice advanced techniques like the Russian method without risking your actual temple.