The Fate of the Vault League in Path of Exile 2 brought with it the Vaal Temple, a feature that has sparked plenty of conversation and debate within the community. Early on, the new mechanic brings a sense of discovery as players build and shape their own dungeons, plan routes, and chase unique loot. However, as the league progressed, many noticed a drop in excitement once the effort required no longer matched the rewards. With patch 0.4.0c Hotfix 13, GGG has started to address these issues and breathe new life into the Vaal Temple system. In this guide, we are going to update how the Atziri Vaal Tempe works after the patch 0.4.0c, the temple room cheat sheet with upgrade synergy, the boss, rewards, and how to maximize your farming efficiency.
What is the Vaal Temple in PoE 2 0.4 The Last of the Druids?
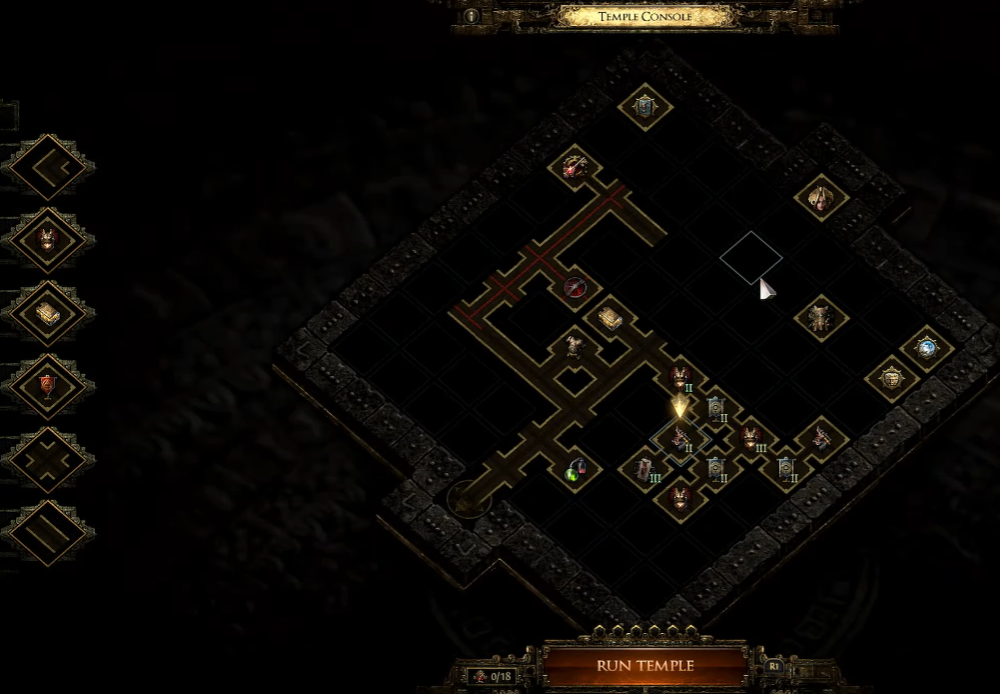
The Vaal Temple is a modular, player-driven dungeon you build by completing Fate of the Vaal encounters across the campaign and maps. Each encounter grants a room tile, and after gathering six tiles, you can enter the temple console to assemble your own layout. This process involves connecting paths, upgrading rooms, and managing a delicate balance between risk and reward. The temple is not a static map; your choices shape its challenges and prizes.
The temple evolves after Act 3, changing its monsters and adding new possibilities. The experience is intended to emphasize planning, efficient placement, and the combination of various room effects for tailored runs.
How Do Vaal Temples Work in PoE 2 0.4?
Each temple run starts by collecting room tiles from Fate of the Vault pedestals found in zones and maps. After six are collected, you access the temple console and arrange the rooms on a grid, forming paths and clusters. The core mechanics can be summarized as:
Room Placement: Each tile can be placed on the grid, connecting to others to create paths. Real estate space is key, cluster valuable rooms together and minimize wasteful paths.
Room Upgrades: Many rooms can be upgraded up to tier three by placing specific rooms next to each other. For example, barracks or garrisons adjacent to other rooms can push them to higher tiers, yielding stronger monsters and better rewards.
Paths and Keys: A straight, efficient route from the entrance to Atziri’s Chamber (the boss) and the Royal Access Chamber (the key) is ideal. Once a path to the key is created, it remains safe from removal.
Temple Reset: Upon beating the architect, a percentage of rooms are removed. Recent updates have reduced this penalty, making it less punishing to run the boss and continue building your temple.
Medallions and Modifiers: You can now apply medallions to add modifiers or reroll waiting rooms, giving more control over the temple’s challenges and rewards.
Banking rooms is possible, you can save up to twelve, enabling back-to-back temple runs or waiting to assemble a higher-level temple for better loot.
PoE 2 Vaal Temple Rewards
Rewards in the Vaal Temple vary by room type and tier, but now scale much better after the patch. Here’s what you can expect:
Currency: Kishara’s Vault and Treasure Vaults provide large stashes of currency. After Act 3, crafting benches also grant raw currency.
Unique Items: The Unique Vault offers a chance at powerful items, and higher temple levels filter out common uniques for better drops.
Crafting & Corruption: Alchemy Labs, Corruption Chambers, and Sacrificial Chambers allow for crafting, double corruption of items or gems, and modification of Vaal uniques.
Limb Modification: At tier three Flesh Surgeon rooms, you can perform limb modifications for unique rewards.
Rare and Magic Chests: Completing any non-boss Fate of the Vault event now always drops a magic or rare chest.
Gear and Experience: Many rooms grant increased monster pack size, effectiveness, and experience, making them great for both loot and leveling.
Modifiers and Medallions: Medallions now let you stack modifiers for ten runs, making temples more difficult and rewarding.
The most lucrative rooms to target are generally Kishara’s Vault (for divines and chaos), the double corrupt chamber, the architect’s chamber, and Atziri’s Chamber for unique drops.
PoE 2 Vaal Temple Rooms (Upgrade & Layout)
The Vaal Temple is built from a variety of room types, each with its own tier and upgrade path. Here’s how to approach layout and room selection:
Room Types and Effects
Garrisons, Barracks, Commanders: These rooms increase the number and effectiveness of monsters, especially when upgraded or clustered together.
Armouries and Smithies: Focus on humanoid monsters and chests with increased rarity and equipment.
Generators and Golem Works: These add construct monsters and can power up other rooms.
Spymaster and Legion Barracks: Boost the effect of temple mods and introduce more rare or magic monsters.
Flesh Surgeon and Synthflesh Labs: Handle unique monsters and grant access to limb modification at top tier.
Corruption Chambers, Sacrificial Chambers, Alchemy Labs: Offer special crafting, corruption, and increased gold or rarity.
Treasure Vaults: Provide a stash of currency and, when present, globally boost item rarity in the temple.
Unique Vaults and Tablet Research Vaults: Contain unique items or devices for further gem or tablet corruption.
Royal Access Chamber: Needed to reach Atziri’s Chamber.
Architect's Chamber: Beating the boss here allows selection of rewarding vaults and unlocks medallions.
Path of Exile 2 Vaal Temple Cheat Sheet (Rooms & Upgrades)
| Room Name | Tier | Upgraded By | Main Effect / Feature |
|---|---|---|---|
| Path | 1 | - | map hidden chest amount +% [40] |
| Guardhouse | Garrison 1 | Commander, Armoury | 10% increased number of Monster Packs |
| Barracks | Garrison 2 | Commander, Armoury | 15% increased number of Monster Packs; Normal Monsters have 15% increased Effectiveness |
| Hall of War | Garrison 3 | Commander, Armoury | 20% increased number of Monster Packs; Normal Monsters have 30% increased Effectiveness |
| Commander's Chamber | Commander 1 | Garrison x3, Transcendent Barracks x3 | Rare Monsters have 15% increased Effectiveness |
| Commander's Hall | Commander 2 | Garrison x3, Transcendent Barracks x3 | Rare Monsters have 30% increased Effectiveness |
| Commander's Headquarters | Commander 3 | Garrison x3, Transcendent Barracks x3 | Rare Monsters have 60% increased Effectiveness |
| Depot | Armoury 1 | Smithy, Alchemy Lab | Humanoid Monsters have 15% increased Effectiveness |
| Arsenal | Armoury 2 | Smithy, Alchemy Lab | Humanoid Monsters have 30% increased Effectiveness; Contains many pieces of Equipment |
| Gallery | Armoury 3 | Smithy, Alchemy Lab | Humanoid Monsters have 60% increased Effectiveness; Contains Rare Equipment |
| Bronzeworks | Smithy 1 | Golem Works | Chests have 15% more Item Rarity; Bench to improve equipment quality |
| Chamber of Iron | Smithy 2 | Golem Works | Chests have 30% more Item Rarity; Bench to add augment socket |
| Golden Forge | Smithy 3 | Golem Works | Chests have 60% more Item Rarity; Bench to improve quality above 20% |
| Dynamo | Generator 1 | Thaumaturge, Sacrificial Chamber | Construct Monsters have 15% increased Effectiveness; Powers nearby rooms |
| Shrine of Empowerment | Generator 2 | Thaumaturge, Sacrificial Chamber | Construct Monsters have 30% increased Effectiveness; Powers nearby rooms |
| Solar Nexus | Generator 3 | Thaumaturge, Sacrificial Chamber | Construct Monsters have 60% increased Effectiveness; Extra Corrupted Abomination |
| Spymaster's Study | Spymaster 1 | - | 8% increased effect of Garrisons, Commanders, Armouries, Smithies, Legion Barracks |
| Hall of Shadows | Spymaster 2 | - | 15% increased effect of Garrisons, Commanders, Armouries, Smithies, Legion Barracks |
| Omnipresent Panopticon | Spymaster 3 | - | 30% increased effect of above mods; Extra Royal Colossus |
| Legion Barracks | 1 | Armoury, Spymaster | (not specified) |
| Viper's Loyals | 2 | Armoury, Spymaster | 30% increased number of Rare Monsters |
| Elite Legion | 3 | Armoury, Spymaster | 60% increased number of Rare Monsters |
| Prosthetic Research | Synthflesh 1 | Flesh Surgeon | Monsters grant 10% increased Experience |
| Synthflesh Sanctum | Synthflesh 2 | Flesh Surgeon | Monsters grant 20% increased Experience |
| Crucible of Transcendence | Synthflesh 3 | Flesh Surgeon | Monsters grant 40% increased Experience |
| Surgeon's Ward | Flesh 1 | Synthflesh Lab | Unique Monsters have 10% increased Effectiveness |
| Surgeon's Theatre | Flesh 2 | Synthflesh Lab | Unique Monsters have 20% increased Effectiveness |
| Surgeon's Symphony | Flesh 3 | Synthflesh Lab | Unique Monsters have 40% increased Effectiveness; Limb Modification device |
| Steelflesh Quarters | Transcendent Barracks 2 | Synthflesh Lab | 30% increased number of Magic Monsters |
| Collective Legion | Transcendent Barracks 3 | Synthflesh Lab | 60% increased number of Magic Monsters |
| Chamber of Souls | Alchemy 1 | Thaumaturge x2 | 15% increased Rarity of Items Dropped by Monsters |
| Core Machinarium | Alchemy 2 | Thaumaturge x2 | 30% increased Rarity of Items Dropped by Monsters |
| Grand Phylactory | Alchemy 3 | Thaumaturge x2 | 50% increased Gold found; 60% increased Rarity; Soul Core Corruption device |
| Thaumaturge's Laboratory | Thaumaturge 1 | Sacrificial Chamber | 8% increased effect of Corruption Chambers, Treasure Vaults, Sacrificial Chambers; Gem device |
| Thaumaturge's Cuttery | Thaumaturge 2 | Sacrificial Chamber | 15% increased effect as above; Gem quality device |
| Thaumaturge's Cathedral | Thaumaturge 3 | Sacrificial Chamber | 30% increased effect as above; Extra Quadrilla Sergeant; Gem corruption device |
| Workshop | Golem Works 1 | - | 8% increased effect of Generators, Synthflesh Labs, etc.; Bench |
| Automaton Lab | Golem Works 2 | - | 15% increased effect as above; Bench |
| Stone Legion | Golem Works 3 | - | 30% increased effect as above; Extra High Priest; Bench |
| Crimson Hall | Corruption 1 | Thaumaturge, Sacrificial Chamber | Rare Monsters 15% chance additional Modifier; Corrupt Items device |
| Catalyst of Corruption | Corruption 2 | Thaumaturge, Sacrificial Chamber | Rare Monsters 30% chance additional Modifier |
| Locus of Corruption | Corruption 3 | Thaumaturge, Sacrificial Chamber | Extra Royal Sentinel; Rare Monsters 60% chance additional Modifier |
| Sealed Vault | Vault 1 | - | 25% increased Rarity of Items Dropped; Many Chests |
| Altar of Sacrifice | Sacrifice 1 | - | 15% increased amount of Rare Chests; Contains Unique Item |
| Hall of Offerings | Sacrifice 2 | - | 30% increased amount of Rare Chests; Contains Unique Item |
| Apex of Oblation | Sacrifice 3 | - | 60% increased amount of Rare Chests; Extra Unchained Beast; Modify Vaal Uniques device |
| Architect's Chamber | 1 | - | Defeat Architect for Vault selection, unlocks Medallions |
| Foyer (Entrance) | 1 | - | - |
| Kishara's Vault | Currency Vault | - | Contains large stash of Currency |
| Vault of Reverence | Lineage Gems Vault | - | Contains random Lineage Support |
| Jiquani's Vault | Augments Vault | - | Contains random high level Rune |
| Tablet Research Vault | Tablets Vault | - | Device for corrupting tablets |
| Ancient Reliquary Vault | Uniques Vault | - | Contains Unique Item |
| Royal Access Chamber | 1 | - | Allows Access to Atziri's Chamber |
| Extraction Chamber | 1 | - | Device to Salvage Socketed Augments |
| Sacrifice Room | 1 | - | Sacrifice a Room to upgrade Sacrificial Chamber |
| Atziri's Chamber | 1 | - | - |
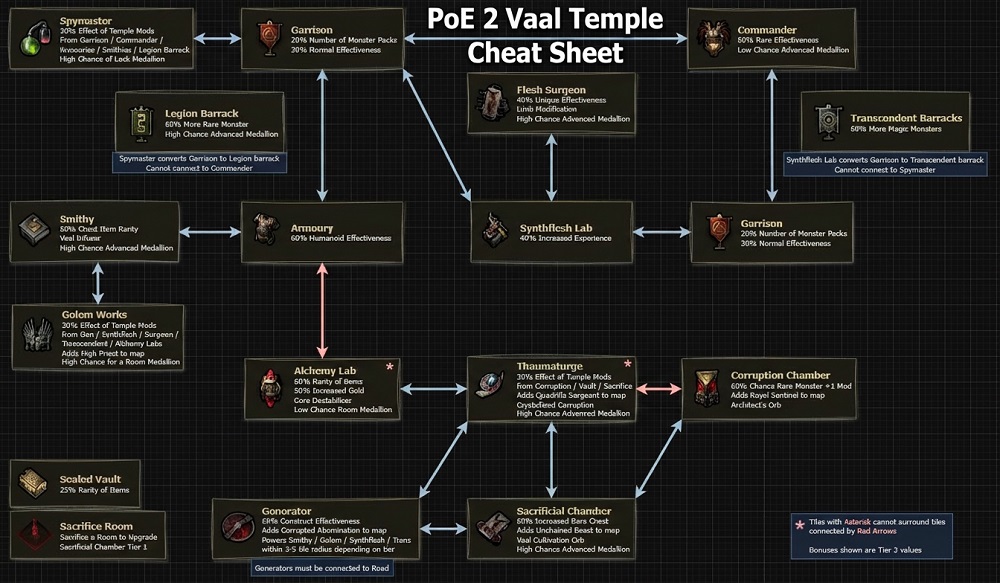
Vaal Temple Room Combo & Upgrade
Rooms often upgrade by placing specific types next to each other. For example, a Garrison next to a Commander upgrades it to a higher tier. At tier three, rooms confer much stronger effects: more monsters, new bosses, or unique devices.
Layout Tips
Cluster Upgrades: Stack rooms to maximize cross-bonuses and make it harder for vital rooms to be removed when closing the temple.
Efficient Routes: Build straight lines from the entrance to Atziri and the key, with minimal pathing waste.
Room Choice: Not every tile has to be used, if a room won’t improve your setup, save it for later.
Pro Layout: Wide clusters of reward rooms allow you to benefit from multiple upgrades and modifiers at once.
Core Mechanics & Rules
1. Room Connectivity
Rule: A room must be connected to your starting point to exist.
If a room is not connected (i.e., the path is broken), it gets removed.
Rooms are removed from the end of the chain backward (the most distant rooms go first).
Exception: Completing an "Architect's Reward" room can bug the chain and break connections, so reconnect if needed.
2. Chains and Room Protection
Longer chains protect your good rooms: If you make a long path (chain) of rooms, the earlier rooms are protected since only the last rooms can be removed. This lets you keep your valuable early rooms safe while expanding the temple.
Best Rooms to Target
1. Corruption Rooms (High Value, “Unsafe”)
Corruption rooms destabilize after use, unless protected by later rooms in the chain.
Sacrificial Chamber – Grants V Cultivation Orb (high value, ~1.5 Divine).
Thormaurge – Grants Gem Double Corrupt (very valuable).
Corruption Chamber – Grants V Infuser (very valuable).
2. Safe/Supporting Rooms
Don’t destabilize after use and are more common.
Commander Headquarters – Chance for advanced medallions.
Surgeon Symphony – Chance for advanced medallions, drops limbs.
Armory, Garrison, Bronzework, Workshop – Additional medallion chances and loot multipliers.
Alchemy Lab – Loot bonuses and modifiers.
3. Supporting Medallion Rooms
Having more medallion sources accelerates temple growth and lets you upgrade/protect key rooms.
PoE 2 Vaal Temple Bosses
The temple boss is accessed through the Architect’s Chamber and, ultimately, Atziri’s Chamber. The architect encounter is designed as a major milestone, not just another fight. In earlier versions, defeating the boss would remove most of your rooms, leading to frustration, but the patch now halves the number of rooms lost, making subsequent runs more valuable.
Bosses in the temple can be quite challenging, especially as you stack modifiers and reach higher tiers. They can drop unique items, currency, and are sometimes required for unlocking further temple features (like medallions or the ability to modify limbs).
Methods to Build a Vall Temple
A. Speedrunning At-Zer (the architect)
Focus: Quick runs to farm the architect.
Build: One central chain, place all your good rooms at the end, then immediately go to the architect next run.
Goal: Preserve the path for efficient architect farming.
B. Building an Extremely Long Chain (“The Snake”)
Focus: Maximize value from each room.
Build: Create a long, winding path, placing your most valuable rooms at the start of the chain.
Goal: Each run adds a room to the chain, so the valuable rooms are always protected.
How does Patch 0.4.0c Change & Affect the Vaal Temple?
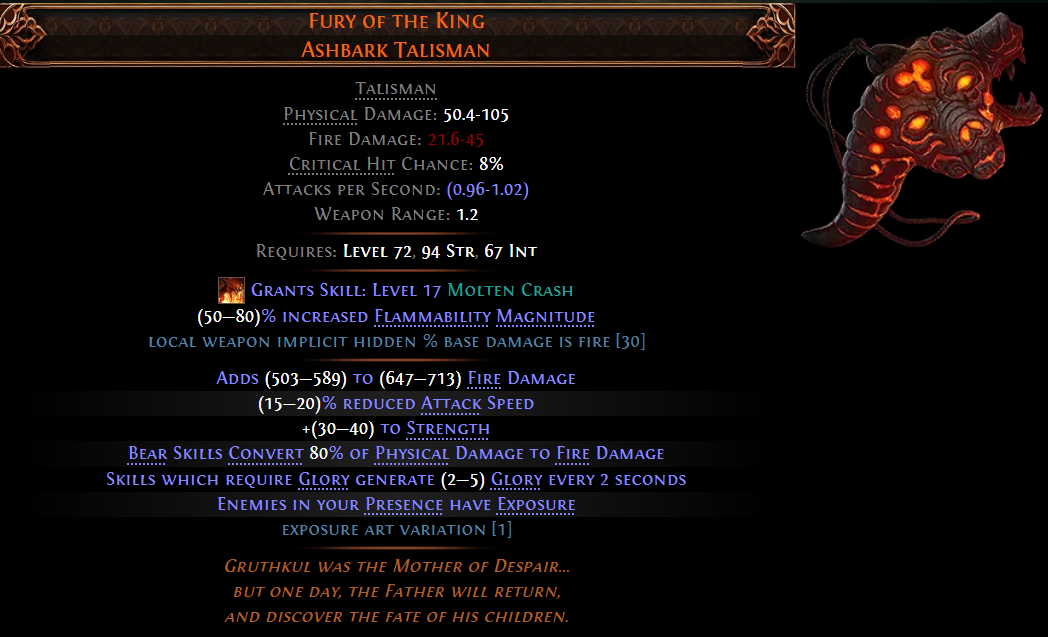
The Atziri Temple mechanic could be the most fun and effective farm strategy in the Fate of the Vaal league; some players could even print 100+ Divine Orbs easily in each run. Unfortunately, with the Hotfix 13 0.4.0c patch, the Temple exploit got fixed while the key medallion's functionality was altered, impacting temple construction strategies.
What Actually Changed?
Essentially, GGG nerfed the Temple, but not in the way most people expected. Yes, they nerfed the loot, but honestly, the loot is still insanely strong. I’ll get to that in a second. The real change is in how you build your Temple.
The main thing: Jutili’s Medallion - the item that locks your room and prevents destabilization—can now only be placed on tier three rooms.
Before, you could lock any room, keep your snake chain safe, and keep building your Temple exactly how you wanted.
Now, you can only lock tier three rooms, so building a snake chain is way harder. You need the right room, a way to upgrade it, and then a lock, for every part of your chain. If you’ve ever tried this, you know how tough that is.
They also nerfed some room modifiers, which just means slightly less loot, but whatever—the loot is still busted.
Why This Patch Is Actually Bad?
Honestly, the loot nerf is fine. Here’s a post-nerf Temple I did:
27 Divines, a Headhunter, two Colandrums, two Abyss tablets, Vortex Mask, 26 more Divines, and a Highreach chest.
The loot is still ridiculous. Frankly, it’s too much for Q2, so I don’t mind the loot nerf at all.
But here’s the real problem:
If you already have a built Temple, you’re fine.
If you’re a top-end player or a 1-percenter, like me, it barely matters. In fact, our loot is actually more valuable now, because fewer people have fully built Temples. That creates a huge wealth gap.
But, if you were in the middle of building your Temple, or just getting started, you’re basically bricked. It’s now almost impossible to finish a snake-chain Temple, because you can only lock tier threes. Building a Temple could now take 150-200 hours instead of 30-50, which is just insane.
The Legacy Wealth Gap
This patch accidentally created a mid-league legacy wealth gap.
Players with fully built Temples before the patch can still print loot.
Everyone else? Good luck. You’re basically locked out.
If you were halfway there, you’re stuck, because you probably lost some runes and can’t lock the right rooms anymore.
The only ways to fix this are:
Reset everyone’s Temples (which would make a lot of casuals mad).
Revert the lock change, so you can lock any room again and keep building.
Neither is great, but something has to be done, because right now, this mid-league patch just wasn’t the move. It’s not a loot issue - it’s the legacy wealth gap issue.
Is the Temple Worth It Now after the Fate of the Vaal Patch 0.4.0c?
The recent patch has delivered several changes intended to increase both the value and enjoyment of the Vaal Temple:
Doubled Room Modifiers: Temple modifiers like pack size and item rarity have had their values roughly doubled at all tiers, directly boosting loot potential.
Extra Monsters in Tier Three Rooms: High-tier rooms now spawn additional dangerous monsters, increasing both challenge and drops.
Global Rarity Bonus: Having a treasure vault room now adds 25% increased item rarity across the entire temple, turning a single room into a valuable multiplier for the whole run.
Crafting Bench Currency: After Act 3, you can now take exalt, alchemy, and other currencies from benches directly, rather than being forced to use them immediately.
Medallions: New medallions let you stack waste modifiers for up to ten runs or reroll waiting rooms, reducing the frustration of bad RNG.
Boss Improvements: Fewer rooms are removed after defeating the architect, and reward rooms placed from the architect's console can now connect to any adjacent room instead of just paths. This flexibility helps avoid bricking your temple.
In-World Encounter Chests: Every Fate of the Vault pedestal event now rewards you with a magic or rare chest upon completion, making them far more rewarding to do as you map.
While these improvements have made the temple more appealing, many players still find the time investment-to-reward ratio lags behind standard high-tier mapping. However, the foundation is stronger, and further improvements may continue to arrive.
PoE 2 Vaal Temple Build Strategy - How To Build Best Temples and Bank Rooms for Max Profit?
1. Prioritize Room Placement and Upgrades
Prioritize Chain Structure:
Start by building out your chain: Always add new rooms to the end of your chain.
Place your best rooms (corruption rooms) at the start of the chain.
Fill the rest of the chain with supporting/safe rooms.
Cluster Valuable Rooms: Stack important rooms together to maximize upgrade potential and make them less likely to be removed after closing the temple.
Upgrade to Tier Three: Focus on upgrading reward rooms to tier three, as these now spawn more monsters and yield much better loot.
Maintain Straight Paths: A direct route from the entrance to Atziri and the key ensures you don’t get blocked.
2. Use Medallions and Rerolls
Stack Modifiers: Use medallions to apply waste modifiers for ten runs, increasing both difficulty and rewards.
Collect and use medallions wisely:
Zantipes Medallion: Prevents destabilization of a room. Use these to protect your critical rooms.
Quipolattles Medallion: Upgrades the tier of a room. Use to upgrade your best rooms.
Other medallions: Some are less useful for this strategy. Focus on those that protect, upgrade, or add rooms.
Reroll Waiting Rooms: If offered a bad room, use medallions to reroll and hunt for the rooms you actually want.
3. Don't Place Every Tile
Be Strategic: Only use tiles that improve your temple. Save others for better opportunities to maximize your layout.
4. Bank Rooms and Plan Your Runs
Save Up to Twelve Rooms: Banking rooms lets you run several temples in a row or wait for higher-level content, increasing your potential rewards.
Time Your Runs: Consider the opportunity cost, sometimes it’s better to wait and assemble a stronger temple for a bigger payout.
5. Target Key Rewards
Focus on the Best Rooms: Always prioritize Kishara’s Vault, the double corrupt room, and the architect’s chamber. Others are often just filler.
Cut Limbs and Modify Gear: Limb modification can provide unique benefits, and double corruption options can yield high-value items.
6. Value Cycling
Aim to cycle through your best rooms in the chain:
Generator → Thormaurge → Sacrificial Chamber → Corruption Chamber → Thormaurge, then branch to safe rooms.
Optionally, attempt a second cycle for more value, but it's riskier.
7. Multiple Chains
You can build multiple valuable chains: Not just one big chain—create several chains, each with their own corruption rooms at the start, then fill out with supporting rooms.
E.g., Generator → Thormaurge → Sacrificial Chamber → Alchemy Lab → Armory → Garrison → Commander.
8. Use Sacrificial Chamber for Path Manipulation
Sacrificial Chamber can be used to remove rooms and reposition your path.
Use it strategically to route your chain along the temple perimeter or to connect/disconnect as needed.
9. Clear Every Encounter
Don't Skip Pedestals: Since every Fate of the Vault event now drops a magic or rare chest, these are worth clearing during mapping.
10. Adapt to RNG
Expect Variance: Not every temple will be profitable, but stacking multiple rewarding rooms together increases your odds of a jackpot.
Should You Run the Temple in Campaign?
Run Only the Best Temples During Campaign
Campaign Temples are often low-level:
The rewards scale with the level of monsters and rooms. Early acts yield less valuable loot.
When to Run:
High-tier currency/unique/item rooms.
Specific crafting benches you need immediately.
A temple with many high-density (monster pack) rooms for quick XP or drops.
Only run temples if you have:
Otherwise, save your temple incursions for mapping/endgame when you can build higher-level, more rewarding temples.
When to Skip:
If your temple is mostly filled with low-value or basic rooms.
If you’re progressing through the campaign and want to save time.
If you want to save temple runs for later when your character is stronger and can clear efficiently.
Rules for Effective Vaal Temple Build
Good rooms early, fodder rooms late: Place your best rooms at the start, then pad the chain with supporting rooms.
Only the end of the chain gets deleted: Each temple run removes the last room, preserving your early (valuable) rooms.
Protect your chain with medallions: Use Zantipes to prevent critical rooms from destabilizing.
Upgrade your best rooms: Quipolattles medallions should be spent on your most valuable rooms.
Deal with RNG: Room/medallion drops are random, so patience and flexibility are key.
Multiple approaches work: Whether you focus on one long chain or several shorter chains, the principle is to maximize value per temple run.
How to Upgrade Vaal Temples After Patch 0.4.0c Hotfix 13?
With the arrival of Hotfix 13 in Path of Exile 2, a number of adjustments were made to the Vaal Temple system, particularly impacting how players progress and finish their temples. One of the most impactful changes is the update to medallion usage, which directly affects anyone still constructing their temple.
The Medallion Adjustment
Hotfix 13 introduced a restriction where medallions can now only be locked onto a level three room. This change does not matter for players who already had a fully completed temple, but it creates a new set of steps for those still in the middle of building out their rooms.
If you are starting with a completely fresh character and an empty temple, these changes will not impact you right away. However, if you are like many players and have a partially built temple with around 20 to 60 rooms, you will need to adjust your approach.
Steps for Progressing Your Temple
To continue upgrading your Vaal Temple, you now need to use the plus one room medallion, which upgrades a room up to a maximum of level three. It is necessary to end each chain of upgrades on a level three room, and this room must be upgradable from the room directly behind it. Common rooms that fit this requirement include Garrison, Armory, Alchemy Lab, and Smithy, with Garrison being the most likely option.
For example, if an Alchemy Lab is to be upgraded, you can position another room behind it, then another after it, enabling both to contribute towards raising the Alchemy Lab to level three. Locking the medallion on this room is only possible if you have the plus one room upgrade. Otherwise, the upgrades will not persist after the temple is run, and the room will revert to level two.
Accumulating and Using Medallions
To push forward, you need to gather two to five rooms at a time, since there is a limit to how many medallions you can hold and use. Between the six rooms available in a new temple and those stored in your stash, you will need a combination of rooms and medallions to advance by several rooms at each step. Unlike before, where you could plan out your upgrades and add rooms one at a time, now you must wait until you can move forward by several rooms at once, using the plus one medallion to ensure the level three upgrade sticks.
Obtaining the Required Medallions
The plus one room medallion, now necessary for continued temple progression, only comes from rooms that specifically mention a chance to drop Quesadilla’s Medallion (the plus one upgrade). It cannot come from rooms that say they have a high chance for advanced medallions, nor does it drop from level three rooms. Only level one or two rooms that state they can drop Quesadilla’s Medallion are eligible, and the drop chance is estimated to be around two to five percent based on recent samples.
Other medallion types, such as Jalapeno’s Medallion or advanced medallions, do not work for this purpose. The only way to continue upgrading is to wait for the correct medallion to drop from the specific rooms, and then use it to move forward by several rooms at a time, always making sure the room you are locking is upgradable from the room behind it.
Planning and Moving Forward
Because you can no longer progress one room at a time, patience and planning are now more important. Accumulate your room medallions, wait for the correct plus one drop, and then plan your path so you can upgrade and lock two to five rooms in a chain. This process is slower and requires more organization than before, but it remains possible to finish a partially built temple as long as you focus on the right rooms and medallions.