


Harvest received a full rework in Path of Exile Patch 3.30, and the old Sacred Grove subarea is gone. Instead, you hunt Sacred Flora directly inside regular maps to collect Lifeforce for horticrafting and raw currency sales. This guide breaks down the new PoE 3.30 Harvest mechanics, how to run the farm, the best maps, the Atlas tree setup, expected profit, and tips to keep your runs smooth and consistent.
PoE 3.30 Harvest Farm Guide
Harvest is one of the most reliable raw Lifeforce farming options in Path of Exile 3.30 Covens of Umbra. This updated strategy trades the old separate Sacred Grove instance for a streamlined map‑based loop built around Sacred Flora spawns. It works for a wide range of builds: you can run cheap white maps with low risk, or push high‑tier, high‑rarity maps for better returns once your character is strong enough. The core goal is simple: spawn Harvest encounters, roll favourable Sacred Flora modifiers when worthwhile, collect Crystallised Lifeforce, and sell it for divines.
PoE 3.30 Harvest Changes
The patch reworks Harvest from the ground up. The old structure is replaced with a simple in-map system, and several drop rules, quest steps and horticrafting prices were adjusted at the same time.
1. Core Mechanic Overhaul
No separate subarea anymore. Sacred Flora now spawns inside regular maps.
Each Flora is tied to one Lifeforce colour. Interacting with it makes Sacred Fauna (the renamed Harvest monsters) crawl out of nearby roots.
Kill most of the Sacred Fauna and the plant releases Wildwood Wisps in its own colour, which then travel across the rest of the map.
On high-tier maps, a Flora can be swapped for a Sacred Specimen, which summons a Harvest boss when touched.
The Wisps are a nice bonus rather than a scaling engine, because they can only affect a limited number of monster targets. You cannot keep feeding them to build up a huge chain.
2. Loot and Drop Tuning
These changes exist for one reason: keep the total Lifeforce you gain close to before, while giving you far fewer items to pick up off the ground.
Tier 1 Harvest monsters no longer drop Lifeforce at all.
Tier 2 Harvest monsters drop it less often.
When Lifeforce does drop, it comes in much bigger stacks.
So the pile looks smaller, but the totals stay in a similar range.
3. Quest and Hideout Update
The old tutorial Harvest quest has been deleted. You do not need to run it to unlock anything. Simply finish your first Sacred Flora encounter and the Horticrafting Station hideout decoration unlocks by itself.
4. Horticrafting Cost Revisions
Three popular recipes had their prices restructured, moving away from "one huge pile of a single Lifeforce" toward "smaller amounts of two types":
| Recipe | Old Cost | New Cost |
|---|---|---|
| Resistance type change | 500 of one Lifeforce | 300 of two different Lifeforce types |
| Damage type change | 500 of one Lifeforce + Crystallised Rancour | 300 of two different Lifeforce types + Crystallised Rancour |
| Divination card gamble | 1500 Vivid Crystallised Lifeforce | 1000 Primal + 1000 Wild + 1000 Vivid Crystallised Lifeforce |
The Crystallised Rancour requirement on the damage conversion recipe did not change. Only the Lifeforce side moved.
PoE 3.30 Sacred Flora Types & Mods
Sacred Flora is the interactive plant object you now find scattered through maps. It is the entry point for all Harvest content in 3.30. Every plant belongs to one of three colours, and that colour decides what you get.
Vivid Sacred Flora→ Vivid Crystallised Lifeforce
Wild Sacred Flora→ Wild Crystallised Lifeforce
Primal Sacred Flora→ Primal Crystallised Lifeforce
The monsters spawned by a plant drop the Lifeforce that matches the plant, so the colour you click directly decides your payout. Since horticrafting demand shifts from league to league, the three Lifeforce types rarely cost the same. Whichever one players are buying most for their recipes will be the most expensive, and farming that colour is usually the better call. Check trade prices before you commit to a long session, because last week's answer may not be this week's answer.
One more variant worth knowing: Sacred Specimen. This appears in high-tier maps in place of a normal plant and spawns a Harvest boss on interaction. Bosses hand out a lot of Lifeforce, but they are also tanky and can roll nasty modifiers.
Sacred Flora Modifiers
Two different modifier systems touch Sacred Flora, and it helps to keep them apart. One rolls locally on each plant you meet in a map. The other sits on the Atlas tree and applies to every map you run.
Local Explicit Modifiers on Each Sacred Flora
When you open a plant, it comes with its own explicit mods, and you can reroll them a limited number of times. The ones worth chasing:
Increased quantity of Lifeforce
Higher chance for the spawned monsters to be Tier 3, which drop noticeably more Lifeforce
More rare monsters, or simply more monsters overall
Do not go overboard. Two or three rerolls per plant is a sensible ceiling; anything beyond that usually costs more currency than the better roll returns.
Atlas Passive Modifiers for Sacred Flora
These live in the Sacred Flora cluster on the reworked Atlas tree. Once allocated, they work in every map.
| Passive | What It Does |
|---|---|
| Doubling Season | 15% chance for Lifeforce dropped by Sacred Fauna to be duplicated |
| Sacred Flora Chance | +15% Surpassing Chance for your maps to contain Sacred Flora |
| Call of the Grove | +40% Surpassing Chance for your maps to contain Sacred Flora |
| Additional Lifeforce | Sacred Fauna drop 6% increased quantity of Lifeforce |
| Sacred Fauna Duplication Chance | 3% chance for Sacred Fauna to be duplicated |
| Arboriculture | Choice node: Vivid Roots, Wild Roots or Primal Roots. 100% increased chance to encounter the chosen Sacred Flora type |
| Nature's Favour | Flora spreads twice as many Wildwood Wisps to Imprisoned Monsters, and Wisps prioritise Imprisoned Monsters |
| Sacred Flora Wisp Quantity | 10% increased Wildwood Wisps spread by Sacred Flora |
| Rich Soil | Explicit modifiers on Sacred Flora have 50% increased effect |
| Tier 3 Monster Chance | 10% increased chance for Sacred Fauna to be Tier 3 |
| Heart of the Grove | 50% increased chance for Sacred Fauna to be a Boss; Sacred Flora cannot be Normal rarity |
| Bountiful Harvest | Sacred Fauna grant 100% increased Experience; Flora spreads Wisps to 30% increased Monsters |
A quick note on Surpassing Chance, since it confuses people. It can go above 100%. At 115%, you are guaranteed one Sacred Flora and have a 15% chance for an extra one in the same map. Stacking Sacred Flora Chance with Call of the Grove pushes that number up quite far.
PoE 3.30 Harvest Farming Strategy
The core strategic principle for this Harvest farm is time efficiency first. Your hourly profit depends mostly on how many full maps you can finish per hour, not squeezing maximum value out of every single monster or boss. All your decisions — map selection, rolling, rerolling Flora, fighting or skipping bosses — should tie back to this rule.
Pre-run Setup (Before you start mapping)
1. Check current trade rates for Vivid, Wild and Primal Crystallised Lifeforce.
2. Confirm your Arboriculture node matches the most valuable Lifeforce type. This passively tilts your spawn pool toward the colour you want, which is the biggest single choice for boosting baseline profit.
3. Judge your build’s clear speed and survivability to decide your map tier and rarity rule:
Weak or squishy build: stick to white maps. Safe, fast, zero extra risk, acceptable steady Lifeforce income.
Strong build: run magic/rare maps with high item rarity, T16.5 or Tier 17 if you can handle the extra monster power. Testing shows rarity gives a small but consistent uplift to Lifeforce drops.
4. Pick a fast, open map layout (Dunes is the top pick). Avoid maze maps or layouts with heavy backtracking.
Inside the Map
1. Enter the map and move through it normally, searching for Sacred Flora. You do not need to pre-plan wisp paths or save plants for later. Wildwood Wisps have a hard cap on target count, so there is no hidden bonus to delaying activation.
2. When you find a Sacred Flora, click it immediately to open its modifier panel.
3. Evaluate its local explicit modifiers and decide whether to reroll:
Priority good mods: increased Lifeforce quantity, Tier 3 monster spawn chance, extra rare monsters or higher monster density.
Reroll limit: maximum 2–3 attempts per Flora. Stop even if the roll is not perfect. Spamming rerolls burns currency and eats mapping time, which hurts your hourly rate more than a slightly worse Flora roll. Remember Rich Soil makes these explicit mods stronger, so a solid roll becomes even better if you have that Atlas node allocated.
4. Activate the Flora once you accept its mods. Kill the spawned Sacred Fauna and collect Lifeforce drops.
5. Watch for a possible Sacred Specimen spawn instead of regular Flora. This triggers a Harvest boss fight, and here is your major decision:
Kill the boss only if it dies quickly and does not threaten your character. Bosses drop large Lifeforce stacks and can be a nice bonus.
Skip the boss if it is tanky, has dangerous mods, or gets empowered by Wildwood Wisps. You already earned value from activating the Specimen; staying for a long fight slows your whole farm and reduces total maps per hour.
6. Keep exploring the map to find the remaining Sacred Flora. On average you will see roughly three Flora spawns per map.
7. You may choose to take Eldritch altars while moving through the map. Blue altars are the standard choice, red altars work too if your build can manage their penalties. Altars are optional extra loot and not required for Harvest itself.
8. Once all Sacred Flora in the map are dealt with, the map is effectively complete. You can leave immediately, even if there are leftover regular monsters.
Repeat & Inventory Management
Turn in, sell or stash your Lifeforce in bulk between maps. Avoid stopping to sell tiny stacks after every single run; frequent trading breaks your mapping rhythm. Also keep an eye out for bonus drops such as Nightmare maps, which add a reliable extra income stream over many runs.
Harvest Farm Profits
Raw Lifeforce tends to land around 8 to 9 Divine Orbs per hour on its own. On top of that, incidental drops add roughly 2 to 3 Divines, which puts a realistic total near 10 to 12 Divines an hour under normal market conditions. Per-map results sit somewhere between half a Divine and one Divine, but the spread is wide:
Good explicit mods or a Specimen boss can push a single map well above that range.
Poor rolls, or wasting time on a tanky boss, drag it down.
Nightmare maps are a steady side income here. They commonly sell for 50 to 60 chaos each, and over a long session that adds up.
Keep one thing in mind: these numbers move with Lifeforce prices. If Vivid is the expensive colour this week, your Arboriculture pick and your whole session should follow that.
Best Maps for PoE 3.30 Harvest Farming
Harvest can spawn in nearly any map, so your priority is speed and clean movement rather than a single mandatory map.
Dunes is the most commonly recommended option for this farm. It has open space, easy navigation, and no awkward tight corridors that slow down hunting Sacred Flora.
Any fast linear layout works as a backup. Avoid maps with heavy backtracking, maze-like tunnels, or dense monster packs that slow you down unless your build excels at clearing them.
Boss layout is not a big factor for Harvest farming, since Specimen bosses are optional. Your only real goal is to move quickly and spot Sacred Flora as you travel through the map.
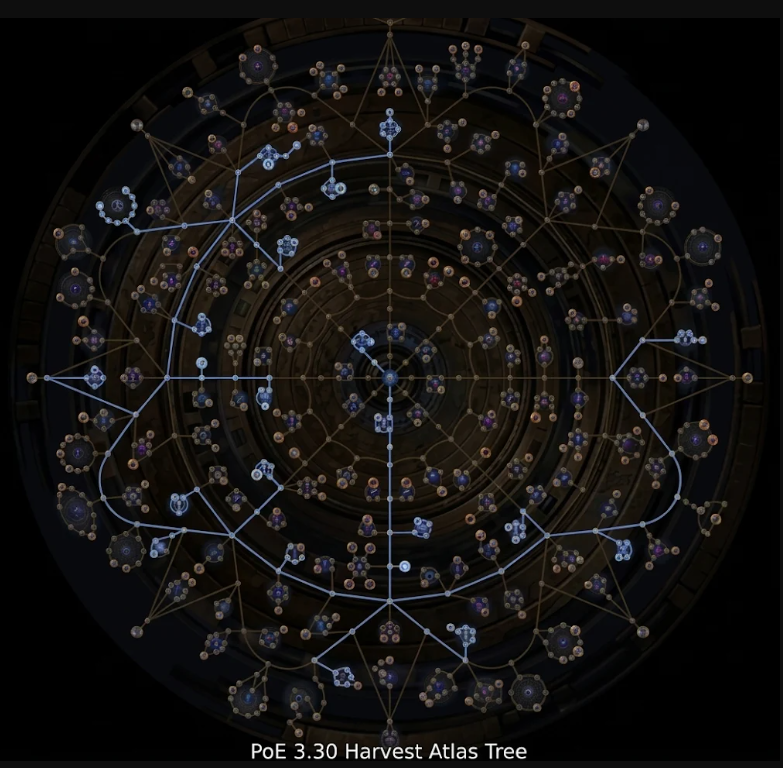
PoE 3.30 Harvest Atlas Tree
For Harvest farming, your first priority is grabbing every dedicated Harvest cluster node. After locking in Harvest nodes, most players add Mirage. Mirage effectively gives you a second map instance, and in 3.30 it covers the whole map instead of a limited zone, which is a strong fit for this strategy. Shrine nodes are optional extras, used only to boost your character’s clear speed and defence; they are not required for Harvest rewards.
1. Take every Harvest cluster node first. They are the backbone of the build; nothing else comes close in value.
2. Add Mirage next. It effectively hands you a second map, and in 3.30 it covers the whole map instead of one small zone, which suits a farm that relies on walking the map anyway.
3. Pick your Arboriculture root to match the Lifeforce that sells best right now. Vivid is often the safe default early on, but verify prices.
4. Grab Shrine nodes only if you want them. They are not required for Harvest income; they just add character power and clear speed.
5. Respec the flexible points as prices shift. The tree is not locked in stone, and one node swap can change your hourly return.