



If you are looking for a reliable currency farm in Path of Exile 3.30 Covens of Umbra, Ritual paired with Mirage is one of the strongest options available. The entire Atlas tree has been rebuilt this patch, scarabs are replaced with Threads, and Ritual itself received a set of rule changes that completely shift how you juice and run the mechanic. This PoE 3.30 Ritual Farm guide breaks down the mechanic rework, strategy workflow, loot table, best map pick, Atlas passive setup, and tips you need to run it consistently.
PoE 3.30 Ritual Farm Guide
Path of Exile 3.30 Ritual shines because Mirage repeats your whole Ritual sequence, while Threads and Blood-Filled Vessels let you scale tribute to massive numbers. The atlas tree build prioritizes Mirage, rare monster rarity and pack size, and Ritual reward weighting, with Unwavering Vision as an optional late-game keystone to hit the 10-thread cap. Jungle Valley is the preferred map for clean layout and isolated boss. Your profit comes mainly from perfect corpses, An Audience with the King, valuable omens, and tribute-sacrifice boss drops. It is not a zero-risk farm, but it is consistent and has very high ceiling when you hit a good Mirage roll.
PoE 3.30 Ritual Changes & Rework
Ritual is no longer the same system from previous leagues, and many of these adjustments define the farm’s core playstyle.
1. Blood-filled Vessel slot rules reworked
You can no longer slap Blood-Filled Vessels onto any map freely. Vessels only work on maps with Ritual Threads applied. You unlock 2 vessel slots at 4+ Ritual Threads, and the full 3 slots once you hit 8 Ritual Threads. This rule is the core of the new juicing system and ties directly into the Unwavering Vision high-thread farm build.
2. Nameless Ritual altar reroll loot balance shift
Extra rerolls after your first reward window do not guarantee An Audience with the King or Waxen Soul anymore. Every post-initial reroll will at least produce one Omen. This lowers the chance of hitting the top reward repeatedly, and makes omens and perfect corpses the more consistent payout from altar rolling.
3. The King of the Mists base drop floor raised
The King in the Mists will always drop an item level 85 or 86 Ritual base type when it spawns. This gives you a reliable high-ilvl base to look out for, instead of random low-tier ritual bases.
4. Blood Shrine adjustments
Blood Shrine of Crows now gives a much larger boost to chaos resistance. Also, you can remove any active Blood Shrine buff manually by right-clicking its buff icon, which stops unwanted shrine modifiers from messing up your map run.
5. Wisp's Blessing buff buffed and smoothed
Wisp's Blessing now gives 50% increased Tribute gain, up from the old 30%. The wisp that grants this buff also teleports far less often. It stays near you longer, so you keep the tribute bonus through more of the ritual encounter without chasing it constantly.
6. Opulent Ritual loot conversion (Quantity → Rarity)
Opulent Rituals no longer add increased Item Quantity to ritual monsters. The devs compensated by raising Item Rarity for these monsters. For this farm, it means you prioritize rarity, pack size and monster copies instead of stacking item quantity.
7. Strong Mirage synergy with Ritual (core league mechanic change)
Mirage turned into a core map mechanic in 3.30. A map with the “Area contains a Mirage” modifier repeats the entire map’s Ritual sequence, including all altars, thread bonuses, vessel spawns and tribute gains. This repeat effect is the main reason the Ritual + Mirage combo becomes such a high-value farm.
PoE 3.30 Ritual Farming Strategy & How to Run
The core idea of the Path of Exile 3.30 Ritual farming strategy is to stack Ritual Threads + Blood-Filled Vessels, and run maps with the Mirage modifier to double your entire ritual loop.
Unwavering Vision Keystone Choice
This is your first important decision, because it changes two separate systems: how many Threads you can fit on a map, and how you gain new Threads for future runs.
✅ Take Unwavering Vision only if both are true:
Your build’s defense can reliably survive max-juiced Ritual bosses and Wisp-scaled encounters
You already have a stockpile of Ritual Threads ready to spend
What it does:
Bypasses the default 8 Thread cap, letting you reach 10 Ritual Threads on one map
Gives +2 extra Ritual Threads to the current map
Hard limit: only one type of Thread can be used per map
75% of any Ritual Threads that drop inside the map turn into Gold instead of adding to your Thread stash
❌ Do NOT take Unwavering Vision if:
You are still low on Threads and actively farming to build your supply
Your build cannot consistently tank high-juice Ritual encounters
Without this keystone:
You cap out at 8 Ritual Threads per map
All Ritual Thread drops you find stay as Threads, letting you slowly build up stock for future high-profit runs
You can mix different Thread types on the same map
Map Prep Step by Step
Move to map preparation after you’ve locked in your keystone choice. Your Thread and Vessel limits depend entirely on that earlier call.
1. Roll your base map
Use Orb of Alchemy and Exalted Orbs to craft an 8-mod rare map. After rolling, use Vaal Orbs, aiming to hit the modifier: Area contains a Mirage. Mirage copies every Ritual altar, tribute gain, Vessel boss and monster pack in the map, which is the backbone of this farm. Mirage is a rare Vaal mod. If the Vaal roll bricks the map or fails to spawn Mirage, save it to re-roll later instead of wasting it immediately.
2. Apply Ritual Threads
Load Threads up to your current cap: 8 normally, or up to 10 if you activated Unwavering Vision. Remember: with Unwavering Vision, all Threads you add must be the same type.
3. Add Blood-Filled Vessels
Add Vessels only up to your unlocked vessel slots:
4+ Ritual Threads = 2 vessel slots
8 Ritual Threads = 3 vessel slots
Vessels massively boost total tribute and spawn extra Ritual bosses. These bosses scale heavily with Wisp buffs and deal very high damage.
Practical tip: Avoid capturing ritual bosses unless your build has top-tier defense. The extra tribute you gain from capture rarely justifies the risk of death and lost progress.
Map Running Rules (Tribute Priority Sequence)
Once the map starts, your #1 rule is tribute preservation. The sequence of altars dictates when you are allowed to spend tribute.
1. Altar 1, Altar 2, Altar 3
Do NOT buy rewards, do NOT reroll rewards here. Any tribute you spend early is tribute you cannot use for the sacrifice boss later. Collect tribute, clear packs, and move on.
2. Altar 4 (final altar, decision point)
This is where you find out if the sacrifice option unlocks.
If sacrifice is available: hold all your tribute. Spend it here to summon the Champion of the King in the Mists. Loot quality and drop chance for high-value rewards scale directly with how much tribute you sink into the sacrifice.
If sacrifice is NOT available: now you are free to spend or reroll tribute on the altar shop rewards, since there is no better outlet for it.
3. Ongoing buff priority during the run
Stack Wisps whenever you can. Wisp’s Blessing gives +50% tribute gain, and this patch’s Wisp update makes them teleport less often, so keeping the buff active is much easier. When Mirage is active, any Delirium you spawn inside the Mirage copy lasts for an extremely long time. Use this to add extra rare monster packs and raise your Item Rarity for better drops.
PoE 3.30 Ritual Farm Loot & Drops
Ritual loot comes in two separate buckets: rewards bought directly from the Nameless Ritual altars using tribute, and drops from the sacrifice boss you summon by spending tribute.
Altar Tribute Rewards
The most sought-after drops are perfect corpses. Examples include Perfect Guardian Turtle, Perfect Forest Tiger, Perfect Runic Skeleton, Perfect Dark Marionette, Perfect Adherent of Zarokh, and Perfect Hulking Miscreation. Prices vary a lot by league and standard, but top-tier perfect corpses are the main consistent payout.
Omen items are another steady source of profit. Omen of Brilliance is one of the more valuable omens you can roll. An Audience with the King is the premium altar reward; it remains highly valuable even after the reroll guarantee was removed. You can also see notable base types, fractured mods, tiered evasion or defensive bases, and standard currency like Divine Orbs, Ancient Orbs, and Divination Cards pop up in the reward window.
Boss Drops
When you sacrifice tribute to summon the boss, possible spawns include Wildwood Abomination, Troll Shaman and more. These bosses drop stacks of corpses, extra omens, and have a good chance to drop An Audience with the King. The more tribute you feed into the sacrifice, the higher the chance for multiple high-value items.
Secondary Drops
While clearing, you also collect Ritual Threads, Blood-Filled Vessels, Divination Cards from strongboxes, shrine rewards, and gold from Thread conversion. Mirage and Delirium stacks on the map add extra rare monster packs, which raise your chance for incidental rare and unique drops.
One thing to manage: imperfect corpses are usually low value. Use your loot filter to hide or de-prioritize them so you do not waste time picking them up.
Best Maps for PoE 3.30 Ritual Farming
Jungle Valley is the top community pick for this Ritual + Mirage farm, and it is the map used in the reference run.
The biggest advantage of Jungle Valley is its separated boss arena. Since the boss is isolated from the main map layout, your Ritual altars roll player-focused modifiers instead of boss-specific modifiers. These player modifiers buff monster rarity and pack size, which directly improve your Ritual loot. The layout is also open, easy to navigate, and works well when you run the Mirage backwards on the return pass.
You can technically run almost any map with the “Area contains a Mirage” modifier, but layouts with long backtracking, cramped rooms, or bosses that spawn in the main path hurt your clear speed and altar modifier pool.
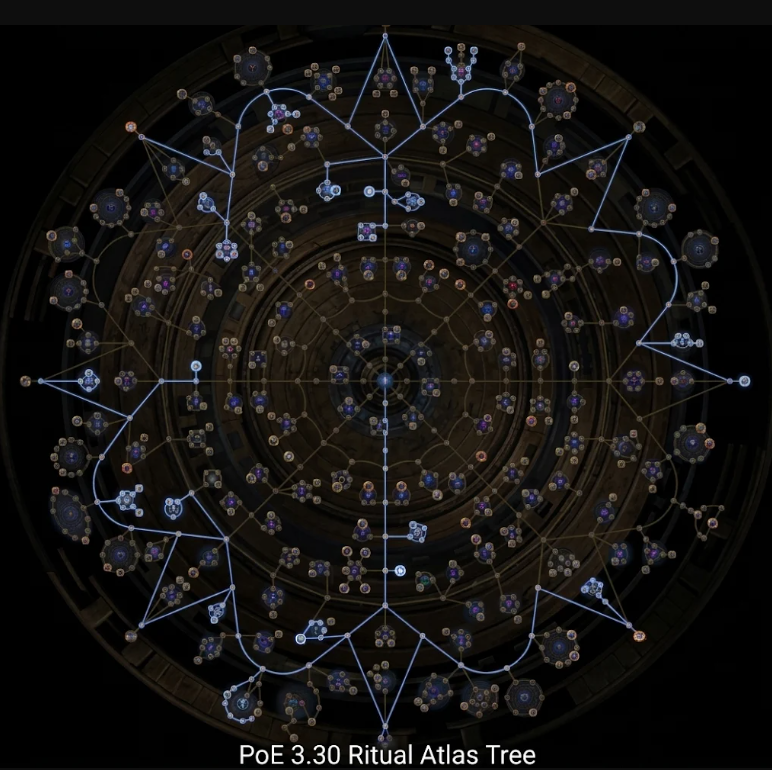
PoE 3.30 Ritual Atlas Tree
The 3.30 Atlas tree is fully reworked, starting from the center and branching outward, with a total of 150 Atlas passive points. Scarab clusters are gone, replaced entirely by Thread clusters. Delve and Heist atlas clusters were removed. This Ritual tree is built specifically for the Mirage-Ritual combo, not generic mapping or unique farming.
Core Tree Choices
Ritual cluster: Take all Ritual-specific notable nodes. Grab the node that increases prefix weight over suffix for Ritual rewards. Skip nodes that reward extra splinter stack size or extra Blood-Filled Vessel drops if you plan to use Vessels regularly, because those bonuses do not apply while Vessels are active.
Mirage nodes: Max out Mirage spawn chance, mirrored rare monsters, duplicated rare monsters, Mirage pack size, and Mirage effect scaling. This is the core synergy that doubles your Ritual run.
Rare monster scaling: Pick nodes that add extra mods to rare monsters, increased rare pack size, and rare monster rarity bonuses. Skip nodes that add extra magic monsters, as normal and magic monsters cannot drop the highest-value loot.
Shrine and Rogue Exile small nodes: Grab the extra shrine and extra Rogue Exile nodes for extra monster density and buffs.
Delirium optional branch: Some runners add Delirium chance and Delirium pack size nodes as a secondary mechanic. Delirium stacks add more monsters and extra loot on top of Ritual, though Delirium no longer gives Item Quantity, only rarity compensation.
Keystone: Unwavering Vision
This is the make-or-break keystone for the high-thread version of the farm.
With Unwavering Vision allocated: You can only apply one Thread type to your maps. 75% of Threads found convert to Gold, but maps with Threads get +2 extra Threads that ignore the 8 Thread cap. This lets you hit 10 Ritual Threads for maximum Vessel slots and tribute scaling. Use this only once your build can comfortably handle dense, juiced maps.
Without Unwavering Vision: You collect far more Ritual Threads from maps. This is the starter setup. Farm Threads first, save them, then swap into Unwavering Vision later for 10-thread juice runs.
Nodes to Skip
Skip Blind Allegiance if you are chasing this tribute-focused playstyle. Blind Allegiance leans into unidentified rewards and tear drops, which conflicts with the consistent altar purchase strategy. Also skip heavy unique-focused nodes; this farm’s profit comes from corpses, omens, and tribute rewards, not random unique drops.
Extra Strategy Notes & Common Mistakes
Build requirement check: This farm spawns huge monster packs, especially with Mirage + three Vessels + wisp buffs. You need decent defenses or very fast clear speed. If you die repeatedly, drop from 10 Threads down to 4–6 Threads and remove Unwavering Vision temporarily.
Wisp management: Wisp’s Blessing is a huge tribute buff, but wisps also make ritual bosses much harder. You can choose to skip wisp nodes if the extra boss danger is too punishing.
Do not force sacrifice: The sacrifice option does not spawn every run. If it does not appear, just buy the best available altar rewards and move on. Trying to force it will waste maps and Threads.
Map mod risk: Some extra map modifiers from 8-mod rolls can be deadly, such as extra rare monster damage or chaos damage mods. Keep an eye on chaos resistance; Blood Shrine of Crows helps cover this gap.
Thread sustain: When you are not running Unwavering Vision, each map gives you a steady stream of Ritual Threads to stockpile. Treat Threads as your farm’s fuel.