Path of Exile 2's 0.5 patch brought one of the biggest reworks the game has seen, and Delirium sits right at the heart of it. What used to be a forgettable fog-machine mechanic with a guy screaming offscreen has been rebuilt into a layered, story-driven, and genuinely terrifying piece of endgame content. The rewards are absurd, the difficulty is brutal, and the depth deserves a proper walkthrough.
PoE 2 0.5 Delirium Guide (Loathsome Mire, Annoint, Tablets, Atlas Tree & Farming Strats)
Delirium received a major redesign in 0.5 that pushed it from a flat side mechanic into a multi-layered endgame system with its own story, visuals, and pinnacle boss. The fog no longer blocks the center of your screen the way it used to, new colorful glass shards now light up your maps, and Simulacrum has been trimmed from 15 waves down to 7. It can easily be the hardest content in the entire game by a wide margin, but the payoff matches the pain, with items like the Raven Staff from the pinnacle boss going for 25-30 divines.
With that overview in mind, here is a full walkthrough of every Delirium layer, the Loathsome Mire, anoints, tablets, the Atlas tree, and the farming strategies that actually print currency.
Why Farm Delirium in PoE 2 0.5?
Among the league mechanics available (Breach, Abyss, Ritual, Expedition, Delirium), Delirium has quietly become one of the most profitable picks if your build can handle it.
Liquid emotions drop from delirious monsters and can be installed onto amulets for powerful anoints like Storm Breaker. Rare ones such as Isolation sit around 10 divines, and Suffering goes for roughly 3 divines.
Simulacrum Splinters sell well, often more than 1 exalt each, with a full Simulacrum (300 splinters) trading for around 6 divines.
Megalomaniac jewels drop here, granting two random notable passives with thousands of possible combinations.
The Raven staff from the final boss, worth somewhere around 25 to 30 divines, plus a unique amethyst ring and high item-level gear.
General loot flooding. The fog raises monster rarity and quantity, so plenty of players pull more Perfect Exalted Orbs and Divine Orbs from Delirium than from every other mechanic combined.
Raw currency density is huge. Players report pulling more Perfect Exalted Orbs and Divine Orbs from Delirium than every other mechanic combined.
One player funded an entire Mageblood from this mechanic alone, clearing roughly 20 divines per hour over a four-hour session. It is the toughest content in the game, but it is also the most rewarding, so a strong build pays off here more than anywhere else.
How Does Delirium Work in PoE 2 0.5?
Once you reach the Ziggurat Refuge endgame hub, head left to find the Withered Willow location. There you'll meet an NPC and a giant tree holding a feather. Progressing the short quest line unlocks the Counter of Madness, which is where you instill liquid emotions onto amulets.
A few quick notes on instilling:
Every amulet can hold only one instillment, and overriding it destroys the previous one.
Recipes can be checked in-game by hovering notables and pressing Alt (or holding right stick on controller).
Use an external tool like the Mobalytics or maxroll instilling calculator before committing premium emotions like Isolation, Despair, or Guilt.
Lower-tier emotions can be combined at the reforging bench, three of the same type producing one higher-tier emotion.
Four Main Delirium Mechanics
Now that the basics are out of the way, here are the four content layers you'll be running.
1. Regular Delirium Mirrors
Regular mirrors appear randomly on maps, can be forced by using Delirium tablets, or are guaranteed by the atlas modifier. When you zone in, the mirror sits at the portal waiting to be tapped.
The fog increases monster damage slightly and monster tankiness substantially, scaling from 0% to 100% deliriousness as you push toward the boss arena. The actual goal is to kill the map boss while the fog is still active. A useful cheat code: clear the map first, walk to the boss without engaging, return to the mirror, activate it, then rush back and finish the boss.
While inside the fog, you'll encounter colored mirror shards that act as fracturing mirrors:
Green/teal - Monster effectiveness, mostly making things harder.
Purple - Quantity or rarity, also adds difficulty.
Red - Spawns bosses (Kosis, Omnophobia, or sends you to the Loathsome Mire). These are the main source of liquid emotions.
Blue - Only appears if you've allocated "I See Your True Nature" on the atlas tree, adds an extra boss with extra loot.
Note that Simulacrum Splinters from fracturing mirrors only show up in your inventory once the Delirium encounter ends.
2. Grand Mirrors
When you kill a map boss under Delirium fog, a Grand Mirror has a chance to spawn on an adjacent map, marked with a pillar icon on the atlas. Inside that map, a giant pillar at the boss arena summons a reflection of the map boss, forcing you to fight two bosses at once.
Completing a Grand Mirror map covers a section of nearby maps in permanent Delirium fog. These maps have no timer, the deliriousness stays active the entire time, and each map cleared adds to your cloud's overall deliriousness percentage (10% per boss kill, more from rare monsters). Once you hit 100%, the Simulacrum unlocks.
Two important things about these spread maps:
Pushing past 100% all the way up to 200% deliriousness produces some of the hardest content in the game. Rare monsters can feel tougher than pinnacle bosses.
Once you have 300 spare splinters, you can right-click a created Simulacrum and apply it to any other map in the cloud, turning that map into another Simulacrum.
3. Simulacrum
The Simulacrum is the third layer and arguably the easiest of the three once you're geared. It requires a map (not a tablet) to run, gives you only one portal, and any map mods like ignited ground carry into the fight. Four or five mod maps work if you're still warming up, six mod maps are ideal, and a Doryani's Science scarab grants an extra revival for two portals total.
The format is seven waves of monsters (down from 15), with Tang Mazu taunting you by showing how various campaign NPCs died and blaming you for it. Different characters apparently get different dialogue, which is a nice replay hook.
Tips for the encounter:
A six-mod map sometimes drops two boss keys instead of one. Corrupted eight-mod maps may push that even higher.
Don't leave loot on the ground before starting, anything dropped gets deleted when the encounter begins.
The main payoff is the Raven's Reflection boss key, plus jackpot drops like Voices, Split Personality, and Megalomaniacs.
Positioning matters more than DPS. Stand still, spin around enemies, and reposition when monsters jump on you so you don't get perma-stunned.
4. The Pinnacle Boss
For your first run, the quest gives you a boss key automatically. After that, every Simulacrum drops a Raven's Reflection, which you bring back to the Withered Willow and slot into the mirror.
The fight takes place in the Paracosm, the area looks fantastic, and the Raven Trickster has roughly 7 million HP across at least two phases. He's noticeably easier than Bodok. Drops include a unique amethyst ring (item level 81 from quest, 82 from farmed runs), high item level rares with good mods, and the chance for the Raven Staff at around 25-30 divines.
Loathsome Mire & How To Complete
Occasionally when you pop a red mirror shard, instead of Kosis or Omnophobia you'll get sent to the Loathsome Mire. It's a gigantic sprawling maze with blood-red ground, modeled directly on PoE 1's Infinite Hunger arena, and it's very easy to get lost in.
Two survival rules carry you through:
Follow the blood. Stop for a second when you spawn and check which direction the blood is flowing. Walk that direction and you'll naturally find your way along the platforms toward the exit.
Stay off the river. Standing in the flowing blood applies a stacking chaos and physical damage-over-time debuff that escalates quickly.
The maze constantly spawns monsters and is easy to die in, so don't sightsee. Push along the platforms until you reach a large central platform with an interactable altar. The altar drops a unique amulet with two pre-allocated anoints.
Most rolls will be mediocre. Lightning Conduit is common, but premium combinations like Eldritch Wheel can be worth a divine or more. The mana stacker combo (lucky lightning hits with bonus mana/life/energy shield) is one of the better outcomes. Grab the amulet, sell or craft on it, and get out.
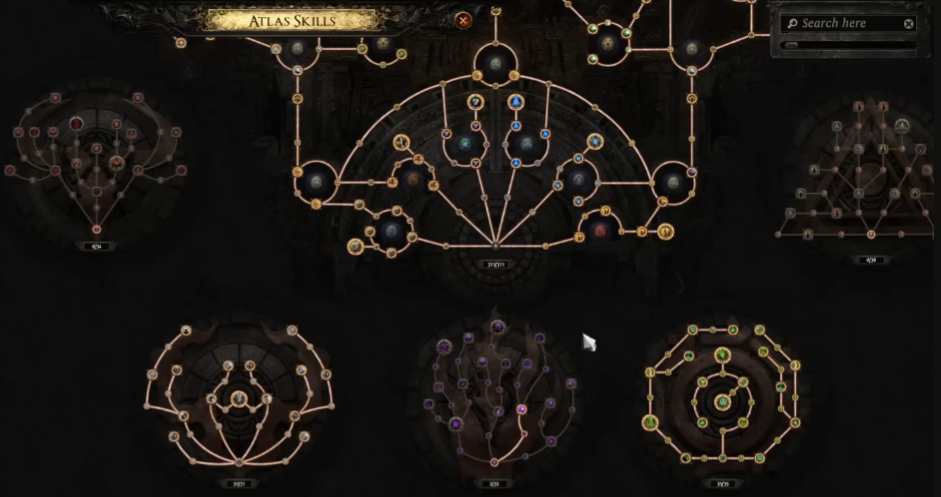
Delirium Atlas Tree Priorities
You can't respec your atlas tree right now, so be careful which direction you commit to. Here are the most important nodes:
"Is This About Me or You?" - Required for Simulacrum Splinters to drop in level 75+ areas at all. You can't allocate it until your first quest Simulacrum is complete.
"You Can't Scare Me Anymore" - Enables Potent Liquid Melancholy, Ferocity, and Contempt to drop from unique monsters. Without it, those premium emotions simply won't appear.
"I See Your True Nature" - Adds a new color of fracturing mirror that spawns an extra boss with extra loot.
Slower Delirium Fog Dissipation (30%) - Probably the first node to grab. Once you have this, fog longevity is rarely a problem afterward.
Tablets Have Double Effect in Grand Mirror Areas - Massive. Tablets juice your maps with extra Abyss, Breach, Ritual, and other bonuses, and doubling them inside Grand Mirror zones is excellent value.
Megalomaniac 10% Chance for Three Notables - Premium Megalomaniacs are worth serious currency.
Recurring Nightmares Keystone Choice:
Spreads to +4 Maps - Guaranteed, predictable, beginner-friendly.
50% chance of additional map + 25% chance to each connected map — Gamble option, can roll into massive fog clouds.
If you're new to the mechanic, take the guaranteed option. Note that some players have reported issues where Grand Mirrors spreading into hub areas like the Monastery of the Keepers can break those locations, so spawn them carefully.
Best Delirium Tablet Mods
Stack these on your tablets for maximum reward:
Increased Stack Size of Simulacrum Splinters - Probably the single best mod. Running this on three tablets can nearly double your splinter haul.
Increased Mirror Shards - More fracturing mirrors means more bosses, more splinters, and more Loathsome Mire opportunities.
Extra Fracturing Mirrors - Same logic as above.
Quantity of Items by Map Bosses (on Overseer tablets) - Pairs well with boss-rushing.
Monster Effectiveness, Rarity, Quantity - Generic but always good.
You don't need longer-lasting fog mods once you have the 30% slower dissipation node. Skip experience and gold mods, they're the worst options on the table.
Boss-Rush Routine
The core loop is simple: gun straight for the boss, since the fog scales as you run and never blocks boss rushing. Stop only to kill unique and Delirium monsters, pop as many fracturing mirrors as you can, and collect the splinters they drop at the end of the encounter. A common setup is three Delirium tablets plus one Overseer tablet (the fourth slot comes from a city-biome Atlas node), with Doriani's favored over Hilda for the effectiveness and extra modifier slot. Rarity isn't the be-all here; around 57% feels great, and movement speed often does more for your clear.
When you hit a Citadel, Matriarch Hall, or anomaly map, pull your Delirium tablets and swap to way stone drop chance tablets, since that stat correlates to bosses dropping more fragments. Players regularly pull two or three Citadel fragments this way. For anomaly maps, swap to Jado's Spy Craft, specifically the lineage gem node, for the jackpot.
Annoints & Unique Amulets
Liquid emotions are instilled into amulets at the Counter of Madness, and each amulet holds only one instillment, though you can override it. Highlight a notable and press Alt (or hold right stick on controller) to see its recipe; Stripped Defenses, for example, uses disgust, isolation, and disgust in that exact order. Premium instillments cost a fortune, so run an instilling calculator on a tool like Max Roll before committing. Drop three matching emotions into the reforging bench to upgrade them a tier so low-tier stacks never go to waste, and save ancient liquid emotions for Time-Lost jewels, where they roll powerful mods like increased maximum energy shield. Beyond the Mire amulet, red mirror shards route you to the special area where new two-anoint Delirium amulets drop, and a jackpot roll there can land meta or spirit skills worth multiple divines.
Profitable Delirium Strategy
Here's the strat one player used to fund a Mageblood, pulling roughly 20 divines per hour over 4.5 hours:
The Loop: Run Delirium maps and boss-rush through them. When you hit a Citadel, Matriarch Halls, or anomaly map, swap to a different tablet setup.
Mapping Tablets:
1 Delirium tablet with stack size of splinters + effectiveness
1 Delirium tablet with chance for more unique bosses
1 Overseer tablet
1 from the atlas tree (city biomes only)
Citadel / Pinnacle Setup: Remove Delirium tablets and slot in tablets with way stone drop chance. This makes the boss drop more fragments, often 2-3 per Citadel. Add one Overseer with quantity of items from bosses if possible.
Atlas Scarab: Doryani's Science is preferred over Hilda for the effectiveness and the extra prefix/suffix modifier. For anomaly maps, swap to Jado's Spy Craft for the increased chance to find lineage gems.
Rarity: Surprisingly not required. 57% rarity has felt fine, raw movement speed (Quicksilver on Mageblood) and clear speed have produced better returns.
Boss Rushing Works: Delirium doesn't punish you for skipping the map. The deliriousness scales as you push toward the boss arena, so charging straight in works perfectly.
More Extra Tips
Splinters drop after the encounter ends. You won't see them on the ground during the fog, they're added to your total when Delirium concludes.
Other league mechanics pause the Delirium timer, except Essences, Rogue Exiles, and the Runestone boss for some reason.
Don't stack Delirium tablets on already-delirious Grand Mirror maps. The fog is already there, you'd be wasting tablets that could roll other content.
Simulacrum has a known bug where monsters can spawn outside the arena and lock the encounter. Re-entering with a new map doesn't always restore the rewards.
Spirits work passively in Simulacrum and Delirium fog, which is a small but nice bonus.
Liquid emotions can also craft Time-Lost Jewels, including mods like increased maximum energy shield.
The 0.5 Delirium rework took what was easily the worst league mechanic in PoE 2 and turned it into one of the most fun, deepest, and most rewarding pieces of endgame content available. The hallway of death in Simulacrum is gone, the boss fight is genuinely cinematic, and the reward density (Raven Staffs, Megalomaniacs, Voices, Split Personality jewels, and stacks of divines) puts it near the top of the profitability charts for anyone with a strong enough build.
If your character can survive the fog at 100%+ deliriousness, Delirium is genuinely one of the best ways to print currency this patch. Just remember: gear up first, scale slowly into the Grand Mirror cloud, and don't push 200% deliriousness until you're absolutely ready for it.