Path of Exile 2 0.5 Return of the Ancients is set to be the biggest expansion the game has ever received, bringing the Runes of Aldur league, massive new content, and sweeping system changes. With the reveal livestream landing on May 7th and the actual release set for May 29th, the community already has plenty to chew on thanks to a steady trickle of teasers pointing toward a massive endgame overhaul. Since the Atlas system was openly called out by game director Jonathan Rogers as something that "sucks" and needs reinvention, the 0.5 patch is expected to completely redesign how players approach the infinite Atlas, passive tree progression, and map farming.
To help you prepare for launch day, this guide compiles everything we currently know about the 0.5 Atlas changes, how they affect map progression, and how to rush your Atlas passive points during the opening week of the league. More detailed tree builds and farming strategies for specific goals will be added here as new information drops, so bookmark the page and check back often.
Updated on June 9th based on the in-game testing after the 0.5 update release!
PoE 2 0.5 Best Atlas Passive Skill Tree Guide & Farming Strats
Before diving into the specific farming routes, it's worth setting the stage for what Path of Exile 2's endgame looks like heading into 0.5. The infinite Atlas remains the primary endgame vehicle, but the 0.4 version left a lot to be desired: aimless map traversal, a weak passive tree, and pinnacle bosses that felt like copy-pasted leftovers from PoE 1. With Return of the Ancients, GGG is doubling down on fixing these exact pain points.
The following sections cover the confirmed and expected Atlas changes, how they reshape farming priorities, and the fastest way to stack Atlas points during the early league rush.
Atlas and Map Changes in PoE 2 0.5 Return of the Ancients
Now that the teaser trailers have painted a clearer picture, let's look at the specific systems getting reworked in this patch.
Completely Reinvented Atlas Passive Tree
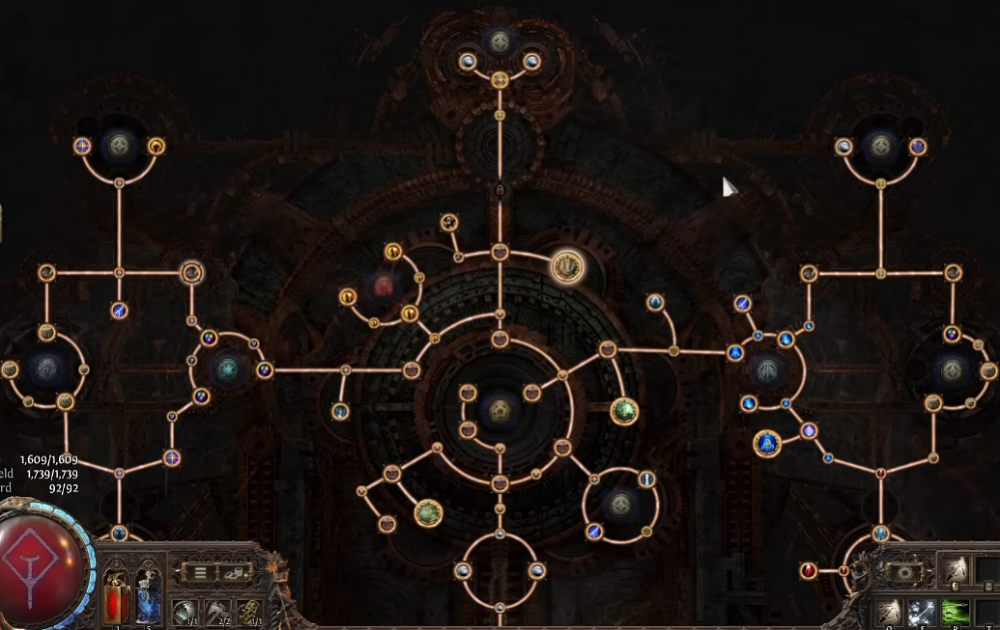
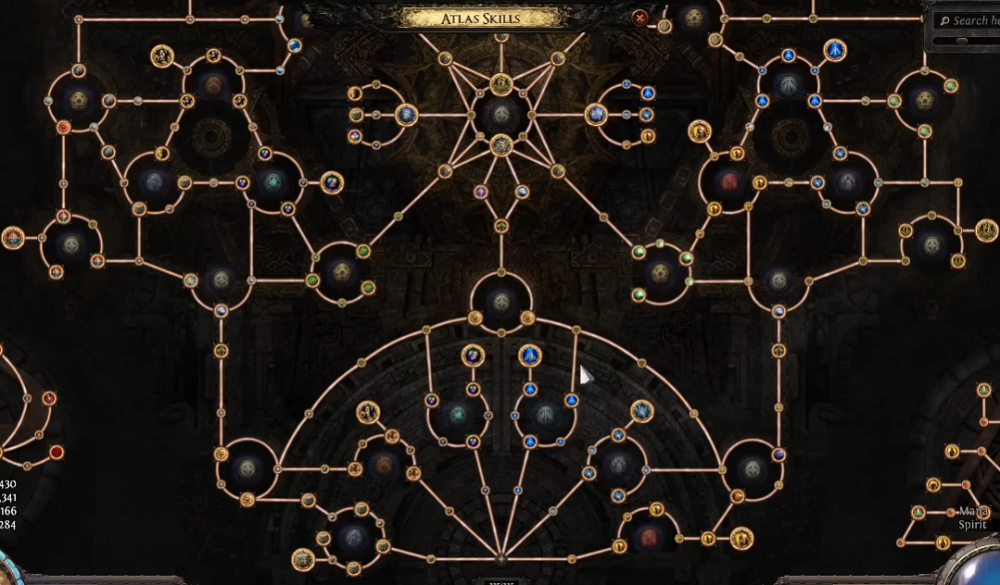
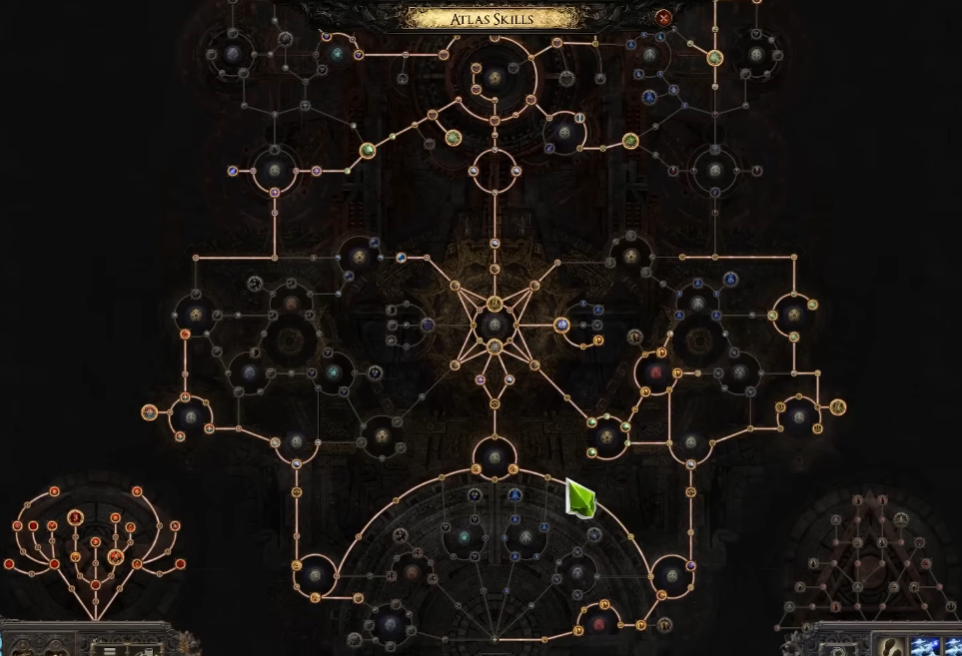
The biggest confirmed change is the full redesign of the Atlas passive tree. Jonathan Rogers flat-out stated that the new system isn't even in the same universe as the current one. That wording suggests the replacement won't simply mimic PoE 1's tree — expect something structurally different, possibly tied directly to biome progression or to the new Ancients meta layer.
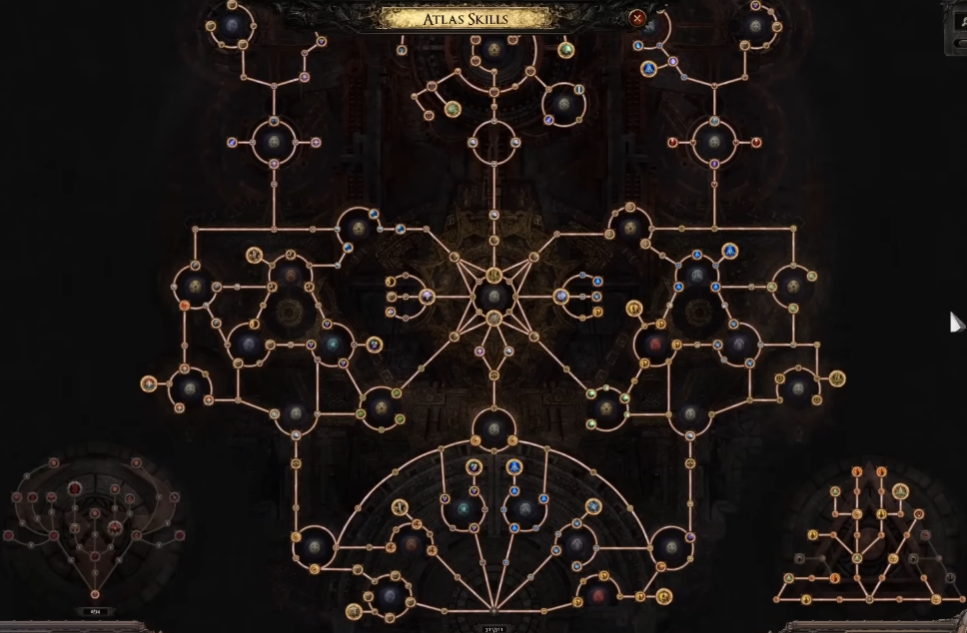
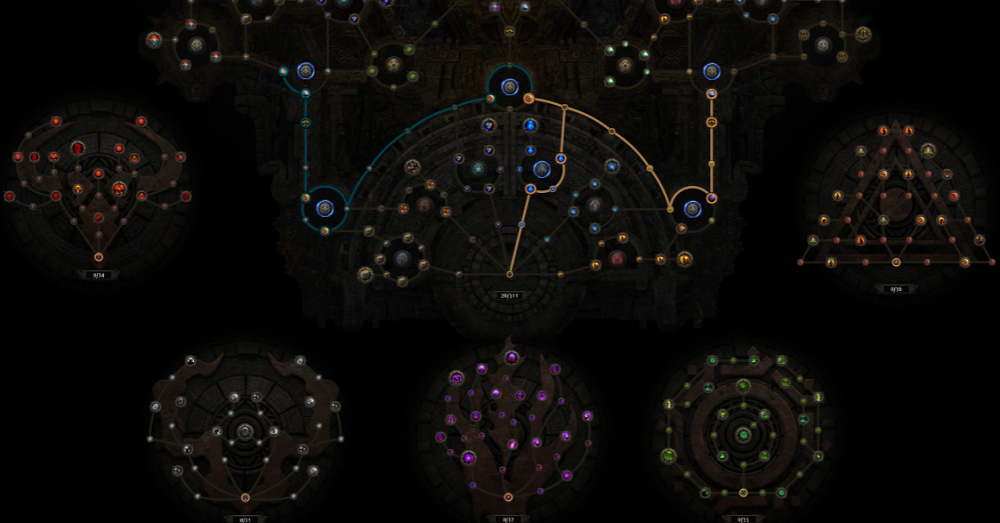
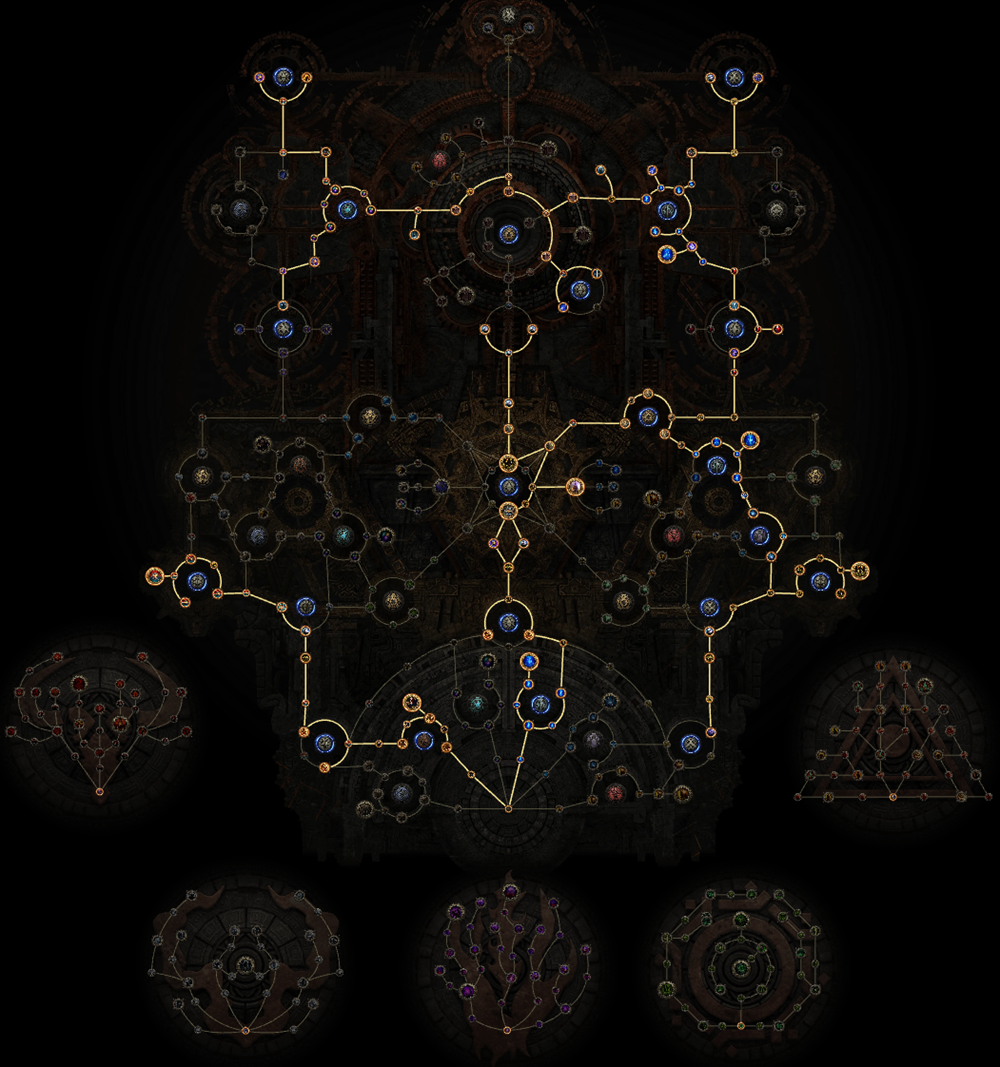
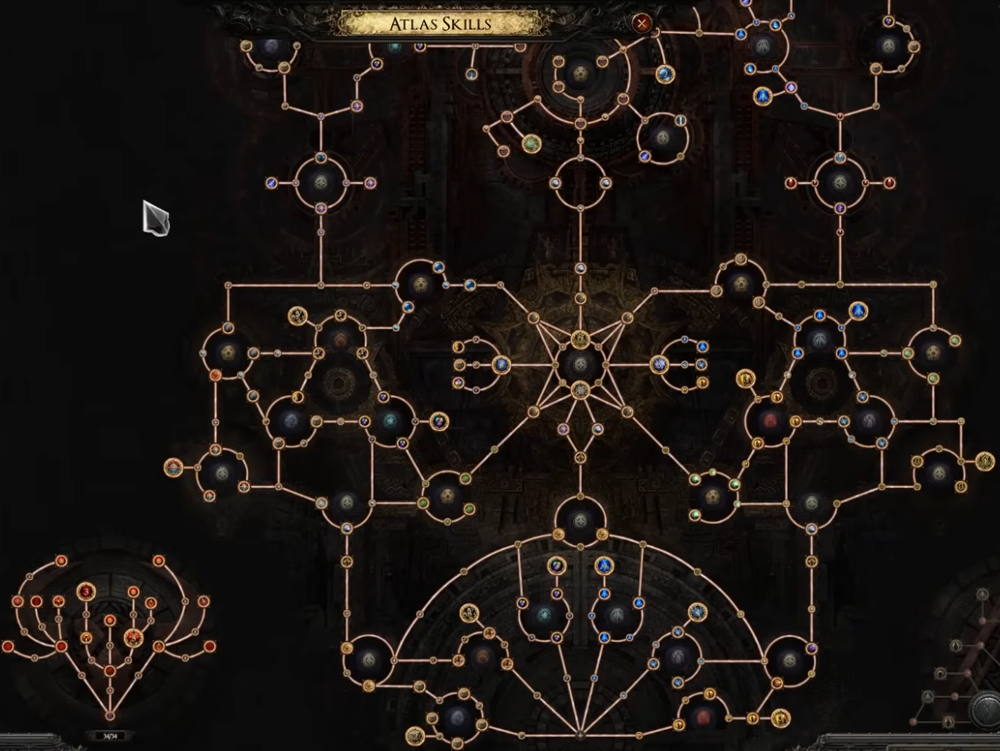
A particularly important note for league launch: in 0.5 you can fill out every single node on your Atlas skill tree, for a total of 311 Atlas passive points. According to GGG's own estimates, completing the entire tree should take roughly three to six hours of dedicated mapping for fast players, and longer for slower ones. This fundamentally changes how you should approach the early league - instead of carefully cherry-picking nodes, the optimal play is now to rush all of them as fast as possible.
Key expectations for the new tree:
Layered progression. Leaks and community analysis point to a central Atlas tree surrounded by smaller sub-trees connected to specific league mechanics (Breach, Expedition, Delirium, Ritual, Abyss, and so on). Completing content inside a mechanic may grow that mechanic's own tree branch.
More impactful nodes. The current tree is stuffed with filler nodes that provide barely any value. The 0.5 redesign is expected to replace weak percentages with nodes that meaningfully change how maps play out.
Real build agency. Instead of every farmer picking roughly the same path, the new tree should let you specialize into specific farming identities: currency, bossing, mechanic-focused loot, or raw map juicing.
League Mechanic Polish Across the Board
Every teaser released so far ties back to a specific league mechanic. Here is what they point toward:
Return of the Ancients (main teaser): A towering Ancient rises from the earth near what appears to be an evolved Burning Monolith. This hints at a new endgame meta progression layer where defeating the Arbiter of Ash triggers the arrival of the Ancients, who steal its power and become the next pinnacle target.
Uncover the Truth: Likely an Expedition rework, possibly tied to Kalguur lore or a new ancient-themed sub-mechanic. The figure carrying a blade in this teaser also strongly suggests swords are finally being added as a weapon base.
Stop the Madness: A Delirium overhaul featuring Elder Maddox. The fractured mirror and trapped figure imagery strongly suggests a new encounter type, possibly tying into Tangmazu lore similar to PoE 1's Act 4.
Now It Is Our Time: A Breach rework featuring Alva and the monastery monks performing a ritual involving the Genesis tree. This points toward Hive and Fortress Breach encounters coming to PoE 2, plus a possible Chayula pinnacle fight. The Breach rework is also confirmed to add a Breach crafting skill tree that can print rare rings, amulets, and belts, a potentially huge currency engine since rings and amulets are typically the most valuable gear pieces in the game.
Pinnacle Boss Upgrades
Rogers confirmed that King in the Mists and Olroth as current pinnacles are "a bit sad" and copy-pasted from PoE 1. Expect new, more epic pinnacle encounters for each league mechanic in 0.5, giving Atlas farmers more meaningful chase bosses.
Possible Quality of Life Fixes
Based on heavy community feedback, several additional changes are likely in the pipeline:
Removal or rework of the Vaal Orb portal penalty that reduces you to one portal on fully juiced maps.
Changes to Item Rarity on gear so it no longer applies to currency drops, reducing the forced meta-build pressure.
A defensive layer pass to bring Armour and Evasion closer in line with Energy Shield.
Performance improvements for heavily juiced maps, especially Abyss encounters.
How These Changes Affect Atlas Progression & Farming
With the structural changes laid out, here is how your moment-to-moment Atlas experience should shift in 0.5.
Farming Becomes Direction-Driven Instead of Aimless
In 0.4, once you finished the campaign you were dropped into the infinite Atlas with no real goal beyond "find citadels and cleanse corruption." The 0.5 design appears to replace that void with biome-based meta progression. Completing a biome likely acts similar to map completion in PoE 1 — it pushes the entire Atlas forward toward the Ancients endgame, rewarding steady map clearing with tangible upgrades.
Mechanic Specialization Becomes a Real Strategy
If the multi-tree theory holds up, players will finally be able to commit to a specific farming identity. A Breach farmer can pour points into the Breach sub-tree for bigger hands, more splinters, and better boss access. An Expedition runner can do the same for Runic Monsters and Logbooks. This is a huge shift from 0.4, where most Atlas trees ended up looking nearly identical.
This also has a critical implication for league start: commit to one mechanic and stay on it. Hopping from Abyss to Breach to Ritual to Expedition wastes time, because each jump means re-grinding sub-tree points before that mechanic is fully juiced. Stacking all your Atlas points into one mechanic and spamming maps with it will out-earn any "sampler platter" approach in the first few days.
Map Juicing Gets Safer and More Rewarding
Assuming the Vaal Orb one-portal rule gets removed or softened, fully corrupting your maps for maximum pack size and rarity becomes far less punishing. Combined with Item Rarity being reworked off currency, this means casual mappers can finally juice maps without feeling locked out of currency drops reserved for meta builds.
New Reasons to Leave the Map
Several of the expected mechanic reworks (especially Delve-style content and evolved Delirium) may pull you out of regular maps for specialized activities. This gives farmers variety between juiced map runs and mechanic-specific instances, breaking up the monotony that plagued 0.4.
BTW, don't have much for grinding, fast to buy cheap PoE 2 0.5 currency items at AOEAH.COM, coupon "AAA" helps you save the most!
PoE 2 0.5 Atlas Passive Tree Fast Progression (311 Atlas Point & Map Unlock at Early League)
The 0.5 Atlas tree contains a total of 311 passive points, and yes - it is fully possible to unlock every single one of them on day one. Players have already proven the route, and if your build is strong enough to handle the new pinnacle boss, the entire process only takes a few hours. The trick is that the most efficient path to a maxed-out Atlas tree is not slow grinding through random maps. It's repeatedly farming the new pinnacle encounter, the Arbiter of Divinity, in the Origin Tower.
Step 1: Reach and Defeat the Arbiter of Divinity
The Arbiter of Divinity is the brand-new pinnacle boss for 0.5, fought inside the Origin Tower. To reach him the first time, you need to clear two prerequisite encounters:
The Patriarch Hall
The Matriarch Hall
Once both halls are completed, you can enter the Origin Tower and face the Arbiter. Defeating him for the first time will trigger the maps in the center of the fortress to be automatically cleared, kicking off the main Atlas point payout.
Step 2: Repeat the Arbiter Fight for Massive Point Drops
This is the key insight most players miss: the Arbiter encounter is fully repeatable. After your first kill, head outside the fortress and look for orange beams in the surrounding area, those beams mark the locations of additional Patriarch Halls and Matriarch Halls that have respawned. Run through them again, and on each clear you will receive another Origin Cradle and Origin Spark (the same items you used the first time around).
To reach these halls as quickly as possible, use a Grand Project Tablet to compress travel time and skip dead space between objectives. This is the biggest single time-saver in the rotation.
Step 3: Refeed the Reactor and Re-fight the Arbiter
Place the Origin Cradle and Origin Spark back into the reactor exactly the way you did during your first run. This re-spawns the Arbiter of Divinity, and a second kill is worth roughly 30 to 50 Atlas passive points instantly. Rinse and repeat: every cycle of "find halls → collect Cradle and Spark → reactor → Arbiter" delivers another 30–50 points in one sitting.
If your build can reliably one-phase or comfortably handle the Arbiter, you can reasonably unlock all 311 Atlas points within a single day of play. This is the fastest known route to a fully maxed Atlas tree on league launch.
Step 4: Prerequisite - Map Sustain First
None of the above works if you can't keep waystones in your inventory. Before you start hunting Halls and the Arbiter, your first 5–8 Atlas points should still go into nodes that increase higher-tier waystone drops and reduce map tier downgrades. Running out of maps in the first hours of the league is the single biggest reason players stall out. Sustain first, then start the Arbiter loop.
Step 5: Pack Size and Magic Monster Density
Once your map pool is healthy and you're cycling Arbiters, layer in pack size, extra magic monsters, and extra rare monsters. These nodes amplify everything else you do, both inside the Halls and during regular mapping between cycles.
Step 6: Pick One League Mechanic to Specialize In
While you're rotating through Halls, you should also start filling out a single mechanic sub-tree. Don't spread thin. Early-league recommendations:
Breach is the strongest pick for raw currency and splinter farming, especially with the new Breach crafting tree adding rare ring and amulet printing.
Expedition is the safest pick for deterministic crafting currency and gear bases.
Ritual offers guaranteed currency drops and predictable returns, ideal for new players.
Abyss remains the best-tuned mechanic from 0.4 and should continue to perform well if other mechanics reach parity.
Step 7: Unlock the Corruption and Citadel Path
Once your specialization branch is complete, pick up the nodes that boost corrupted area spawns, citadel progress, and Burning Monolith activity. These feed directly into the new Ancients meta progression layer, which is exactly the same layer the Arbiter of Divinity sits at the center of, so investing here amplifies your repeat-farming returns.
Step 8: Luxury Nodes Last
Finish off with quantity nodes, extra currency nodes, and waystone drop bonuses. These are multipliers on top of an already-functional farming loop, not the foundation of one. By the time you reach this stage, you should be deep into the 311-point total and converting your fully maxed tree into pure currency throughput.
PoE 2 0.5 Best Atlas Tree & Farm Strategies for Trading Mode
Below, we are going to update the most effective farming strategies for the trading mode in Return of the Ancients expansion and the Runes of Aldur league:
Best Early Game Atlas Setup & Farming Strategy
Because the entire endgame is being rebuilt from scratch, no one - content creators included - has a polished, node-by-node Atlas tree to copy on day one. What follows is the best educated game plan for the first 24–48 hours of league launch, based on what GGG has confirmed plus carry-over logic from 0.4. The core idea is simple: rush the campaign, rush every Atlas point, then commit to one mechanic for instant returns before high-end items spike in price.
Day One Priority: Campaign → Full Atlas Tree Rush
Plan on roughly 4–5 hours to clear the campaign at a fast pace (longer if launch-day server issues hit, which is a near-guarantee). The moment you exit the campaign, do not stop to dabble in mechanics — go straight into the main Atlas storyline and rush every main Atlas point you can reach, the same way Lumak's Atlas points worked previously. Because the 0.5 tree lets you fill every node and that takes about 3–6 hours, every minute spent farming a mechanic before your tree is full means losing the free juice those passives would have provided. Get the foundation in first; juice the maps second.
First Mechanic Pick: Abyss
Out of the five league mechanics on the table at launch: Abyss, Breach, Ritual, Expedition, and Temple (Trial of the Sekhemas / Temple of Chaos) - Abyss is the recommended day-one pick. The reasoning:
Crafting is still strong. Abyss crafting via the Soldier was not nerfed, and it remains one of the best ways to make competitive gear early in the league.
Dense rare monster spawns. Abyss naturally pumps out rare packs, which directly feeds raw currency and gear drops.
Day-one rare gear actually sells. Tier 4–5 rare drops are normally junk, but on day one when most players have nothing, these pieces move quickly at 1c–5c apiece. Spamming your shop with anything decent is genuinely lucrative when other players are desperate for any upgrade.
Abyss may not end up being the single best long-term farm, but it has the best balance of crafting, rare density, currency, and gear drops for the opening hours.
Strong Secondary: Breach (Day Two Candidate)
Breach is the most interesting wild card thanks to its rework. The new Breach crafting skill tree lets you print rare rings, amulets, and belts. Belts don't matter much (rare belts are typically weak), but rings and amulets are usually the most expensive non-weapon slots in the game. If the printing rates are reasonable, Breach could rival or beat Abyss for currency conversion.
The tradeoff is that Breach historically has fewer rare monsters than Abyss, so raw currency and gear-drop volume tends to be lower. The premium ring/amulet output may close that gap, but it's unproven. A reasonable plan is to start on Abyss, then sample Breach on day two once your Atlas tree is full and you have a baseline of currency.
Mechanics to Skip or Delay on Day One
Ritual - The big appeal of Ritual is omen drops, but omens aren't worth much in the first few days because almost nobody is crafting at scale yet. Guaranteed uniques sound nice, but unique generosity rates are unknown, and most uniques in PoE are junk anyway. Skip for now.
Expedition - Currently a personal least-favorite mechanic, and the Ocean Exploration rework is a complete unknown. Unless the loot turns out to be absurd, this is not a day-one pick.
Temple - Even after the snake-strat nerf, Temple can stabilize at around 50 rooms, which still sounds like a solid endgame strategy. The problem is setup time: Temple takes hours upon hours of investment before it pays out, and most rooms will be repeatedly destroyed, so almost nothing gets upgraded early. Day-one returns from Abyss or Breach are far better than slow-cooking a Temple. Revisit this once the league has settled.
Delirium - Traditionally an overlay mechanic stacked on top of other content, not a standalone day-one farm. It will scale extremely well into the league's length thanks to voices, mega-maniacs, and chase items, but those items don't peak in price until weeks in. Also, the new tree allows up to 200% Delirium on a map, and 200% Delirium is brutally tanky content, not realistic to push on a fresh character. Save it for the mid-league.
Why Sticking to One Mechanic Beats Sampling Everything
It's tempting to try Abyss, then Breach, then Ritual, then Delirium, then Expedition just to see what hits. Don't. Once your full Atlas tree is filled out, every Atlas point you have is locked into the mechanic-specific sub-trees you chose. Jumping between mechanics means under-juiced maps for whichever one you're currently running. A fully specialized Abyss spam will out-earn a "tour" of all five mechanics by a wide margin.
Early Profit Habits to Stack on Top
Outside of mechanic farming, a few habits compound your day-one earnings:
Pick up white bases, alt-trans-aug anything with potential, and be deliberate with your crafting currency rather than spamming on bad bases.
List every decent rare you find in the price range of 1c to 5c (or one Exalt for standout pieces). With premium stash tabs, the cost of listing is zero, so spam your shop. Most of the volume you sell on day one is junk-tier rares to players in worse gear than you.
Minimize hideout time. Every minute in the hideout is a minute not generating drops.
Push your map rarity to 100% as early as possible, Abyss's currency output scales hard with rarity, and you can usually hit the 100% rarity threshold by the end of day one.
Long-Term Outlook
Expect the truly optimized Atlas trees and farming routes to take three to five days of community testing before clear winners emerge. Until then, the safest plan is the one above: speedrun the campaign, fill the entire Atlas tree as fast as possible, lock into Abyss for instant day-one returns, sample Breach on day two if you want to test the new ring/amulet printing, and revisit Temple, Delirium, and the new pinnacle bosses once you have a stable currency base. Full mechanic-specific deep dives will be added to this guide as the league progresses, so bookmark the page and check back often.
Best Abyss Atlas Tree Setup & Farming Strategy
Abyss farming is one of the strongest currency-generating strategies in PoE 2 patch 0.5, capable of producing hundreds of divines per league through a mix of raw currency drops, valuable Heart of the Well diamond jewels, and powerful Omens. The strategy works by stacking Atlas tree investment, Abyss tree nodes, and Tablet modifiers to maximize Abyss spawns, monster density, and Rogue Exile encounters across your maps. There are two main paths you can take: the Ulaman route, which is beginner-friendly and prints raw currency through chests, and the Amu route, which is harder but rewards you with high-tier Omens for serious profit.
Step 1: Finish Unlocking the Atlas
Before committing to Abyss farming, you need every Atlas point available. There are two ways to get there:
Defeat the second Arbiter (the boss in the middle War Journal Tower) five times, which lets you click every zone and instantly unlock all Atlas points.
Complete every map inside the fortress area manually, which takes much longer but works fine if you prefer the slower route.
Once unlocked, you cannot respec your Atlas as a whole, only the bigger notables, so picking the wrong path early on isn't a problem since you will eventually own the entire tree.
Step 2: Build the Right Atlas Tree
For Abyss farming, focus your Atlas points on these priorities:
All natural juice nodes - increased number of rare monsters, increased magic pack size, and regular pack size. This is the foundation of every map you run.
All tablet effect nodes - type "tablet" into the search bar and grab every node that lights up. Tablet effect scaling is huge for Abyss returns.
All Rogue Exile nodes - Rogue Exiles drop diamond jewels when consumed by Abyss, so every exile you add to a map is another chance at a Heart of the Well.
Additional Rogue Exile from powerful map bosses if you plan to run powerful boss maps.
Increased Effectiveness notables for stronger monsters and better drops.
Beyond those priorities, pick the side mechanics you enjoy. Essence, strongbox, and shrine nodes all work fine since you will eventually own the full tree anyway.
Step 3: Choose Your Abyss Faction Path
This is where the two strategies split. Both require fully completing your Abyss tree first.
The Ulaman Route (Easier)
Pick this path if your character isn't fully geared yet or you want a relaxed farming session.
Select Ulaman as your Abyss faction.
Take Abyss Pits as scattered through the areas of Abysses so multiple pits spawn in each map.
Take the node that gives Ulaman a chance to spawn currency chests, which procs frequently and prints raw currency.
Stack Rogue Exile spawn chance on top of this so more exiles get consumed for diamond jewel drops.
This setup is forgiving, very consistent, and works well on any tier of map your character can clear comfortably.
The Amu Route (Harder, Higher Reward)
Pick this path if your character is decently geared and can handle six-mod three-tablet tier 15 maps.
Select Amu as your Abyss faction.
Take increased effectiveness for each closed pit, up to 100%. At full stacks, monsters get tanky fast, so be sure your build can handle the extra defense.
When Amu rares spawn inside the darkness cloud, kite them out of the cloud before killing them. Walk away, let them follow, and finish them in clear ground for the highest chance to drop Abyssal Echoes, Omen of Light, and other top-tier Omens.
This route produces far more Omen value per map but punishes you hard if your defenses or DPS aren't there.
Step 4: Set Up Your Tablets
Tablet selection is forgiving in 0.5, so don't get too picky early when sustain is rough. Any modifier that adds juice to your map is worth slotting in:
Increased Item Rarity
Increased Monster Effectiveness
Additional Rare Monsters
Increased Pack Size
Increased Rogue Exile Spawn Chance (top priority for the Ulaman diamond-farming route)
If you can't sustain three Abyss tablets yet, run one Abyss tablet, one precursor tablet, and one of any other juice tablet you have on hand. You can also combine Abyss with Ritual, Delirium, or other mechanics depending on what tablets you sustain best.
Step 5: Pick Up the Right Loot
The biggest mistake players make with Abyss farming is treating it as a pure currency strat. The largest portion of profit comes from items dropped during the run, not from raw currency on the ground:
Pick up rare items with strong implicit or affix rolls.
Grab the right normal bases for crafting projects.
Save Heart of the Well jewels (especially double-modifier rolls), which can sell for huge amounts.
Sell or vendor crafted rings, amulets, and weapons made from picked-up bases for steady divine returns.
A well-rolled craft from picked-up bases can outvalue an entire map of raw drops, so don't skip the loot filter management.
Step 6: Manage Bugs and Workarounds
Abyss has known bugs in 0.5 that can block your Atlas point progression in the Abyss zones. The most common issue is Abyss cracks failing to complete properly. Two workarounds usually work:
Open your Atlas tree, select any faction node, then re-run the Abyss map.
Run the same map a second time, since some maps simply don't spawn Abyss on the first attempt.
Keep these in mind during early progression so you don't lose points to broken instances.
Best Abyss & Rogue Exiles Atals Tree & Farming Strategy
This is a Rogue Exile + Abyss dual-farm strategy where you stack tablets and Atlas passives to spawn extra Rogue Exiles inside Abyss pits. When Rogue Exiles get consumed by the Abyss, they guarantee drops of Heart of the Well jewels (the main chase item), while also dropping item level 82 rare gear (especially valuable jewelry) thanks to the area level boost. Profit comes from selling rolled jewels, high-tier rare gear, currency chests from the Abyssal faction, and bonus loot from citadels/matriarch calls along the way. The strategy is extremely strong right now but will likely decline as rare gear devalues later in the league.
1. Atlas Passive Tree
Fully complete the Atlas tree if possible (mid-tree city nodes are strong).
Bare minimum priorities:
All Tablet notables, especially +1 Maximum Modifier on rare tablets.
All Rogue Exile nodes (this is a dual farm).
Key must-have nodes:
Overlord Domain → guaranteed additional exile every map.
The Chosen Path → 100% increased chance of chosen content (Rogue Exiles).
Jewelry drop node on the exile cluster (counts for belts → possible Mageblood/Headhunter).
2. Abyss Atlas Tree
Take all Abyss nodes (cheap and fast to grab).
Pick Omens and Treasures branches.
Take Abyss Pits (more scattered pits across the map = higher chance exiles get consumed by the Abyss).
Avoid the "effect" node — it reduces overall jewel output.
3. Faction Choice (Abyssal)
Pick one of two options:
Ulaman (easier / chill option): Grants currency chests that drop Divines, Exalts, and Chaos fairly often. Easier rares to kill.
Amanamu (higher profit / harder): Rares drop Omen of Light / Omen of Echoes when killed outside their dark clouds. Requires either pulling them out of clouds or bursting them down instantly — needs higher DPS but yields the most profit.
4. Tablet Setup (run 3 tablets on a 6-mod map with 0 rerolls available)
Cheap setup (~40ex / 10 maps):
1x Abyss tablet → "chance to spawn additional Abyss pits"
1x Overseer tablet → any mod (boss = +1 guaranteed exile via Atlas node)
1x Irradiated tablet → +1 Area Level (pushes area to lvl 80 → exiles drop ilvl 82 gear)
Expensive setup (~5–6 div / 10 maps):
Same as above, but swap the Overseer and Irradiated tablets for ones with "Map is inhabited by 1 additional Exile" (2–3 div each).
5. Map Preparation
Run Tier 15 / Waystone Tier 16 (600+) maps, biome doesn't matter.
Exalt twice → ensure 6 mods → corrupt (Vaal) every map.
Ensure 0 rerolls available so you can slot 3 tablets.
Map modifiers don't matter, most profit comes from jewels (unaffected by map mods).
6. Master / Kingsmarch Choice - Use Jadetongue
Partial Translations → double effect of explicit tablet modifiers.
Long Days → ~20% more random extra content (more Rogue Exiles).
Keen Appraisal → increased rarity of items found.
(Optional) Ancient Activations → can spawn extra exile mods.
Avoid Doryani (the +1 area level node "Disengage Safeties" is currently bugged).
Avoid Hilda (tablet stacking mod appears bugged / non-functional).
7. How to Run Each Map
Kill all Rogue Exiles.
Complete every Abyss (let pits consume exiles when possible).
Kill the map boss (+1 exile from Atlas).
Ignore everything else, leave the map.
Path toward Citadels while clearing, collect Matriarch/Patriarch calls (Arbiter/Divinity fragments = 4–5 div each) and regular Strongboxes/fog encounters for bonus profit.
8. Heart of the Well Jewel Rolling
Each jewel has 4 modifiers (2 prefix / 2 suffix). The crucial "X% as Extra Damage" mod can ONLY roll on the 1st and 4th lines.
Rolling method:
1st roll: Apply Abyssal Echo → reroll until you hit "as Extra Damage" (Cold > Lightning > Fire > Chaos).
2nd & 3rd rolls: Turn Echo OFF - too expensive. Just take the best of what's offered (Crit, Attack Speed, Movement Speed, Crit Damage).
4th roll: Turn Echo back ON and gamble for a second "as Extra Damage" mod (always worth it if the 1st line already hit; skip if 1st line missed).
3-to-1 vendor: Combine 3 useless (no "as Extra") jewels at the fortune bench to get 1 fresh unidentified jewel back.
9. Selling
Unidentified jewels: ~3 div each.
Single "as Extra" + decent mod: 2–3 div.
Double "as Extra" (e.g., Cold + Lightning): ~17 div base, scaling up to 55–90+ div with high rolls and good secondary mods.
ilvl 82 rare jewelry from exiles is often the biggest profit driver - price-check every piece.
Best T16 Negative Rarity Atlas Tree & Farming Strategy
The T16 Negative Rarity strategy revolves around running fully juiced six-mod tier 16 maps with as little (or negative) item rarity as possible to maximize the drop rate of high-tier white bases, which are the real moneymakers. Instead of scaling rarity, you scale monster effectiveness, pack size, and modifier effect to flood your maps with rares and magic packs that drop tier 4 and tier 5 white bases worth 1 to 30+ divines each. The strategy is supported by overseer precursor tablet sustain, triple Abyss tablets for explosive density, and a focused Atlas tree built around essences, shrines, strongboxes, summoning circles, and exceptional item drops. Profit margins in 0.5 are extreme, with reports of 10 to 20+ divines pulled per map for a setup cost of around 3 divines.
Step 1: League Start Atlas Pathing (Pre-Endgame)
Before reaching your final tree, follow this barebones progression so you can sustain maps and gear up:
Path through the Essence cluster first. Essences provide crafting materials to gear your character up early. You can grab Greater Essence of Abrasion for weapon crafting or Greater Essence of Liberation if you need elemental rolls.
Take the 20% rare monster node as you path outward.
Rush down to Quantity of Wastestones and Overseer Precursor Tablet drop chance. Sustain in 0.5 is extremely rough, and Overseer tablets are the only reliable way to keep your map pool full at league start. With Overseer tablets active, four-mod maps guarantee 1.5 to 2x sustain, and three-mod maps roughly break even.
Path up to Irradiated Precursor Tablets and Tower Reveal. This gives towers more visibility and more pack density per map.
Run one Irradiated tablet plus one Overseer tablet per map while leveling. Alternatively, buy maps from Doryani one tier below your highest, then upgrade them at the Reforge Bench in Molten Vault if your sustain dries up.
Avoid every rarity node on the tree. This is the most important rule of the strategy.
Step 2: Build the Optimal Endgame Atlas Tree (≈223 Points)
Once you've fully unlocked the Atlas, your final tree should prioritize the following clusters and notables:
Every "Exceptional Item" node, since many high-value bases can drop as exceptional with extra sockets or quality.
Increased Effect of Explicit Modifiers on map mods, which scales the value of every juicing modifier.
All small pack size, magic monster, and rare monster nodes across the tree.
Increased Rarity for Unique Monsters, which is unavoidable on the pathing and doesn't really matter since unique bosses rarely drop bases anyway. Most loot comes from Abyss.
For league mechanic specialization, focus on:
Essences for crafting materials and steady currency throughout the league.
Shrines and Strongboxes, which are no-brainer density boosters that scale monsters without scaling rarity.
Summoning Circles, which are the key to fracturing orb farming. Cleansed zones (from running corrupted zones) have a 5% chance to drop fracturing orbs, and there's a tree node that gives summoning circle bosses additional modifiers and drops inside cleansed areas. Fracturing orbs are worth 4 to 5 divines each in 0.5.
For Atlas masteries, pick these specific choices:
Essences: Take Abrasion (or whichever essence type matches your craft).
Journey Ahead: Effectiveness of all monsters in your map. This is the single strongest mastery in the tree.
Nemesis Rising: 15% increased monster effectiveness. Second most important.
Summoning Circle: Two packs spawn.
History of Faruan: Desert biome (strongest based on the conversion notes).
Essences: Corrupts additional time and Essence of Battle.
Avoid Specialized Seeker - it's considered the worst node for this strategy.
Step 3: Complete the Abyss Tree
Yes, you take Abyss tree points too. Doing the 16 Abyss maps for the questline guarantees you every Abyss passive, which significantly buffs density and adds another loot layer to every map. After clearing all 16 maps, you fight the final Abyss boss, which awards the last batch of points.
Step 4: Craft Your T16 Waystones
Waystone filtering for "no rarity" is currently bugged in 0.5, so you can't filter properly on trade. Use this crafting method instead:
Pick up a tier 16 waystone with high pack size (target above 15%) and ideally some Monster Effectiveness, since waystone effectiveness is multiplicative with all other effectiveness sources from your tree and tablets.
Alch the waystone to magic or rare and check if it has rarity rolled.
If it has rarity, activate Omen of Chaotic Rarity before slamming a Chaos Orb. The omen forces the Chaos Orb to replace any modifier that does not grant item rarity, effectively targeting and removing the rarity mod.
Repeat until the waystone is six-modded with no rarity, ideally with pack size, monster effectiveness, and dangerous mods like extra damage as elements.
Avoid Jeweller's Touch (extra mod) since the new mod can roll item rarity and brick the map.
Step 5: Set Up Your Tablets
For your tower setup, run the full juice:
One Irradiated Precursor Tablet (Overseer if you still need sustain).
Three Abyss Tablets stacked together. Testing has confirmed that triple Abyss only blocks other big mechanics like Expedition, Ritual, and Breach. You still get shrines, strongboxes, essences, and other small density mechanics, so the triple stack is safe and worth running.
Look for tablet rolls like increased monster effectiveness, increased pack size, additional rares, and increased magic monsters. Effectiveness is the highest-priority modifier since it stacks multiplicatively with everything else.
Step 6: Choose Your Allflame / Boss Setup
For boss chamber setup, the recommended pick is Doryani with one additional revive. The other options are essentially nothing for this strategy. Long-term you may switch to Jadoo for Keen Appraisal, but skip "First Mod of Jadoo" because the additional modifier can roll item rarity and brick your map.
Step 7: Run the Maps Properly
The execution matters as much as the setup. Follow this routine on every map:
Always do the boss last. If you die before fully looting the map, all remaining loot and rares despawn permanently. Clear the entire map, loot everything, then engage the boss.
Pull Abyss rares out of the darkness cloud. Walk away from the spawn point so the rares follow you out before killing them, increasing the chance of high-tier omen drops.
Stash mid-map when inventory fills up. PoE 2 lets you re-enter your map unlimited times through portals, so portal back to your hideout, stash, and return without losing progress. Use the entrance checkpoint to come back in safely.
Pick up everything red on the loot filter first, since these are the high-value tinks (1+ divine bases). Reds in tier 81-82 are typically 5 to 30 divines. Smaller white items are usually sub 3 exalt but still add up.
Grab buffs from shrines and runic altars before risky rare packs, especially when the map has dangerous mods like proxy damage or one revive.
Always grab the highest-value altar/expedition reward, since they spawn more monsters and more loot.
Step 8: Watch for Bugs and Pitfalls
Throwing charm bug: Charges Used from Ingenuity can zero out throwing charms, making them useless. Swap to a different charm if affected.
Temporal Bubble waystone mod is bugged — you can stun yourself in your own bubble. Reroll if it appears.
One Revive map mod is high-risk. Play conservatively, grab the entrance checkpoint immediately, and avoid Abyssal Depths runs late in the map if you don't have revives banked.
Some bosses occasionally bug out and become un-killable. Just port out and re-enter if it happens.
Step 9: Why the Strategy Prints Currency
The core money comes from white tier 4 and tier 5 bases dropping off rare and magic monsters in your juiced maps. Examples from a single map run include obliterator bows for 3 to 6 divines, dagger foot sandals at 1 divine, second-pass sandals, juicer staves, and skull crushers worth 0.9 divines each. With 1 entry-level T16 map you can pull 10 to 20+ divines of bases, plus bubblegum currency, for a total entry cost around 3 divines including your Visions of Paradise scarab and self-rolled tablets. Exceptional bases (with extra sockets or quality) are a bonus on top — not the core, but in a Runes of Elder league with high demand for socketed items, they sell for 20 to 40+ divines when rolled well.
Stick to the rule of zero rarity, scale effectiveness to the moon, run triple Abyss tablets, and loot every white base, the strategy will consistently print currency throughout the league.
Best Essence Atlas Tree & Farming Strategy
The Essence farming strategy is currently one of the most profitable Atlas pathing options in PoE 2 0.5, capable of generating 1–2 Divine Orbs per hour (or more) during the early days of the Runes of Aldur league. The strategy takes advantage of the new Atlas Passive Tree's three Essence nodes — two on the right side and one in the middle — which are connected by an exceptionally efficient path that lets you grab numerous high-value supporting nodes along the way. By stacking essence drop chances, applying Vaal Orbs to upgrade essences, and pairing it with essence-boosting tablets, you can flood your maps with valuable essences like Greater Abrasion, Greater Opulent, Perfect Battle, and the four resistance essences, all of which sell for substantial amounts of currency.
Step 1: Progress the Whole Fortress Quest Line
Begin by completing Doryani's quest at the Breakers of the Tower, which spawns the Whole Fortress in the top-left of the Atlas. Follow the in-game quest line carefully, since each completed map inside the fortress awards one passive point for the new Atlas tree (311 points total). Remember: you cannot respec these points, so plan ahead before committing.
Step 2: Rush the First Essence Cluster (Right Side)
Path toward the right side of the Atlas tree and pick up the generic essence nodes that increase essence drops. When you reach the first choice node — Essence Housing — select the option that makes one essence type more common. Recommended pick: Abrasion, since Greater Abrasion essences are among the highest-value drops in the current economy.
Step 3: Move Into the Middle Cluster
Continue pathing toward the middle of the tree, unlocking nodes as you progress through the story (some nodes are gated behind story milestones). In the middle cluster, prioritize:
Increased chance to find essences
A guaranteed essence on every map
Increased map effectiveness (more loot overall)
Skip the X Slam node — it's not worth the points.
Step 4: Grab the Tablet Node
Pick up the node that increases tablet drops. Tablets are extremely valuable right now (a base Abyss Tablet alone sells for ~20 Exalted Orbs), so even tablets you don't personally use become free profit when sold.
Step 5: Path to the Second Essence Cluster (Right)
Continue right, picking up additional essence nodes. Skip the rogue exile node, they're not worth the hassle. At the second choice node: Crystalline Patterns, select Greater Essences of Battle, the most expensive non-corrupted essence available.
Step 6: Complete an Enigma Chamber to Unlock the Top Path
You'll hit a progression lock requiring an Enigma Chamber completion before moving up. Bank your passive points until you finish it — you should have around 10 points ready to dump into the upper essence cluster all at once.
Step 7: Unlock Corrupted Lattices (The Profit Multiplier)
Once you reach the upper essence section, take the third choice node: Corrupted Lattices, and select Option 3: Two Vaal Orbs for the price of one on each essence you click. This is the single biggest profit boost in the entire strategy.
Step 8: Pick Up the Exceptional Nodes
Grab all the Exceptional nodes in the upper area. These allow drops with additional sockets or quality above 20%, which sell for huge amounts of currency.
Step 9: Take Tablet Modifiers
Pick up the tablet modifier node in the middle path, which lets you Regal your tablets to add more modifiers. This translates directly into more loot per map.
Step 10: Finish the Tree (Endgame Path)
With your remaining points (around 40+), continue expanding in this priority order:
All top-tier nodes at the top of the tree (very strong)
Shrine nodes (high value)
Irradiated Precursor Tablet node on the left (these sell for 1/3 of a Divine each)
Strongbox nodes
Summoning Circle, rogue exile cleanup, and biome-related nodes near the middle
Step 11: Set Up Your Tablets
Once Corrupted Lattices is active, switch to specifically buying tablets that boost essences:
Overseer Tablets with "map contains two additional essences" (cheap relative to their value — empowers bosses for extra loot AND adds essences across 10 maps)
Irradiated Tablets with "increased chance to contain essences"
Run both tablet types together for compounding essence density.
Step 12: Map Execution Routine
While running maps:
Always do Runes of Aldur when you see them (extremely rewarding)
Always kill the map boss before leaving
Always interact with Abysses (great profit)
Skip Delirium and Rituals — not worth the time in this strategy
Open all essences immediately as you find them
Step 13: Vaal Orb Usage Rules
Carry Vaal Orbs in your inventory and apply them strategically:
Perfect essences → Always corrupt. Chance to upgrade to Essence of Hysteria (worth over 1 Divine each)
Greater Essence of Battle → Always Vaal it. Chance to upgrade to Perfect Battle Essence, the most valuable non-corruption-exclusive essence
Step 14: Selling Your Essences
Bulk-stash and sell your essences periodically. Focus selling efforts on:
Greater Abrasion essences
Greater Opulent essences
Perfect Battle essences
The four resistance essences (chaos + three elemental)
Most other essences are essentially paperweight, only sell them in massive bulk if you can find a buyer.
Best Ritual Atlas Tree & Farming Strategy
The Ritual mechanic received massive changes in PoE 2 0.5, making it one of the most explosive money-making strategies at league start, capable of generating 300+ Divine Orbs in just 2 days, plus dropping nearly every T0 unique in the game (with the exception of Mageblood). The strategy is built around the Ritual section of the Atlas tree (located on the left side of the tree from the Arbiter's fortress), combined with stacking ritual-boosting tablets and exploiting the Astrolabe / Head of the King mechanic returning from PoE 1, which chains rituals across multiple maps and pulls bosses into your ritual circles for absurd loot density.
Step 1: Path to the Ritual Section of the Atlas Tree
At league start, head to the left side of the Atlas tree from the fortress with the Arbiter — this is where the Ritual nodes are located. As you complete maps in this region while progressing the main quest, you'll start earning Atlas passive points to invest in Ritual nodes.
Step 2: Prioritize Ritual Atlas Passive Nodes
Focus on Ritual passives in priority order while clearing the surrounding map area. Key nodes to prioritize include the 20% chance for a free reroll in rituals and any nodes that boost favor, deferral options, and ritual rewards. Complete the entire left region to bank enough points for the next phases.
Step 3: Tablet Setup - Tier 1 (Budget Start)
When you're still low on currency, run a single tablet with the most important stat: increased quantity of tribute (favor) gained from killing monsters in rituals. This is the cheapest entry point and immediately boosts your ritual rewards on every map.
Step 4: Tablet Setup - Tier 2 (Two Tablets)
Once you have a bit of currency, add a unique tablet that doubles the number of rerolls in rituals. Combined with your Atlas passive granting a free reroll chance, this dramatically increases the quality of items you can buy from each ritual. This is where loot density starts to noticeably explode.
Step 5: Tablet Setup - Tier 3 (Three Tablets)
After investing in the central Atlas passives, add a third tablet that increases area level. Higher area levels mean you encounter more expensive and valuable Omens within rituals, which is one of the primary profit sources.
Step 6: Unlock the Astrolabe / Head of the King Mechanic
This is the core of the strategy. After killing the main ritual boss in a map, a Head of the King drops. If you don't have one yet, you can buy it from trade (currently around 83 Exalts, sometimes 2–3x that price). This item is the key to chaining rituals across multiple maps.
Step 7: Activate the Astrolabe Chain
Travel to the Astrolabe location and use the Head of the King on the effigy/scarecrow. You'll be prompted to select 6 maps that will form your ritual chain. This activates a powerful sequence where:
Each map in the chain gains strong ritual buffs
Bosses from each map are sucked into the final ritual encounter
Both the original ritual-zone bosses AND the map bosses pile up at the end
You'll face a massive boss-stacked finale that drops huge amounts of tribute, T0 uniques, omens, and league mechanic combos
Step 8: Choose Your Map Modifiers Carefully
When you click on each map in the chain, you'll get up to 3 choices for ritual modifiers (fewer if your map connections are limited). Priority for choices:
Increased number of bosses — by far the most important, this is what generates the loot
Quantity of favor (e.g., "+20% favor" rolls)
Chaos Orb rewards (e.g., "+4 Chaos Orbs")
Omens, Divine drops (max ~5 Divines per ritual), and bounty T0 uniques are nice bonuses
Boss count is king — everything else is secondary.
Step 9: Tablet Setup - Tier 4 (Four Tablets / Endgame Juice)
Once your Atlas tree is mostly complete, target City biomes specifically. Cities have a passive node that grants an additional tablet slot, letting you run four tablets simultaneously. Add a fourth tablet with extra ritual tribute quantity for maximum juicing.
Step 10: Map Execution Routine
Run the chain of 6 maps with this approach:
Clear each map and complete the ritual encounters along the way
Loot everything as you go, the chain provides escalating rewards
Save your strongest defenses and DPS for the final map, where the absorbed bosses will all spawn at once
Step 11: Be Prepared for the Final Encounter
Build strength is critical. The final map of an Astrolabe chain spawns an enormous number of bosses simultaneously, and many will be empowered by Wisps and Essences from the Atlas tree synergies. This will absolutely destroy weak builds, make sure your character has the survivability and DPS to handle a massive multi-boss pile-up before committing expensive tablets and Heads of the King.
Step 12: Sustain and Scale
After successful chains, sell your loot (T0 uniques, expensive omens, Divine drops) and reinvest into more Heads of the King and tablets. As you progress, the strategy snowballs — more omens, more astrolabe chains, more loot per cycle.
100+ Div Lineage Support Gems Atlas Tree & Farm Strategy
The Lineage Support gems - Garrick's Resolve (~180 div) and Rakiata's Flow (~100 div) - are some of the most expensive support gems in the game, dropped exclusively from two specific Atlas maps: the Sacred Reservoir (Temporal Sanctum) and the Jade Isles (Eye of the Storm). Rather than being a dedicated farm, this strategy is best layered on top of your normal mapping: explore the Atlas as you go, and when you uncover one of these special maps, swap to a fully min-maxed waystone-drop-chance setup to maximize your odds of getting these chase gems to drop from the map boss.
Step 1: Find the Hidden Maps on the Atlas
While running your regular Atlas strategy, push outward in one direction to reveal more of the map. The two target maps appear obscured by environmental effects:
Sacred Reservoir - covered by a sandstorm visual (rarer)
Jade Isles - covered by a tsunami/hurricane visual (more common)
Complete the surrounding maps to "reveal" the true name of these special nodes.
Step 2: Unlock the Mandatory Atlas Passives
Do not run these maps until you've unlocked both:
Memories of the Maraketh
Memories of the Kurui
Together these give a +15% chance for the boss to drop an extra Lineage Support gem. This is non-negotiable for serious farming.
Step 3: Max Out Jedo (Master)
Complete Jedo's full questline and allocate:
Untold Histories - 35% increased chance to find Lineage Supports
Partial Translations - 20% chance to double the effect of explicit tablet modifiers (this doubles your waystone drop chance rolls)
Step 4: Optionally Spec into Doryani for Faster Atlas Exploration
If you want to find these maps faster, take Hidden Patterns on Doryani, 10% chance on map completion to make nearby maps accessible (functions like the Grand Project unique tablet). Optional but strong for explorers.
Step 5: Prepare Your Waystones
When you find a Sacred Reservoir or Jade Isles map, run it with the highest possible waystone drop chance:
Use a 6-mod (corrupted) Tier 15+ waystone
Alch + Exalt your T15s, then corrupt them
Aim for 120%+ waystone drop chance, ideally 130%+
Step 6: Set Up Your Towers and Tablets
Influence the target map with 3 tablets rolled with the modifier:
"Increased Quantity of Waystones found in your Maps" (rolls up to 40% each)
The tablet base itself doesn't matter, only the waystone-drop-chance mod does. Optionally, a Boss Tablet with "increased waystones dropped by map bosses" may help, since the Lineage gems drop from the boss (unconfirmed but plausible).
Step 7 (Optional): Use a Visions of Paradise Tablet
This unique tablet (~7 divines) lets you run the map twice. Replace one of your three quantity tablets with it for a second attempt at the boss. Profitable in expectation given gem prices, but still a gamble.
Step 8 (Optional): Use a Grand Projects Tablet
At ~2–3 divines, this lets you run any nearby map after completing the tower without needing connections, great for jumping between unrevealed Atlas areas faster while hunting for targets.
Step 9: Run the Map
With everything stacked: maxed Atlas nodes, Jaad bonuses, 6-mod waystone, triple quantity tablets, kill the map boss and pray to the RNG gods. The Jade Isles drops Rakiata's Flow; the Sacred Reservoir drops Garrick's Resolve.
Pro Tip: Run your normal farming strategy while searching the Atlas, then only swap to this full quant-waystone setup when you actually find one of the two target maps. That way you don't waste resources scouting.
Breach + Delirium Atlas Tree & Farm Strategy
This is a high-investment, high-reward raw currency farming strategy that stacks Breaches with Delirium on city maps to generate massive amounts of rare monsters per map (20+ rares per breach × 5 breaches). The bulk of your profit comes from natural rare drops (divines, exalts, chaos, high-tier rare gear, and uniques), with explosive payouts when the Djinn Barya "Partial Translations" mod procs to double tablet effects. It is not a beginner-friendly strategy, it requires a strong character, a fully completed Atlas tree, and significant upfront investment in tablets, but it can yield 10+ divines per juiced map when things proc.
Step 1: Complete the Atlas Passive Tree
Fully complete the Breach tree, prioritizing Shape the Change and Power in Rares #1, plus Breeding Program (Large Wingus or your preference).
Fully complete the Delirium tree, taking +4 Spread (this is mandatory, without Delirium, loot drops massively).
In the general tree, take either increased monster modifiers or increased effectiveness (both perform similarly).
Take The Journey Ahead and the relevant biome nodes for cities:
Desert → Increased Monster Effectiveness
Grass → Increased Effectiveness
Forest → Increased Rare Monsters
Take the 10% chance for Exalts to be Chaos Orbs node (Chaos Orbs are valuable this patch).
Skip Breachstones, Hives, pack size nodes, mountains, and water biome nodes — they do nothing for this strategy.
Step 2: Acquire Your Breach Tablets (4 Total)
You need 3 Rare Breach Tablets with these mods:
Mandatory: "Unstable Breaches in Maps spawn 3 additional Rare monsters when stabilized" (rolls 1–3 — buy at 3, or buy lower and Divine if cheaper).
Desired secondary mods (1–2 per tablet, budget-dependent):
5–20% increased Effectiveness of Rare Breach Monsters (best mod)
10–15% increased Monster Effectiveness (generic)
8–12% increased Rarity of Items found in your Maps (weakest of the three)
Price guide: ~2–3 div bare, 5–6 div with one good mod, 8–9 div post-Divine with extra mods.
You also need 1 Unique Breach Tablet (Xoph's/equivalent):
Must roll 5 additional Rare Monsters (rolls 2–5) — this multiplies with everything.
Aim for at least 0–1% pack size; avoid negative pack size.
Top two rolls don't matter (they affect non-Breach content).
Step 3: Source High-Quality City Maps with Delirium
City maps are mandatory because they hold 4 tablets instead of 3 — a massive juice increase.
To get Delirium on cities, use the Mirage mechanic:
Run 3 Delirium Tablets (any mods, doesn't matter) + a 6-mod waystone on every map while traveling toward cities.
Each map has roughly a 15–20% chance to spawn a Grand Mirage.
When the Grand Mirage map spawns, run it and place the 200% Delirium directly onto your city maps on the Atlas.
Practice efficient map traversal — every city should have full Delirium coverage.
Step 4: Roll High-Quality Waystones
Run Tier 15 maps (or Tier 16 if pushing area level 81 with Doryani for ilvl 82 gear). Use 6–8 mod waystones.
The only stats that matter:
Increased Item Rarity (target 40–50%)
Monster Effectiveness (target 15–25%)
Combined target: 60%+ between both stats
Pack size is irrelevant — rare monster count is static. Monster Rarity is mostly wasted for the same reason. Roll your maps with Alchemy + Vaal, keep the best, sell the rest.
Step 5: Configure Your Djinn Barya (Masters)
Unforeseen Threats — additional Jade Islands for more rares.
Partial Translations — 20% chance for double effect of tablet modifiers (this is your jackpot mod — turns +3 rares into +6, +3 breaches into +4, etc., resulting in 3–4x loot when it procs).
King's Appraisal (or any utility mod of your choice — flexible slot).
Step 6: Execute the Map
Slot all 4 tablets (3 rare + 1 unique) into your city map.
Equip your high-rarity/effectiveness waystone.
Clear breaches from the edges inward — monsters that spawn after stabilization don't drop loot, so you must kill the initial expanding wave around the perimeter.
After clearing the edges, push to the middle and kill all the rares plus the map ball.
Ignore everything else in the map — ~95% of your loot comes from breaches; regular rares barely matter.
Important Warnings
You need a tanky, well-geared character. Running 200% Delirium with 20+ rares spawning simultaneously per breach is extremely rippy.
If playing a ranged build (like bow), stay at max range to handle dangerous rare mods safely.
Most of your profit comes from the Partial Translations proc — non-proc maps roughly cover tablet costs plus small profit (~3–4 div in raw drops). Proc maps can hit 10+ divines easily.
Best Boss Rush Atlas Tree & Farming Strategy
This is a low-investment, high-speed farming strategy that ignores monster juicing entirely and focuses on rushing boss zones across the Atlas, specifically Breach Lords (Twisted Domains), King in the Mists (Cracks of Nothingness), and Patriarch/Matriarch Hollows (Citadels). With zero gear rarity requirements and only the cheapest tablets, a fast character can net 20+ divines per hour purely from selling boss fragments and drops, plus you accumulate a stockpile of Grand Mirrors and unlocked Jade Isles as bonus value for future farming sessions.
Step 1: Stock Up on Boss Keys
Before you start, make sure your inventory always carries:
Breachstones (for Twisted Domain entrances) — extremely cheap (~44 ex each).
Audiences with the King (for Cracks of Nothingness) — cheap and provide huge value per run.
Buy these in bulk so you never have to stop traveling once you find a boss zone.
Step 2: Configure Your Atlas Tree
This strategy requires almost no Atlas investment:
Take 50% increased chance to find Lineage Support in Forest Mastery (the only meaningful node).
Grab generic tablet effect nodes at the top of the tree.
Everything else is optional, you can run this with practically any existing Atlas setup.
Step 3: Set Up Your Masters (Doryani by default)
Run Doryani while traveling and rushing maps for these key mods:
Hidden Patterns - 10% chance when completing a map to make a non-adjacent map accessible (lets you skip across the Atlas).
Head of the Snake - Powerful map bosses have a chance to reveal a nearby Citadel when defeated.
A safety mod like Stitch or Flash in case you die.
Swap to Djinn Barya specifically when entering Breach (Twisted Domain) zones for Untold Histories (35% increased chance to find Lineage Support - Breaches sometimes drop valuable supports). Swap back to Doryani for normal map rushing.
Step 4: Pick a Direction and Travel
Starting from your fortress, commit to one direction (left or right) and push as far as possible across the Atlas.
Always prioritize traveling through any node containing a Breach zone, Crack of Nothingness, or Citadel.
Pick up basic nodes like Jade Isles along the way, don't count them as profit, but unlock them for future RNG-based runs.
Step 5: Tablet Setup for Travel Maps (Empty Rushing)
While searching for boss zones, use the cheapest possible setup:
Run 1 Delirium tablet on every map (any basic rare Delirium tablet, no requirements, costs almost nothing).
This gives you a 5% chance per map for a Grand Mirage to spawn nearby (kill the boss within the fog), letting you stockpile Grand Mirrors for future juiced strategies.
If you don't have the Delirium Atlas tree, skip it entirely and just rush empty maps.
Optional second tablet: a basic Powerful Map Bosses tablet to proc Doryani's Hidden Patterns and Head of the Snake more often.
Step 6: Rushing Travel Maps
Use basic blue waystones with no special rolls.
Do not kill any monsters. Run straight to the boss, kill it, exit.
Speed is everything — your profit per hour scales directly with how fast you traverse.
Step 7: Boss Zone Setup (Citadels & Patriarch/Matriarch Hollows)
When you reach a Citadel or Patriarch/Matriarch Hollow, switch to your premium setup to double your fragment drops:
Waystone: Use one with as high a Waystone Drop Chance as possible — minimum 95%, ideally 105%+. This is what gives you the chance to drop 2 fragments instead of 1.
Tablets: Run basic Irradiated tablets with 40% increased Quantity of Waystones found in map (3 of them, all rolling ~36–40% quantity). These cost roughly 10 exalts each and dramatically multiply your fragment drops.
Step 8: Boss Zone Setup (Cracks of Nothingness)
When entering a Crack of Nothingness for Audience with the King:
Use any basic 6-mod waystone with some item rarity.
Rush the boss as fast as possible.
Bonus: this also unlocks more Jade Isles and territory for future RNG farming.
Step 9: Profit Sources (Why This Works)
Your stable income comes from boss fragments and drops:
Breach Lord Sacks — ~5.4 divines each (~10 div if you double-drop).
Head of the King (always drops from King in the Mists) — ~1.8 divines each.
Origin Cradles (Citadel drops) — ~3.5 divines each.
Sparks (alternate Citadel drop) — ~2.4 divines each.
Bonus drops: Diamond jewels from King in the Mists (~13 div, rare), Rakiatas, Garans, and other Jade Isle uniques.
Step 10: Save Your Grand Mirrors
After a session, you'll have many Grand Mirror locations scattered across your Atlas. Do not run them now. Save them for future Breach, Ritual, Abyss, or other juiced strategies, the doubled tablet effect makes them extremely valuable for high-investment farms later.
The above guide is based on current information and testing from the 0.5 update. More accurate and detailed Atlas tree build guides, plus strategies for different farming purposes, will be continuously updated here as more information becomes available and the expansion goes live. Stay tuned.