Animal Crossing: New Horizons 3.0 update brought one of the most exciting features for creative players: Slumber Islands. These special dream islands act as a sandbox where you can let your imagination run wild—no limits, no rules, just pure fun designing exactly what you want. Whether you want to build a cozy cottage village, a tropical paradise, or a mini-game arena to share with friends, Slumber Islands are the place to go. In this guide, we’ll introduce the ACNH 3.0 Slumber Islands unlocking requirements & steps, sizes, layouts, villagers, limits, multiplayer, as well as how to make and design the island.
ACNH 3.0 Slumber Islands Guide
Slumber Islands are separate dream world islands that you can access by sleeping in a bed in your ACNH home. Unlike your main island, they’re blank canvases—no shops, no plaza, no pre-built structures—giving you total freedom to create. Think of them as a creative playground where you can use all the items you’ve unlocked in your main game, terraform the land, change the weather and time of day, and even build with friends online. You can create up to three Slumber Islands per save file, so you can work on multiple projects at once. Whether you want to test a new island layout, design a themed park, or just mess around without messing up your main island, Slumber Islands are the perfect space.
How to Unlock Slumber Islands in ACNH 3.0?
Unlocking Slumber Islands is simple, but it requires a few steps—don’t worry, we’ll walk you through each one. First, there are two key requirements: you need a house (upgraded from the initial tent) and an active Nintendo Switch Online subscription. Even if you plan to play alone, Slumber Islands need internet access to work, so make sure your subscription is current.
Step 1: Upload Your Dream Address
Start by going inside your house and lying down in any bed. When Luna appears, select the option “I’d like to share a dream.” Luna will upload your main island to the dream world and give you a unique dream address. This address lets other players visit your main island in dreams, but for Slumber Islands, it’s just a way to unlock the feature. You don’t need to share the address with anyone—you just need to complete the upload.
Step 2: Wait for Luna’s Letter
After uploading your dream address, you need to wait one full day (in-game time). You can either let the game progress naturally or use time travel to skip to the next day. The next day, check your mailbox—you’ll find a letter from Luna confirming your dream upload and unlocking Slumber Islands. This letter is crucial: without it, the Slumber Islands option won’t appear when you sleep.
Step 3: Access Your First Slumber Island
Once you have Luna’s letter, go back to your bed and lie down again. This time, a new option will appear (like “It’s slumber time”)—select it to start the Slumber Islands tutorial. Luna will explain the basics, and then you’ll be ready to create your first dream island. That’s it! You’re now ready to dive into the creative fun.
Animal Crossing Slumber Island Sizes and Layouts
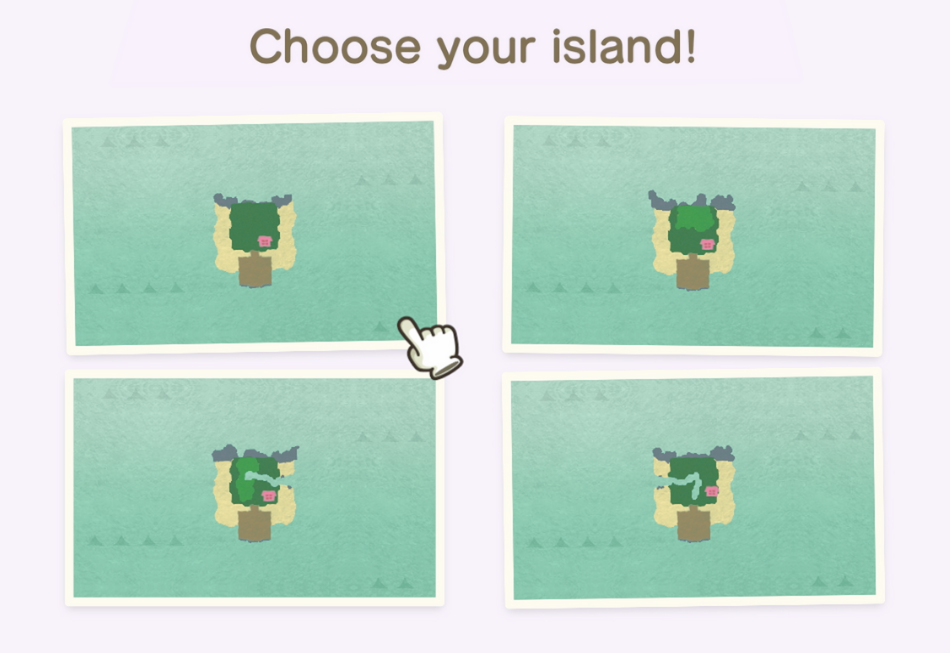
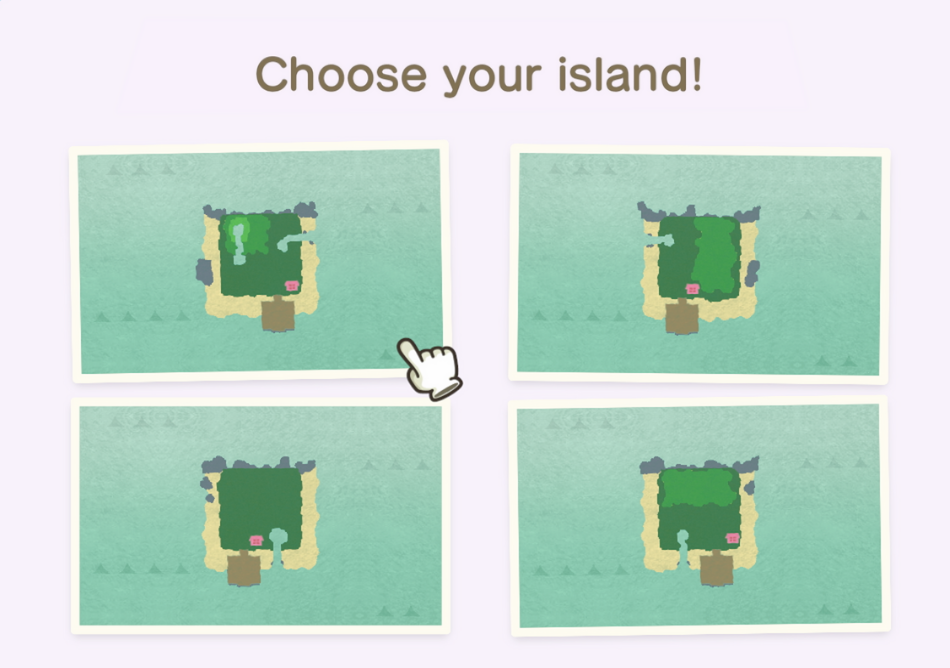
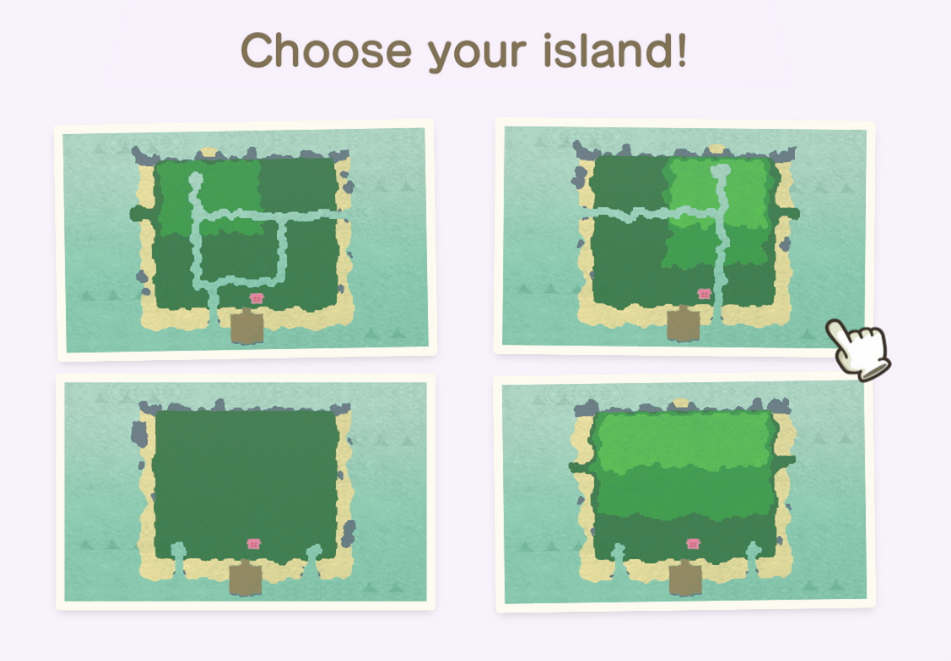
When creating a new Slumber Island, the first choice you’ll make is the size. There are three options: small, medium, and large. Each size offers different possibilities for design, so pick one that fits your vision.
Small Slumber Islands & Layouts
These are compact and perfect for simple projects, like a cozy cabin retreat or a small garden. Small islands have 4 random layouts to choose from—some have a single river mouth, while others have no rivers at all. They may also have small cliffs or flat land, so you can pick a layout that matches your idea. Since they’re small, they’re easy to decorate quickly and great for testing out small-scale designs.
Medium Slumber Islands & Layouts
A happy medium between small and large, these islands are ideal for more detailed projects, like a village or a themed park. Medium islands always have one river mouth, and they come with 4 layout options. The layouts may include rivers that wind through the island or small ponds, plus a mix of flat areas and cliffs. They give you more space to work with than small islands but aren’t as overwhelming as large ones.
Large Slumber Islands & Layouts
If you want to build something grand—like a tropical resort, a sprawling city, or a mini-game complex—large islands are the way to go. They have the most space for terraforming, decorating, and adding multiple areas. Large islands always have two river mouths, and they offer 4 layouts with more varied terrain (like longer rivers, bigger cliffs, and more beach space). Keep in mind that large islands take more time to design, but the end result can be truly impressive.
No matter which size you choose, all Slumber Islands start with a few basic features: some trees (some with fruit), a pier (your entrance point), and your bed placed on a purple rug. There are no weeds, flowers, rocks, or villagers initially—so you can build from scratch.
How to Invite Villagers to Slumber Islands in ACNH 3.0?
You can invite villagers to Slumber Islands in ACNH 3.0. This feature is available to everyone—whether you’re the host or just a visitor. The process is simple, and you have access to a wide range of villagers to invite.
First, enter the Slumber Island (either as host or visitor).
Open the item catalog. This is the menu you use to place furniture and other items on the island.
Swipe or tap to the far right tab of the catalog—this is the “villagers tab.”
In the villagers tab, you’ll see a list of all your available villagers (current and past ones).
Select the villager you want to invite. Once you choose them, they will immediately appear on the Slumber Island!
What Happens When Villagers Visit Slumber Islands?
Once your villagers arrive on the Slumber Island, you’ll notice some interesting things about their behavior. They will walk around the island freely, which is fun to watch—especially if you’ve decorated the space with a theme.
Villagers don’t speak: If you try to interact with them (like talking to them), they won’t say anything. Instead, they’ll just wave at you or do an excited wiggle. They can’t have conversations with you or other villagers here.
They don’t react to nets: A fun little detail—if you use a net on a villager in Slumber Islands, they won’t get upset or react at all.
Everyone has their own villagers: Remember, each player has access to their own set of villagers. So if you’re visiting a friend’s Slumber Island, you can invite your own villagers, and your friend can invite theirs. This makes it fun to see all your favorite neighbors together in one place.
ACNH 3.0 Slumber Islands Entrance: What to Expect When You Arrive
When you first enter a Slumber Island, you’ll wake up on a large square pier. This pier is your home base and has everything you need to start designing:
Your Bed: This is where you arrive and where you’ll sleep to exit the Slumber Island. It’s placed on a purple rug, and you can’t move it—think of it as your “spawn point.”
Luna: The friendly tapir is here to help. She’ll greet you when you arrive and can assist with basic functions, like saving your progress or explaining features.
Lloid: The hardworking construction character is on hand to build bridges and inclines instantly. Unlike on your main island, you don’t need to wait for these structures to be built—just ask Lloid, and they’ll appear right away.
Wardrobe and Mirror: On the pier, you’ll find a wardrobe and a mirror. These let you change your clothes, hairstyle, and appearance without having to go back to your main island. It’s perfect for matching your look to your island’s theme!
Archway: To enter the main island, walk through the large, decorative archway at the north end of the pier. This is where your design journey begins.
How to Make and Design Your Slumber Island in ACNH 3.0
Designing your Slumber Island is all about fun and creativity—there are no wrong choices! Here’s how to get started:
First, access your tools. When you’re on the Slumber Island, you’ll have all the same terraforming tools as your main island (shovel, axe, watering can, etc.) plus a special “builder mode” that lets you place items quickly. You can also open your catalog (all items you’ve collected in your main game are available here) and drag-and-drop furniture, decor, trees, flowers, and more anywhere on the island.
Terraforming is totally free and unlimited. Want to create a mountain range? Dig cliffs with your shovel. Dream of a winding river? Carve paths for water. Need a flat area for a house? Level the land—no need to worry about resources or time. You can also add bridges and slopes instantly using Lloid, so you don’t have to wait for construction.
Planting and landscaping is easy too. You can plant trees at any growth stage (saplings, young trees, full-grown trees) and place flowers, bushes, and weeds wherever you want. If you want fruit trees, just plant fruit—they’ll grow right away. You can even add rocks to your island if you want a more natural look.
Don’t forget about the little details. Use paths to create walkways, add fences to section off areas, and place furniture to make spaces feel cozy. Want a picnic area? Add a table, chairs, and a cooler. Dream of a beach party? Place umbrellas, beach balls, and a grill. The possibilities are endless—you can even add resident villagers from your main island to your Slumber Island! Just go to your catalog, find the villager you want, and place them down—they’ll wander around and add life to your dream island.
Can You Change Seasons on ACNH Slumber Islands?
No, you can't change the season. This is not a small issue—seasons are a core part of ACNH’s charm. Also, you can’t place any buildings except your own house. No shops, no Resident Services, no museum, and no villager houses. For most players, the inability to change seasons breaks many of their creative ideas. Many players dreamed of making Slumber Islands based on specific seasons. For example, they wanted to build a cozy autumn island for Halloween, with orange leaves and pumpkin decorations. Or a winter wonderland for Christmas, covered in snow. But without being able to change the season, these ideas are impossible. The Slumber Island’s season is fixed, so you can’t match it to your theme. Players noticed that the season change feature already exists in ACNH’s Happy Home Paradise DLC. They expected Slumber Islands to have this feature too, but it’s missing. This makes the new feature feel less complete than what’s already available. If you’re disappointed too, you’re not alone. Many players are hoping for a future update that adds season change, building placement, and dream address sharing to Slumber Islands.
However, you can control the weather and time of day. No more waiting for rain or sunset—you can set it exactly how you want. To change these settings, press Left on your D-pad. A menu will pop up where you can choose the time (from 6 AM to 11 PM) and the weather (sunny, cloudy, rainy, snowy, etc.). This is perfect for setting the mood of your island: create a magical nighttime scene with stars and a full moon, or a rainy day for a cozy indoor café. The weather and time stay exactly how you set them, so you don’t have to worry about them changing while you’re designing.
ACNH 3.0 Slumber Islands Multiplayer
Slumber Islands are even more fun when you build with friends! Unlike your main island (where only you can terraform and place items during multiplayer), Slumber Islands let everyone join in the creative process. To invite friends, go to the pier and talk to Luna—she’ll give you a “sleep-based invite code.” Share this code with your friends, and they can join your Slumber Island. Once they’re there, they can use all the same tools and items as you: place furniture, terraform the land, plant trees, and more. You can work on a project together (like building a theme park) or just mess around and have fun. It’s a great way to collaborate with friends and show off your creative skills. Just remember: all players need a Nintendo Switch Online subscription to join, and the island owner has to be online for others to visit.
ACNH 3.0 Slumber Islands Customization
Name Your Slumber Islands: Did you know you can name each of your three Slumber Islands? Give them fun, themed names like “Tropical Paradise” or “Cottage Cove” to keep track of your projects.
Test New Designs: Use Slumber Islands to test out ideas before applying them to your main island. Want to see if a certain path layout works? Try it on a Slumber Island first.
Create Mini-Games: Design obstacle courses, treasure hunts, or quiz games for you and your friends to play. Slumber Islands are the perfect place for silly, creative mini-games since you don’t have to worry about ruining your main island.
Use All Your Catalog Items: Since you have access to every item you’ve ever collected, don’t be afraid to mix and match. Combine different themes (like fairy tale and modern) to create something unique.
Change Your Appearance: Use the wardrobe and mirror on the pier to match your outfit to your island’s theme. Wear a swimsuit for a beach island or a wizard’s robe for a magical forest.