


When it comes to surviving and thriving in ARC Raiders, the right loadout can transform a run from a desperate scramble into a confident, rewarding raid. After hundreds of hours in the field, it’s clear that loadouts need to be practical, affordable, and ready for everything from quick loot runs to intense PvP skirmishes. In this guide, we break down the best free & budget build loadouts for various goals, providing plenty of advice drawn from hard-fought experience.
ARC Raiders Loadout Tier List - Best Build Loadouts in Season 2
Having a well-prepped kit in ARC Raiders isn't just about firepower; it’s about balancing what you can carry, how fast you can move, and your ability to adapt to shifting threats. Many players build for a specific focus: maybe it’s looting, outlasting in PvP, or keeping options open for both. The most effective loadouts are simple, maximize your space, and give you the edge for whatever you’re aiming to do.
Three categories stand out: looting, PvP, and hybrid loadouts. Each serves a different purpose. The looting loadout is perfect for quick, efficient runs focused on extracting the highest value with minimum risk. PvP kits are designed for fighting and winning tough battles. The hybrid finds a middle ground, so you’re ready for almost anything.
1 - Best Beginner Loadout for Early Game
When first stepping into ARC Raiders, you want a gear setup that’s easy to craft, dependable in any fight, and forgiving if you make mistakes. This loadout is built for new players who want to survive their early raids, fight back against enemies, and gather loot efficiently. Every piece can be assembled from resources you’ll easily find as you play.
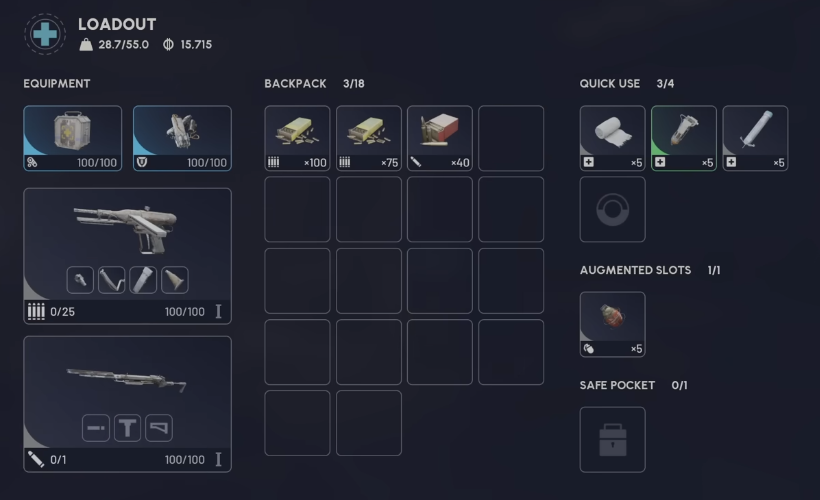
The Pharaoh is a solid battle rifle, ideal for handling both enemy raiders and Ark. Its damage output is impressive, and with careful aim, you’ll drop threats fast. Pair the Pharaoh with a Stitcher SMG—this gun shines at close range, uses light ammo, and features a quick reload thanks to its magazine. Compared to the Rattler, the Stitcher is much more efficient for PvP, letting you take down opponents without the hassle of loading each bullet one-by-one.
Attach an angled grip, compensator, extended light mag, and stable stock to your Stitcher for smoother recoil and more sustained fire. The Pharaoh works well without attachments, but if you find a silencer, adding it will help you shoot unseen.
For your augment, start with the Looting type to increase how much you can carry. As soon as you upgrade your stations, switch to Combat Mark 2 for higher shield compatibility, giving you a real edge in firefights. Magnets and electrical components (both easy to find or craft) are all you need to make these augments.
Equip yourself with a medium shield as soon as you can craft one. The materials—arc circuitry and batteries, are common, and the protection boost will help you win more fights.
Adrenaline shots are a must-have for running or escaping danger, and you’ll want a stack of bandages for healing mid-raid. Shield rechargers let you recover quickly after taking hits. Light impact grenades are cheap and effective for damaging groups of enemies or breaking up clusters of raiders. If you unlock smoke grenades, keep a few handy—they’re great for escaping with loot.
With this beginner setup, you’ll be able to tackle most early challenges in ARC Raiders, survive fights, and make it out with plenty of loot.
Augments
Looting (Green)
Combat Mark 2 (Blue, when available)
Shields
Medium Shield (Upgrade from Basic as soon as possible)
Weapons
Pharaoh (Battle Rifle)
Stitcher (SMG)
Attachments (for Stitcher)
Angled Grip
Compensator
Extended Light Mag
Stable Stock
Healing
Bandage
Shield Recharger
Utility
Adrenaline Shot (x5)
Raider Hatch Key (if available)
Grenades
Light Impact Grenade (x5)
Smoke Grenade (if unlocked)
This setup is reliable, simple to build, and gives beginners everything they need to survive, fight, and loot in the early game. As you progress, swap in blue augments and shields for even more survivability, and experiment with new grenades or utility items you unlock.
2. Best Early Game Loadout for PvE/Solo/Looting
Ark can be fun, but early on, it can also get a bit confusing, especially when you’re just figuring out what works. Instead of learning the hard way, this setup is the one many return to when the goal is simple—leave with more than you came in with and avoid losing gear. It isn’t about chasing every fight or going for flashy plays. You just want something reliable, not some sweaty meta.
Two guns are all you need here. The Pharaoh takes the primary slot for all your mid-range work and PvE. It’s great for clearing bots at a distance, hitting hard enough that you’re not burning through your ammo, and easy to control so you’re not rushing shots. If someone closes the gap or you wind up indoors, the Stitcher is your answer. It’s quick to reload, so if you make a mistake, you’re not stuck waiting around. The time it takes to reload the Rattler feels like you could literally start a family, so it stays out of the mix for now.
With this pairing, you’re not trying to make one weapon do everything. Instead, each gun has its job, Pharaoh for distance, Stitcher for up close. The playstyle here isn’t about charging into every fight you hear. That’s just a fast way to lose your kit. Instead, you clear out PvE, defend yourself when needed, and focus on leaving with loot.

Equipment Setup
Weapons
Pharaoh: Handles bots and mid-range threats. Use it first, take your time, and don’t rush.
Stitcher: Pull this out when someone pushes you or you’re in tight spaces—perfect for close quarters and quick reloads.
Augments
Start with the green looting augment; the extra backpack space early on makes the biggest difference, even if you can’t run bigger shields yet.
Once you’ve built up gear and dying isn’t a setback, Combat Mark 2 and medium shields become an option. If you’re unsure, just keep using the green one.
Shields
Stick to basics early on. Higher level shields come later once you feel more comfortable, but for now, more inventory space usually helps more.
Ammunition
Around 40 heavy rounds for the Pharaoh and about 200 light for the Stitcher. Any more and you’ll just run out of space for loot.
Quick Use Items
Healing first, then adrenaline shots (stamina is a lifesaver for escaping trouble), shield rechargers after that, and grenades last.
Light impact grenades are cheap and reliable. Throw them at the start of a fight, not when things have already gotten out of hand.
In-Raid Tips
When you’re in the middle of a raid, always use the Pharaoh first to clear out robots and keep things under control. If someone gets close, don’t hesitate—just switch to the Stitcher and handle it. No need to second-guess or swap back and forth.
Here’s a simple tip that works early on: if you’ve filled most of your backpack and haven’t even needed to fire your weapon, it’s probably time to head to extraction. That’s a win.
Free loadouts are also worth grabbing at the start. They give you decent gear without any risk. If you make it out, you can trade up those gray augments for a green, building up your stash without losing anything you care about. Just remember, there’s no safe pocket—if you go down, everything is lost.
Progression & Early Tips
Get in the habit of using in-raid crafting. Look for the wrench icon under survival. This lets you craft during a run, and then you can put more points into stamina afterward.
Early quests are genuinely useful. They give you a purpose, help you learn the map, and the loot is solid for new players. You’ll find yourself recognizing more and more locations as you go, and objectives naturally guide you through different zones.
With this setup, you’re always prepared for those first quests. There’s nothing missing, and you’re not at a disadvantage. You can clear whatever’s in your way, defend against threats, and just focus on learning the game. It all works together, so it’s ideal for building confidence and progressing without worrying about gear loss.
Ratings
Solo: ★★★★★
This is a great option if you’re solo and just want to make steady progress, learn the map, and avoid unnecessary risks.PvP: ★★☆☆☆
Not designed for hunting other squads, but you can defend yourself when needed.PvE: ★★★★★
Perfect for clearing bots and getting through objectives without burning through your resources.Looting: ★★★★★
The extra backpack space and simple goals mean you’ll usually leave with solid loot.Learning/Quests: ★★★★★
Ideal for new players who want to focus on quests, map knowledge, and steady upgrades.
If you want to learn the game, avoid constant resets, and steadily build up your stash, this is the loadout to run. It gives you what you need to clear AI, survive run-ins, and walk out with loot—without distractions or complicated gear choices. This build keeps it simple so you can focus on learning, improving, and enjoying every raid.
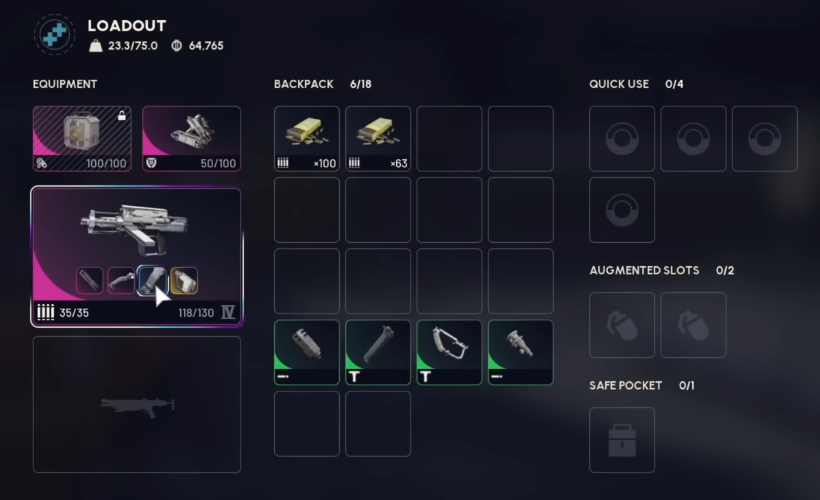
3. Best Budget Stitcher Loadout for Looting/Solo/PvP
The Stitcher often surprises players with its capabilities, standing above even every single pink gun in ARC Raiders for its cost and performance. Even at level one, it’s already a monster, easily handling 1v2 situations and netting over 100k in just minutes with an entire kit worth only 6K. When comparing it to other weapons at the same level, such as the Bobcat 1, the Stitcher’s faster reloads and ability to one-clip a medium shield give it a clear advantage, while also being much cheaper to craft.
Upon upgrading to level four, the Stitcher’s only early weakness—horizontal recoil—disappears, and reload times drop by half. At this stage, accuracy and reload buffs are present, but the Stitcher’s improvements feel more meaningful than those on the Bobcat. Testing both weapons side-by-side confirms that Stitcher comes out ahead, especially once you factor in the crafting cost. The only real contenders are the Volcano and the Kettle, but with the right attachments, the Stitcher dominates from range and up close.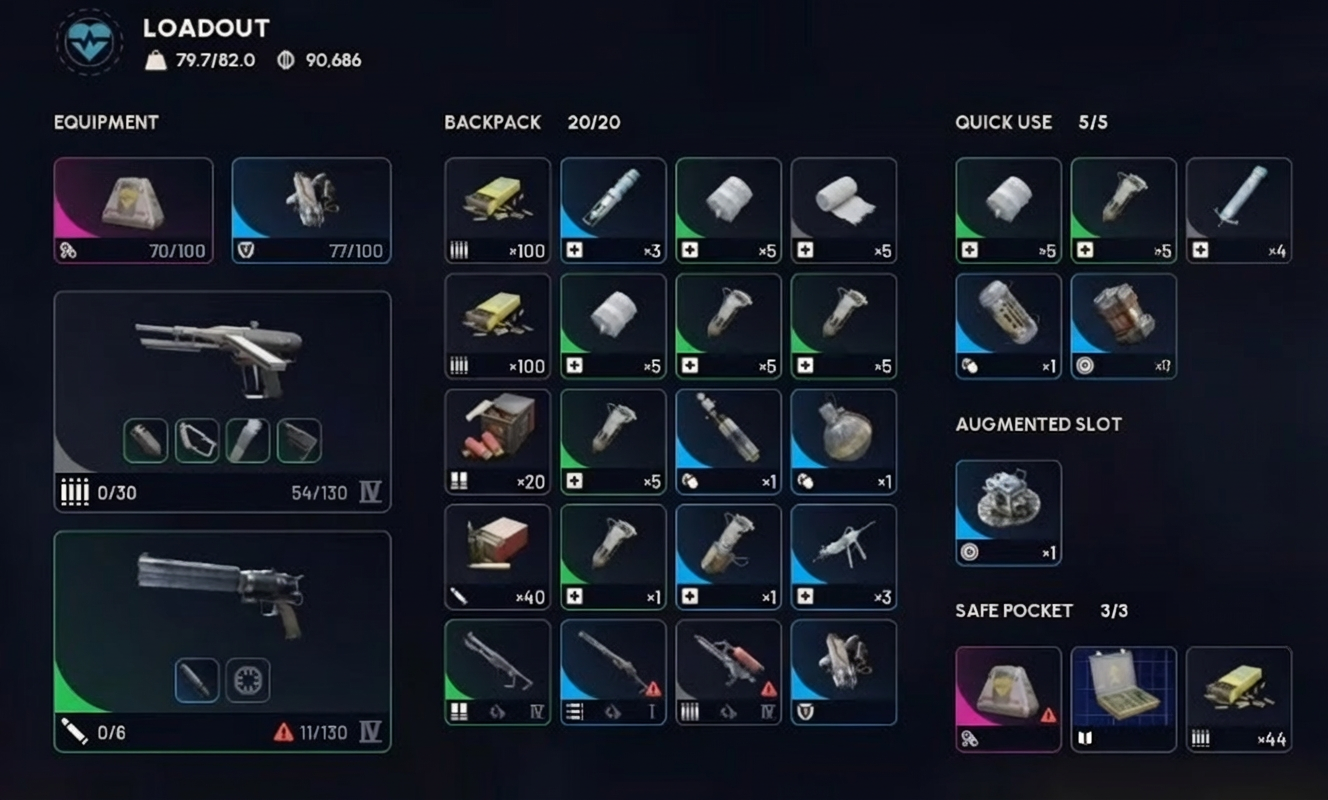
Playstyle & Tactics
Using the Stitcher is all about positioning and awareness. You can fry enemies at 20 meters with ease, and its forgiving recoil allows for rapid follow-ups. The gun thrives in close to mid-range scenarios. In big open areas, it’s best to move quickly to covered positions or lower levels for tighter engagements. Utility shines here: bringing tools like jolt mines to guard your loot spots and using cover to push or retreat when needed.
Short, aggressive raids pay off big. By taking small but consistent wins, you can snowball profits rapidly—250k in under an hour is easily achievable. The Stitcher’s low cost makes it risk-free to take into raid after raid, and its performance lets you out-DPS even high-tier weapons like the Venator 4.
Equipment
Augments
Tactical MK. 2 (extra healing or looting boost)
Combat MK. 2 (added shield compatibility)
Optional: Looting MK. for more finds on each run
Shields
Medium Shield (best balance for solo runs)
Light Shield (for speedier movement)
Weapons
Stitcher (ideally level 4, but level 1 is still excellent)
Sidearm (optional—most fights resolve with the Stitcher alone)
Attachments
Green Light Mag (required; blue works, but only adds 5 rounds)
Horizontal Grip (green is plenty for recoil control)
Green Stock (optional, but helps with stability; higher rarity stocks slow weapon swap)
Compensator (improves ranged performance, though muzzle brake is also viable)
Healing
Bandages
Shield Recharger
Utility
Jolt Mine (for defense while looting or healing)
Adrenaline Shot (escape or chase down enemies)
Raider Hatch Key (speed up extractions)
Grenades
Lure Grenade or Trigger 'Nade (flush enemies from cover or create openings)
Traps
Jolt Mine
Strategy Tips
Always stay alert to your surroundings and check every direction when looting or healing.
Prioritize close and mid-range fights—push into buildings or lower floors where the Stitcher excels.
Use utility gear aggressively; items like jolt mines and grenades can easily turn fights to your advantage.
Don’t hesitate to snowball—win quick, loot fast, and extract early for rapid profit.
The Stitcher is forgiving if you lose it, so play with confidence and take calculated risks.
Effectiveness Ratings
Solo: ★★★★★
The Stitcher’s affordability, ease of use, and power make it perfect for solo snowballing and quick raids.PvP: ★★★★☆
Out-DPSing top-tier guns in skilled hands, it holds its own against the best—especially with good positioning.PvE: ★★★☆☆
While solid, there are more efficient choices for farming AI, but it still gets the job done.Looting: ★★★★★
Low risk and fast clear speeds mean you can rack up loot with minimal investment.
This loadout is ideal for aggressive, budget-conscious solo players looking to rack up quick wins, loot fast, and challenge even the highest-tier weapons in close and mid-range PvP. The Stitcher’s value and reliability make it a top pick for snowball runs and rapid progression.
4. Best Endgame Loadout for Solo/PvP
When you want to go all-in on firepower, this Bobcat setup delivers wild rates of fire and huge magazines that let you clear rooms and hold your ground during intense PvP moments. The Bobcat, equipped with a kinetic converter, extended light mag 3, horizontal grip, and extended barrel, is described as the most loaded Bobcat you've ever seen. With this configuration, the rate of fire is described as kind of ridiculous, and you can run through entire squads if you keep your aim steady. The kinetic converter provides a sharp boost, pushing the fire rate to insane levels.
This build thrives in Stella Montis, the map to PvP in ARC Raiders, where trusting nobody and shooting on sight is the safest strategy. The horizontal grip, considered the best grip in the game, helps reduce both horizontal and vertical recoil, making it easier to control the Bobcat’s high output. On lighter weapons like the Bobcat or Stitcher, reduced ADS speed from the grip is barely noticeable, so you get all the recoil control without much penalty.
Even without the horizontal grip, an angled grip can work well, especially if you're used to controlling vertical recoil yourself. The extended light mag 3 is described as nothing crazy, but it gives you the capacity you need for those drawn-out fights. Ammo drains rapidly with this gun, so always keep an eye out for more.
Upgrading and maintaining this loadout can be expensive, so always stock up on steel springs, duct tape, and light gun parts. These are needed for mod components and weapon improvements. The Bobcat itself is a pricier weapon, so only take this kit into raids when you're ready to risk it all.
Playstyle
Playing with this setup, it’s best to move carefully, looting high-value areas like cafeteria and assembly while always being wary of other raiders. Night raids can sometimes yield more blueprints, and checking briefcases and lockers often pays off with rare items. The kit is perfect for a solo player who’s ready to play a bit ratty, always watching for ambushes and ready to shoot first.
This build excels in PvP, especially for those who want to push aggressively into hot zones. If you run into trouble, don’t hesitate to use cover and reposition, taking advantage of your large magazine and high fire rate. The Bobcat, especially in its fourth upgrade, remains effective even with less expensive attachments, as long as you keep the extended mag.
Equipment
Augments
Combat MK. 2 (for shield compatibility and a combat edge)
Optional: Looting MK. for better loot chances in high-value areas
Shields
Medium Shield (good balance of weight and protection)
Weapons
Bobcat 4 (main weapon, fully upgraded if possible)
Sidearm of choice (optional, since Bobcat will be your primary)
Attachments
Kinetic Converter
Extended Light Mag 3 (for maximum magazine capacity)
Horizontal Grip (for best recoil control; optional: Angled Grip)
Extended Barrel
Healing
Bandages (for quick recovery)
Shield Recharger (restore shield fast after combat)
Utility
Adrenaline Shot (for escaping or chasing down enemies)
Raider Hatch Key (for fast extractions)
Mechanical Components (carry some for quick weapon repairs)
Grenades
Regular Grenade or Light Impact Grenade (for clearing rooms or forcing enemies out of cover)
Traps
Jolt Mine (for securing escape routes or entrances)
Strategy Tips
Always keep your ammo topped up; the Bobcat drains magazines rapidly.
Use the kinetic converter for a major boost in fire rate, but know that you’ll burn through ammo even faster.
Play slow and check all briefcases and lockers for blueprints and materials.
In PvP, trust no one. Shoot on sight—players can always turn hostile.
When low on supplies or facing multiple enemies, don’t hesitate to retreat and heal up.
If you run out of high-level attachments, the Bobcat still performs well with just an extended mag.
Effectiveness Ratings
Solo: ★★★★☆
This build gives you the firepower and flexibility to take on groups or escape sticky situations on your own.
PvP: ★★★★★
The high rate of fire, big magazine, and strong recoil control make this Bobcat loadout one of the top choices for PvP encounters on high-action maps like Stella Montis.
This setup is ideal for players who want to push into PvP hotspots, take out enemies quickly, and loot efficiently while keeping their advantage in both fire rate and capacity. The key is to stay aggressive, manage your ammo, and always be ready for action.