


As Path of Exile 2 continues its early access journey, the upcoming 0.4 update, The Last of the Druids, stands out as one of the game's most anticipated patches to date. With the new Druid class arriving and the Fate of the Vaal league mechanic being introduced, the endgame Atlas and mapping experience are getting a substantial overhaul. This guide walks through the major changes to Atlas and maps in PoE 2's latest season, explains how these updates affect progression and farming, and offers strategies for rapidly progressing your Atlas Passive Tree and maximizing map rewards.
PoE 2 0.4 Best Atlas Passive Skill Tree Guide & Farming Strats
Path of Exile 2's 0.4 update, The Last of the Druids, is a major step forward for both the campaign and endgame Atlas systems. With more flexible and rewarding mapping, new league mechanics, and a streamlined approach to map juicing and Atlas passive progression, players can enjoy a smoother, more engaging path from campaign to endgame wealth.
Atlas and Map Changes in The Last of the Druids & Fate of the Vaal
Still, let's break down the key changes to the Atlas passive tree and maps in the new season and league:
Druid Class & Shape-Shifting Mechanics
The new season introduces the long-awaited Druid, with forms such as wolf, bear, and possibly even wyvern hinted at through game file data. These forms are tied to weapon types and are not class-locked, meaning other classes can also access them through specific weapons or skill gems. This approach mirrors how ascendancies in PoE 2 don't force players into a single archetype; instead, your weapon and skill selection guide your playstyle.
Fate of the Vaal League Mechanic
The Fate of the Vaal mechanic brings a fresh take on time-worn Vaal side areas. Lorewise, this season explores the downfall of the Vaal civilization, focusing on the last queen, Atziri, and her quest for immortality. The league is expected to feature modernized versions of Vaal side areas, possibly involving a dimension-shifting mechanic similar to Scourge League from PoE 1, and could introduce a new pinnacle boss encounter with Atziri.
Atlas & Map System Overhaul
One of the headline changes in recent updates, enhanced further in 0.4, is the way map juicing and Atlas progression works:
Towers & Tablets: Towers have been decoupled from tablets. Now, tablets are placed on each map you choose to run, and their slots scale with the map's tier and modifiers. This enables every map to be juiced individually rather than chasing rare multi-tower combos, making high-reward mapping accessible to a wider player base.
Tablet Guarantee: Towers now serve primarily to guarantee a tablet drop and remove fog of war, but otherwise function as regular maps.
Mapping Flow: This system allows players to juice maps on demand, without spending hours setting up elaborate tower chains. The reward ceiling from extreme juicing is a bit lower, but the overall experience is smoother and more approachable.
Rarity & Currency Drops: PoE 2's item rarity system now acts as a pseudo quantity modifier for currency. There’s a "sweet spot" of around 100–150% rarity for optimal drops, but stacking it can restrict build diversity since not all builds can reach this threshold without compromising power.
Quality of Life & Endgame Variety
Trade Improvements: Asynchronous trade lets even late-league players access items instantly, extending the life of each season.
Content Blending: The integration of past league mechanics like Incursion and Ritual within the Atlas keeps maps engaging and less barren, compared to the early days of PoE 2.
Endgame Content: There's an ongoing push for more vertical endgame, including Uber bosses and complex map activities.
How These Changes Affect Atlas Progression & Farming
Mapping is More Accessible and Flexible
With tablets now being slotted per map and towers simply guaranteeing tablets and removing fog, the "setup grind" for juicing maps is gone. This means you can focus on running and juicing your favorite maps consistently, rather than chasing rare setups. The change makes the mapping loop more engaging for the majority of players, not just the top 1%.
Rarity is More Important Than Ever
Since rarity modifies which tiers of currency drop, having enough rarity on your gear is now a major factor in currency farming efficiency. However, not every build can stack rarity easily, so some strategies may be more limited to certain archetypes or gear setups.
Mapping Remains the Core of Wealth Generation
With the ceiling for hyper-juicing brought down, and with more players able to juice their maps regularly, mapping is the central activity for endgame progression and wealth creation. This also brings more variety to viable farming strategies, with methods like Abyss, Ritual, and Breach all seeing play depending on the patch's balance.
Player Agency in Atlas Tree
The Atlas Passive Tree remains the main way to customize your late-game experience. With new content nodes and rebalancing each season, players can target the content they enjoy (or find most profitable) more easily.
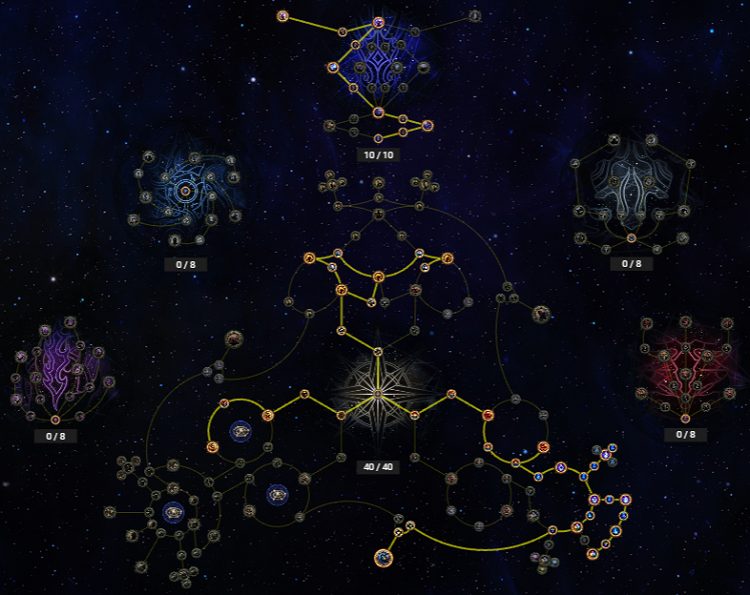
PoE 2 0.4 Atlas Passive Tree Fast Progression (Atlas Point & Map Unlock at Early League)
Progressing your Atlas efficiently in Path of Exile 2: Last of the Druids requires a focused approach, especially in version 0.4 where only a minor change regarding towers was introduced. Players no longer need to interact with towers to activate tablets, streamlining the process. By following a straightforward path and prioritizing key mechanics, you can quickly earn your Atlas points and advance through map tiers, achieving near-completion in under 20 hours.
1. Setting the Foundation: Early Atlas Progress
The initial stages of Atlas progression revolve around two main objectives: defeating boss maps to increase your map tier, and collecting Atlas points through corrupted zones and unique maps. Boss maps are identified by a boss icon and each one completed provides a +1 tier boost. For the first 30 Atlas points, focus on clearing corrupted zones, which appear visibly in the fog of war and always contain a corrupted nexus. These zones are scattered throughout the Atlas and are easy to spot once you know what to look for.
To secure the remaining 10 Atlas points, you’ll need to complete five different unique maps. Note that repeating the same unique map won’t count; each must be distinct. Aim to visit corrupted zones and any boss maps along your path, as this combination accelerates both your point collection and tier progression.
2. Optimizing Map Acquisition and Upgrading
A helpful tip for maintaining momentum is leveraging Doriani’s shop, which always sells maps one tier below your highest unlocked tier. Each time you level up, the vendor’s inventory refreshes, giving you a steady supply of maps. If you purchase three maps of the same tier, you can use your forgebench to upgrade them to the next tier, bypassing the need to farm lower-tier maps repeatedly. This method is particularly useful for quickly advancing through the tiers right from the beginning.
3. Rolling and Running Maps Efficiently
When it comes to preparing your maps, simplicity is key early on. For maps of tier 1 to 7, simply use a transmutation orb; avoid investing higher-value currency like alchemy orbs or regals at this stage. Once you reach tier 8 to 10, start re-rolling for at least three modifiers to improve your rewards. Upon hitting tier 13 or 14, begin using alchemy orbs for better returns, but hold off on exalting maps until you’re ready to fully juice them with tablets. At first, focus on sustaining your map pool and progressing rather than maximizing loot.
4. Tablet and Mechanic Choices
Tablets play an important role in boosting rewards and progression. While you can choose any mechanic, Abyss stands out as a particularly strong option this patch, both for currency and self-crafting potential. Always transmute and augment your tablets, and once you defeat the orbiter, consider regaling and exalting them for even better results. If you haven’t unlocked three-tablet maps yet, pairing a single Abyss tablet with another like breach precursors or delirium is effective, especially for the extra map level bonus.
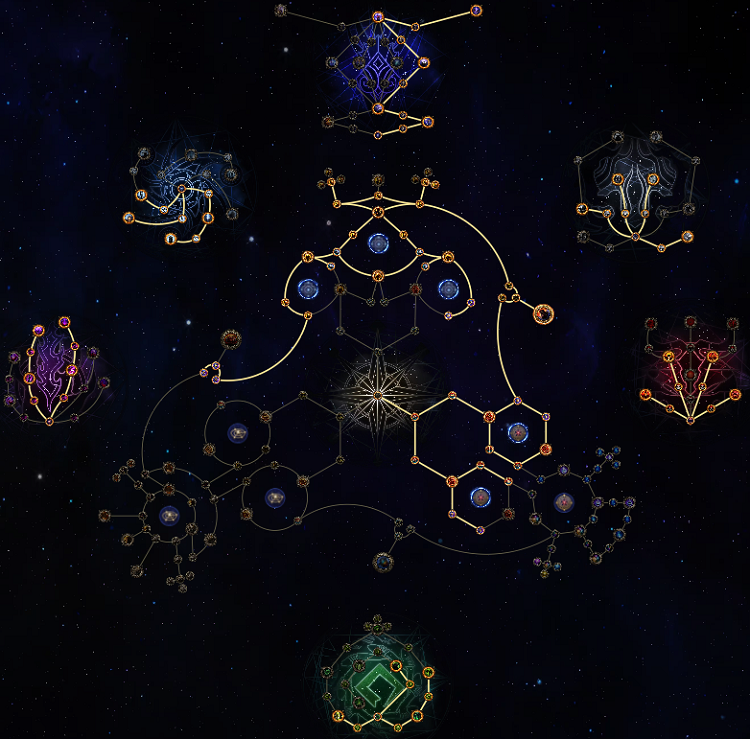
5. Allocating Atlas Points
As you earn points, consider following point allocation trees, such as 0-20 points or 20-40 points, depending on your current progress. Early on, investing in essence and strongbox nodes provides valuable currency and gear upgrades. Strongboxes, in particular, offer substantial rewards when combined with researchers. You can also focus on nodes that increase map effect or juice, depending on your preferred playstyle.
6. Finding Citadels and Advancing to Arbiter
For those seeking the arbiter quickly, citadels won’t appear until you’ve made some progress on the Atlas. Move in a straight direction rather than circling, as this approach triggers citadel spawns more efficiently. Once the first citadel appears, two more of different types will also appear, accelerating your journey toward the arbiter.
PoE 2 0.4 Atlas & Map Juicing Strategy for Divine Farming
Farming divines in Path of Exile 2 patch 0.4 is more rewarding than ever, thanks to streamlined map juicing mechanics and lucrative Atlas node choices. With the removal of towers, every map can be packed with currency potential, especially when you focus on specific biomes and mechanics. The loot this league is excellent, and while monster density was reduced, juiced mechanics like Breach and Abyss still produce plenty of monsters and loot. Effective juicing is the key to big currency drops, as raw currency becomes scarce without it. Here's a comprehensive approach to setting up your Atlas and maps for the best divine returns.
1. Setting Up Your Atlas for Maximum Currency
Start by focusing your Atlas tree on maximizing map effect, taking all nodes that boost this stat. Local Knowledge is a vital node, as it grants swamp and water biome maps a 40% increased chance to drop basic currency. Grass biomes are also worthwhile, offering a similar bonus for socket currency, which is valuable when six-links are in demand. However, avoid running Local Knowledge if you're mapping in other biomes, since it alters drop weighting, often reducing raw currency in mountain biomes for example. To make the most of this, stockpile water and swamp maps, then spec into Local Knowledge, complete them, and unspec afterward if needed.
For mechanics, prioritize Abyss and Breach. The optimal Abyss path stacks as many additional Abysses and monster modifiers as possible, increasing both the number and value of Abyss monsters. Out of the Pit is a strong node, boosting Abyss monster effectiveness - a new stat in 0.4 that works similarly to quantity, so 25% effectiveness is roughly 25% more loot from monsters. For Breach, pick up nodes that add monster density and increase rare Breach monster effectiveness for even juicier runs. Skip mechanics like Expedition and Ritual unless you have points and interest, as Breach and Abyss currently offer the best returns.
2. Rolling and Juicing Your Maps
Juicing begins with map rolling. In 0.4, you can simply alchemy your maps, even if they're magic, and then exalt them up to six modifiers. If your build isn't tanky enough, stop at five modifiers for two portals instead of one, giving you more room for error. Next, consider using a Chaotic Rarity Omen, which converts all map mods to item rarity and stacks multiplicatively with your character's rarity. These omens are expensive, so reserve them for maps that don't already roll high rarity. If a map naturally has 80% or more combined item rarity and rare monster mods, save the omen and run it as is.
If you want to go cheaper, just vaal your maps—no downside now that distills are gone. However, avoid vaaling if you’ve used Chaotic Rarity, as it could ruin a high-rarity map. For each map, check the mod totals: if the combined rarity is below 80%, use a Chaotic Rarity Omen; if it’s above, keep it for a juiced run.
3. Optimizing Tablets for Currency
To generate rare tablets, first defeat the normal orbiter. This can be attempted as many times as needed, so don’t worry about failures. For tablet rolling, always transmute and consider alching for four mods. If you get a strong mod, regal and keep it; otherwise, reroll until you land on valuable modifiers. The top tablet mods for currency are increased rare monsters, increased monster effectiveness (the new quantity), and increased item rarity inside the map. Ideally, pair two of these mods on one tablet for a big boost. Early on, you won’t always get the perfect combo, but prioritize effectiveness and rare monster mods over pure rarity, since your maps already have plenty of it.
Save your best tablets for your most juiced maps, especially those with double mods. If you have lackluster tablets, use the forge bench to 3-to-1 them into fresh rolls, hoping for better results.
4. Choosing Mechanics: Abyss and Breach
For a straightforward start, stick with Abyss and Breach tablets. Abyss currency is in high demand, and even if you aren’t crafting, simple items like the reserve collar bone can fetch 7–20 exalts. For your third tablet, consider Precursors for +1 map level and more experience, or Delirium for extra loot. Expedition and Ritual are also options, but less consistent for currency compared to Abyss and Breach.
5. Running and Clearing Maps
When running maps, always full clear the map, complete breaches and abysses, and then move on. Prioritize cleansed area maps, which you obtain by cleansing corrupted zones—these maps reward extra raw currency. Since overlaps and towers are gone, running as many cleansed and water/swamp biome maps as possible maximizes your currency gain. Pin or save these maps for juiced runs, and only enable Local Knowledge when running qualifying biomes.
For your best results, combine three double-mod tablets (increased rare monsters and effectiveness) with ten juiced water or swamp maps, activate Local Knowledge, and watch the divines roll in.
6. Advanced Abyss and Breach Specialization
For more advanced strategies, you can specialize in triple Breach or Abyss tablets. For triple Breach, look for mods that add +1 rare monster per breach, then focus on clearing breaches for a flood of rares and loot. The Abyss approach relies on stacking “two additional rare monsters from Abysses” mods, and with three of these, you’ll spawn massive packs of rares—ideal for headhunter users, as the challenge increases with the number of rares on screen.
Always limit these advanced strats to water and swamp biome maps, with max juicing and high-effectiveness nodes. This approach is already popular, with two-rare-monster tablets fetching a divine each, as players recognize the value.
PoE 2 0.4 Best Abyss Atlas Tree & Farm Strategy
Abyss has established itself as the top-performing mechanic for both crafting currency and gear upgrades in Fate of the V League, offering an unrivaled combination of raw currency drops, valuable crafting bases, and synergy with other mechanics like essences and expedition. With the new Atlas passive tree and abyss tablets, it's possible to tune your maps for maximum rewards while also streamlining the process. The basic gameplay loop is straightforward: find the green cracks in your map, clear the waves of monsters, and collect the loot. However, with a bit of optimization in your map rolling, tablet selection, and Atlas passive allocation, Abyss can turn every map into a goldmine for both solo and group play.
1. Setting Up Maps and Rolling for Abyss
The first step for a successful Abyss farm is to prepare your maps efficiently, which has become much easier in this patch. Grab a map and use an alchemy orb to add four modifiers. For a safer run, you can leave it at four or exalt up to five mods. If you're looking to maximize currency and crafting drops, push for six mods using a couple of exalted orbs—this setup usually costs less than three exalts per map. Occasionally, you might hit a tier 16 or even seven or eight mods, but even tier 14–15 maps can be extremely rewarding.
When rolling maps, prioritize item rarity and rare monster modifiers, as both directly impact your rewards. If you're aiming for maximum juice, Omens of Chaotic Rarity can be used with chaos orbs to guarantee all modifiers boost rarity, but these are expensive and best saved for high-investment sessions.
2. Abyss Tablet Optimization
Abyss tablets are central to the strategy, and the prefixes you want are rarity and rare monsters. Once you’ve killed Arbiter of Ash and unlocked four-mod tablets, always try to stack these two on every abyss tablet you use. Additional strong prefixes like “map contains an additional essence” can further boost your crafting currency, as essences are the next best option after abyss for crafting.
On the suffix side, prioritize “map contains an additional abyss” and “map has a 20–40% chance to contain four additional abysses.” These add waves of new monsters and loot, creating multiplicative effects when combined. Other useful suffixes include “two additional rare monsters are spawned from abysses in map,” which, though recently nerfed, still remains quite solid. Always run an abyss tablet in every map to guarantee abyss spawns.
For your other tablets, precursors add a map level and can grant valuable suffixes like increased chance for essences or extra map mods, boosting both the map’s tier and its reward pool. Expedition tablets provide excellent synergy, as abyss monsters can appear in expedition events, multiplying your loot. Breach and delirium tablets are also options, with delirium providing the highest risk and reward combination.
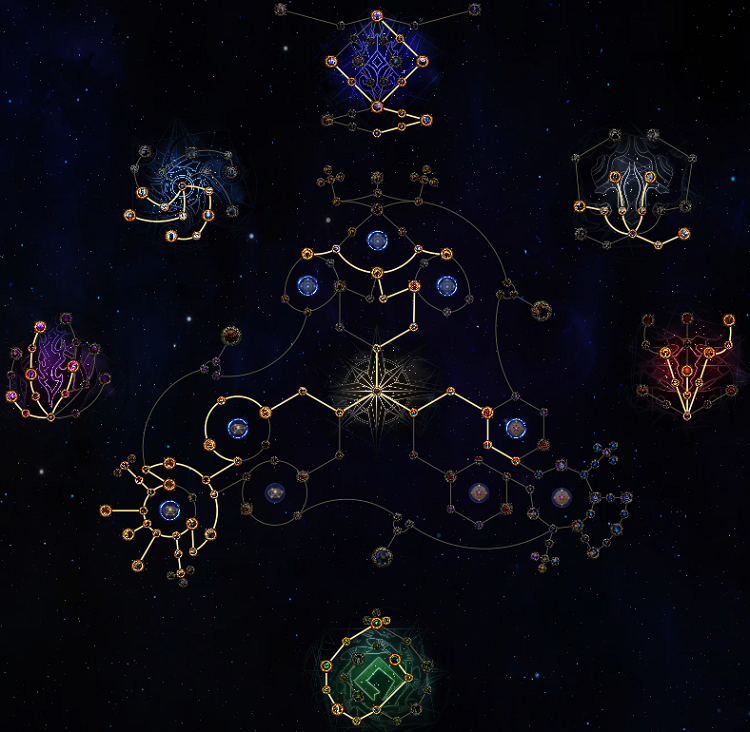
3. Abyss Atlas Passive Tree: Node Choices and Pathing
The most effective Atlas path for Abyss focuses on nodes that multiply abyss encounters, monster density, and loot quality. Here’s how to allocate your points:
Stir the Swarm: Guarantees an extra abyss in every map with an abyss and has a 5% chance to overrun a nearby map, granting a super-juiced abyss experience, run these immediately for huge rewards.
Sprawling Rupture: Scatters abysses across the map, spawning more monsters while spreading them out, making encounters less overwhelming and more lucrative.
Unholy Influence: Increases the chance for abyssal monsters to have powerful modifiers, making them harder but much more rewarding.
From Out of the Pit (Ulaman path): Choose the Ulaman bonus for 25% increased effectiveness of abyssal monsters. Effectiveness acts as quantity, so this directly translates to more loot and XP. While Ulaman monsters are dangerous, they’re the least annoying, and the reward is worth the risk.
While Dark Bloodlines and Shadow of Undeath offer some alternatives, they’re less impactful for currency and crafting. Abyssal is mostly for leveling your tree, as it helps you find bosses to unlock more points early on. Close to the Surface applies waystone mods to abyssal depths, which can be valuable in highly juiced maps, but isn’t worth the investment in most cases.
All the minor nodes on the left also increase your chance to access abyssal depths, which are always worth running for their unique loot and omens.
4. Farming Gameplay and Tips
Once your tree and tablets are set up, your loop is simple: run each map, always activating your abyss and focusing on clearing every abyss wave. For best results, combine with essences and expedition when possible, as these mechanics synergize perfectly with abyss for both crafting and raw currency drops. When you encounter Amanumu’s void modifier, remember that you must stand inside the black swirling cloud to damage the rare, watch out for hidden ground effects.
Crafting from abyss loot is a steady source of profit. Pick up promising rare bases, use exalts and desecrated currency dropped from abyss mechanics, and sell upgrades to other players. Abyssal depths are especially rewarding and should never be skipped.
PoE 2 0.4 Best Delirium Abyss Atlas Tree & Farm Strategy
This strategy focuses on leveraging the reworked Delirium Mirror content, stacking it with Abyss for synergy and adding either Precursor or Overseer tablets to further amplify loot. Delirium mirrors have become much more rewarding in patch 0.4, offering strong multipliers to both item drop rates and quality, especially when combined with other league mechanics. The fog no longer blocks ground effects or vision, making it easier to navigate, and the passive tree now provides bonuses that can push currency and crafting bases to new heights. While Delirium increases map difficulty as you progress, the combination of increased item rarity, extra rare monsters, and overlapping mechanics makes this approach a top choice for players seeking both challenge and high returns.
1. Map Setup & Rolling
Begin by rolling your maps for maximum reward. The standard process is Alchemy and double Exalted Orbs on each map. If your build can handle any mod (like Poison Pathfinder), simply corrupt your maps for a chance at tier 16 or eight modifiers; more modded maps are better, with eight-mod maps being the most valuable. If you want to squeeze out even more, use Omens of Chaotic Rarity: right-click the omen, apply it to a map with poor item rarity, and watch all mods convert to item rarity. Corrupt again if desired, aiming for eight modifiers. This approach juices your maps to their highest reward potential.
2. Tablet Selection
For tablets, the main setup revolves around Delirium and Abyss. Delirium tablets have specific prefixes and suffixes to aim for. Key prefixes include rarity of items found in the map, rare monsters found in the map, and increased effectiveness of monsters. These increase quantity, experience, and overall loot quality. While you can only have two prefixes by default, after defeating the Arbiter of Ash once, all your tablets can roll up to rare quality (with four mods). Rarity and rare monsters are the best, but effectiveness is also good, as it boosts both quantity and XP, making monsters tougher but not overwhelmingly so.
Abyss tablets offer strong suffixes across the board, but the most impactful are those that grant an additional Abyss or a chance for up to four additional Abysses. These dramatically increase encounters and drops, outpacing other suffixes. Other Abyss suffixes remain strong, and any combination adds value.
For Delirium suffixes, the best are those that make delirium last longer or pause the timer when you slay rare monsters. These include "slaying a rare monster in the map pauses the timer" and "more likely to spawn unique bosses." Unique Delirium bosses drop the bulk of Simulacrum splinters, and modifiers that spawn more bosses or extend the fog’s duration are the most valuable. Increased pack size or scaling speed are less effective. These mods allow you to clear the entire map under delirium, maximizing both loot and splinters.
As a third tablet, you have choices:
Precursor tablets are very effective, adding irradiation to increase the zone level by one (turning tier 15s into tier 16s, etc.), granting more loot at the cost of tougher monsters.
Overseer tablets empower the map boss, leading to massive loot drops and the chance for valuable uniques, but also increased danger. Suffixes for item quantity and rarity from map bosses stack multiplicatively with prefix bonuses for even more returns.
Breach tablets are a simple alternative, offering fast currency drops but less synergy with Abyss and Delirium. In practice, Precursor or Overseer tablets outperform Breach for this farm.
The best combination is Delirium, Abyss, and Precursor tablets, with Overseer being a strong alternative and Breach being less reliable for overall profit.
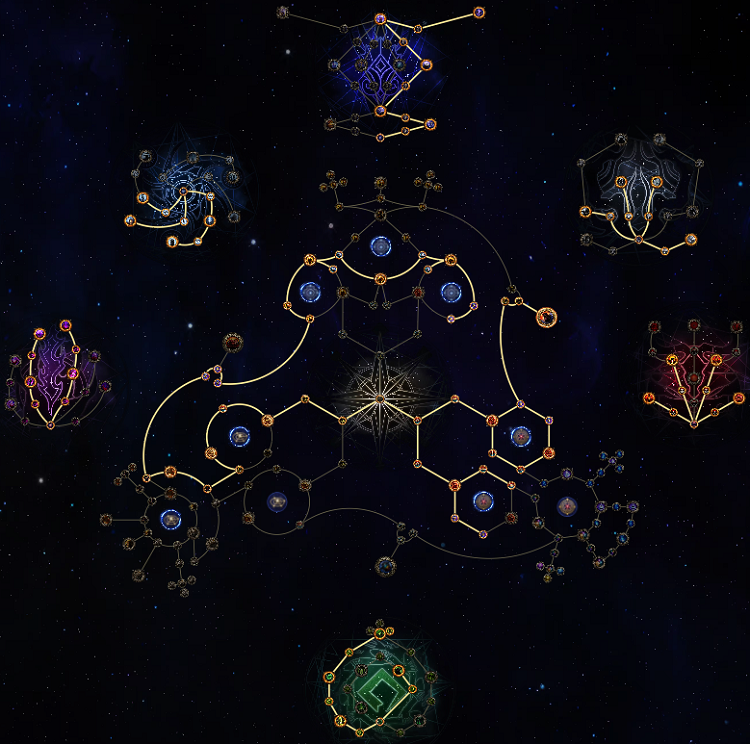
3. Atlas Passive Tree Setup
Your passive tree should merge map mod effect juicing with bonuses for Delirium and magic monsters. On the lower left, instead of maxing out map mod effect, prioritize magic monster bonuses. Take nodes like Unstable Energies, Grueling Journey, and Enigmatic Intensification for general map rewards.
The Delirium cluster has been reworked, so focus on the following:
They’re Coming to Get You: This node provides Delirium mirror pausing when you kill rare monsters and increases the chance for Delirium bosses (Kosis and Omniphobia) to show up. These bosses drop the most Simulacrum splinters, making this node a must-have.
The Mirrors: Grants more fracturing mirrors, spawning more Delirium monsters and further increasing loot.
It’s Not Real: Rare monsters always have delirium demons, granting 10% item quantity and 30% XP—an immediate boost to loot and progression.
Get Out of My Head: This makes all magic monsters in your maps have a 25% chance to gain an extra modifier; if they have two modifiers, their item rarity is doubled. This is a huge bonus and the main reason to invest in magic monster mods in the tree.
Nodes like "You Can’t Just Wake Up From This One" provide more consistency in timer duration, but "They’re Coming to Get You" is usually more rewarding as it fits better with the focus on rare monsters. Other nodes like "I’m Not Afraid of You" or "Would You Like to See My Face" don’t offer as much value, as Delirium bosses die quickly and splinter gains from these sources are inconsistent.
One node to avoid is "Isn’t It Tempting?" which redirects Delirium monster currency drops to the boss and duplicates them if killed in time. While it sounds good, in practice it’s unreliable: reaching the boss before the Delirium effect fades is often not feasible, especially on large or multi-phase maps, and the bonus currency is not as impactful as just having more magic monsters.
4. Abyss Tree Notes
For Abyss, take Stir the Swarm and loop around the left side. The top node "From Out of the Pit" is the preferred choice. You can pick up boss nodes, but some interactions (like Organized Forces with tablets) were reported as bugged; they only worked with natural bosses at last testing, not with spawned tablet bosses. If this has changed, Overseer tablets become even better. Otherwise, stick with irradiated Precursor tablets.
5. In-Map Execution
Once inside a map, rush to the Delirium mirror and start clearing. With the right tablets and Atlas setup, you want to keep the fog moving, killing rare monsters to pause the timer and extend your run. The focus is on full-clearing the map under Delirium to maximize splinters, currency, and valuable bases. When Abysses spawn, prioritize them for extra monsters and loot. If running Overseer tablets, be ready for tough map bosses, but the payoff is worth it—high-value uniques and a flood of loot.
Clearing Delirium bosses quickly is important, as they’re the primary source of Simulacrum splinters. With magic and rare monster bonuses stacked, you’ll notice a marked improvement in drop quality and quantity. For extra juice, always aim for maps with eight mods, high item rarity, and the best possible tablet mods.
6. Results & Recommendations
In testing, this strategy created tons of currency, valuable crafting bases, and unique drops, while also offering the chance for rare Abyss omens. Delirium mirrors now provide much more loot without needing permanent deliriousness, and the updated Atlas tree supports this farm style perfectly. While the strategy is dangerous, Delirium increases monster damage reduction and overall difficulty—it’s absolutely worth it for the rewards. Stick with Delirium, Abyss, and Precursor (or Overseer) tablets for the highest returns, and avoid nodes or mechanics that feel unreliable or slow. With this setup, you can expect a steady flow of currency, high-value drops, and a fun, challenging mapping experience in PoE 2 0.4.
PoE 1 0.4 Best Essences Atlas Tree & Farm Strategy
Essence farming remains one of the most accessible and reliable currency strategies in PoE 2 0.4, delivering daily profits with minimal fuss and making it a favorite for both new and veteran players. The core idea is to fill your maps with as many essence encounters as possible, ensuring a steady flow of valuable loot. Overseer Precursor tablets are key, as they roll guaranteed additional essences in each map. Even if these tablets seem a bit pricey, they pay for themselves after each run, so it’s worthwhile to invest in them. For those on a budget, filtering for tablets with a minimum of one or two essences can lower costs, although the currency return per map will also decrease accordingly. Mixing two double-essence tablets with a single-essence one is a good compromise, and allows you to occasionally add in other mechanics like abyss, breach, or delirium for extra profits.
1. Map Rolling and Selection
Start by gathering a supply of tier 15 maps and alchemizing each one to have at least four mods for regular runs. If your build is capable, push further by exalting your maps to six mods for the full effect, which enables running three tablets at once. Check each map after rolling to spot any with 60% rarity or higher—these can fetch a premium, selling for 10 exalted or more, and maps with 80%+ rarity are worth even more. Sell the high-rarity maps for quick profits or reinvest in more waystones.
Before running, use a rejection filter to weed out maps with mods your build can’t handle. Paste your rejection keywords into the filter, and only run maps that pass the check. Bring a healthy stack of vaal orbs, as these will be used to corrupt essences for a shot at even higher value outcomes.
2. Precursor Tablets
Run each map with double-essence precursor tablets whenever you can afford them. If you’re tight on currency, use one double-essence and one single-essence tablet, leaving room to add a tablet for another mechanic. These tablets are combined with your maps to maximize the number of essences available in each run.
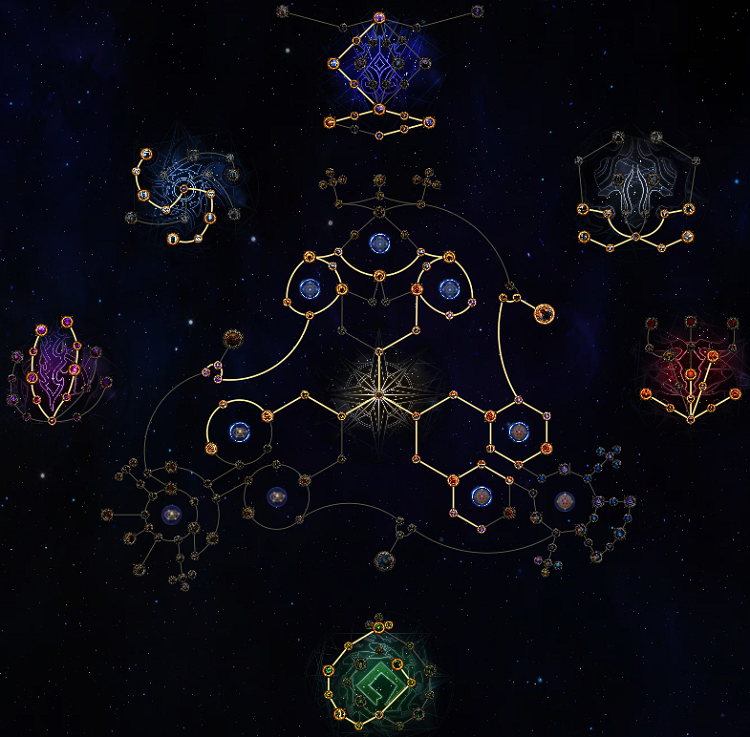
3. Atlas Tree for Essence Farming
For the atlas passive tree, focus on nodes that increase the quantity and quality of essences and precursor tablet effects. At the top of the tree, take every node related to precursor tablets to make maps richer. Remnants of Power is especially valuable, with a 20% chance to double the total essences in your maps. Move to the bottom right and select every essence-related node, then allocate any remaining points into experimenter spirit nodes for more extra juice. Be sure to pick up Ecological Shift for further increases to total essences.
Pay close attention to the main essence node, which offers a choice between different essence types to increase in frequency. Opt for Energetic Resonance to boost the spawn rate of attack, speed, and chaos essences, as these are in high demand and fetch high prices. Also, allocate at least three points into the boss tree at the top, which grants an extra essence from the Crystal Realm. If you’re planning to incorporate abyss tablets, grab Shadow of Undeath for more abyss essences.
4. Running the Maps
When you enter a map, hug the wall to quickly locate the boss. Once the boss is defeated, every remaining mechanic in the map—including essences—will light up, making it easy to track them down. Check each essence monster to see if it has a perfect essence of sorcery, haste, or battle, or a greater essence of ruin or opulence. If you see any of these five, kill the monster for your loot. If not, use a vaal orb to try for a better outcome—vaaling can upgrade greater essences into perfect ones or even a rare essence worth a divine orb or more.
This straightforward process lets you clear maps efficiently, focusing only on the most valuable outcomes. There’s no need to get bogged down with complicated mechanics; simply check for the top essences, vaal when necessary, and keep the pace high.
When running side maps or other mechanics, you can use a white, unmodified tier 15 map to make things easier, as it doesn’t affect your chance to get crisis fragments and keeps the process simple. Just remember that dying in these maps causes you to lose both your crisis fragments and any essences in the map.
5. Selling and Profits
After several runs, you’ll accumulate a large stash of essences. The quickest way to offload them is by listing them on the currency exchange. Most high-value essences will sell fast, while others with low demand may sit in your stash for a while. Use POE Ninja to check current prices and trade volumes, focusing on selling those with good turnover. Perfect essences tend to sell particularly well, while others are best ignored or left to rot if they don’t move.
With this method, consistent currency gains are the norm. Even with some RNG such as back-to-back high-value essences or dry spells, the strategy brings in four to five divines per hour for a well-optimized setup with three double-essence tablets and full mod maps. Faster builds can push these numbers higher, while slower builds may earn a bit less, especially if running with fewer tablets.
PoE 2 0.4 Ritual Atlas Tree & Farm Strategy
This farming approach is all about maximizing tribute and omens from Ritual encounters while integrating bridge mechanics for extra profits. By setting up your Atlas, waystones, and precursor tablets in the right way, you can consistently gain tribute, omens, and other valuable drops. The strategy doesn't demand enormous investment or top-tier gear, making it accessible to most builds and especially enjoyable for melee, since monsters come to you. With the right preparation, you should see a steady flow of currency, bridge splinters, catalysts, and omens, often reaching several divine orbs per hour.
1. Waystone Preparation
Begin by preparing your waystones. Use the highest tier stones you can, ideally tier 15, but any high-level stone will do. Start by applying an Orb of Alchemy, then two Exalted Orbs to craft strong modifiers. When examining your rolls, focus on implicit modifiers—monster pack size and magic monsters are top priorities. You can use search tools (like highlighted filters) to spot suitable waystones quickly. The more monsters and higher pack size, the better your tribute and loot will be. Upgrading your waystones with extra omens is beneficial, but you don’t need to hunt for item rarity, which is expensive; instead, prioritize modifiers that boost the number of magic or rare monsters and pack size. If you want to go all-in, use chaos orbs to reroll for more magic monsters and maximum pack size.
2. Precursor Tablets
Tablets are split between two phases: fishing (seeking good omens) and pooling (collecting them). For the fishing part, use Ritual precursor tablets. Look for suffixes like "ritual monsters grant more tribute" and "differing favors cost less tribute," as these help you accumulate and utilize tribute more efficiently. The irradiated tablet is another key—irradiation upgrades the area level, so aim for level 80 areas for better omen odds. On irradiated tablets, seek more magic monsters, increased pack size, or more rare monsters.
For the third tablet, you have options: you could use a ritual tablet with increased omen chance, but extra omens aren’t always valuable, given the wide range of omen prices. Instead, many prefer to slot a bridge tablet for bridge splinters and extra catalysts, since bridge splinters can often be traded one-for-one and catalysts fetch a decent price. This combination makes the farming more predictable and lucrative.
3. Atlas Tree Setup
Your Atlas tree needs to support both Ritual and bridge content. Key nodes include "Tempting Offers" (extra reroll and cheaper offers) and the left branch, which lets you defer ritual offers at a 50% discount. Unlocking all four rituals in a map is important; with just three, you may not have enough points to use all rerolls.

For bridge, allocate points to increase the chance of additional bridges and full stacks of bridge catalysts. Nodes that boost the quantity of bridge splinters and monster density are also helpful. If you prefer a slower pace, take the node that makes bridges open and close slower, which gives you more time to clear.
In the Ritual section, focus on nodes granting more magic monsters, higher pack size, and increased numbers of rare monsters. The bottom left branch supplies lots of extra monsters, directly increasing your tribute. The bottom right provides item quantity, bonuses to explicit waystone modifiers, and more powerful enemies, which means better loot—noting that rarity itself doesn’t affect Ritual rewards, so you don’t need to prioritize it here. The top of the tree should be filled out with bonuses to precursor tablets, increasing their effectiveness and odds for double effects, which can make your runs much more rewarding.
4. In-Map Strategy
When you enter a map, gameplay is straightforward. Go straight to the ritual circles and clear all monsters both inside and just outside the circles, as all these contribute to the ritual. You don’t need to wait for monsters to move inside, just clear them as soon as you see the circle. If a ritual only has a few monsters, consider skipping it and moving to the next area for better density.
On each altar, defeat all monsters, collect tribute, and use tribute points wisely. Start by deferring any valuable items or omens, since the cost to defer will drop with each subsequent offer. On the third ritual altar, most rewards become visible, and you can start buying items or continue deferring. With each reroll, you get a fresh set of rewards, so keep an eye on tribute costs and try to maximize your tribute gain for more defers and purchases.
Adding bridge to your tablets brings extra splinters and catalysts with each run and doesn’t slow you down much. If you choose, you can swap bridge for delirium, which causes delirium monsters near rituals to also appear in the ritual circle, adding even more tribute and loot.
5. Transitioning to Advanced Rerolling
Once you’ve "hooked" good omens and want to claim them, it’s time to maximize rerolls. For this, use the unique precursor tablet "Freedom of Faith," which doubles your rerolls (up to four). Although it increases favor costs, you can offset this with tablets that reduce rerolling costs. If you get a precursor tablet that adds three more rerolls, you can combine this with Atlas passives for up to 12–15 rolls per map. This approach is expensive, as these tablets can cost several divines, but it lets you cycle through potential omens much faster.
When using high-cost reroll tablets, always check the number of uses remaining to avoid scams. Combine these reroll tablets with tablets that boost tribute gain or reduce defer costs. If you prefer not to invest, just stick with basic tablets that increase tribute per monster or reduce defer cost.
When fishing for rare omens, defer them as soon as you see them, and use your rerolls to keep them cycling through your ritual offers until you can afford to buy them outright. More rerolls improve your odds of seeing multiple valuable omens per map.
6. Profits and Efficiency
With this setup, you’ll regularly see high tribute gains, often 7,000 tribute with just two rerolls used. Your focus should be on omens, splinters, and catalysts. Defer expensive or rare items and buy them when tribute allows. Even without massive investment, you can expect several divine orbs per hour if you keep your maps rolling and tribute flowing. Mixing bridge or delirium into your runs diversifies your loot, and the strategy remains effective whether you go for the standard tribute-maximizing approach or the high-investment reroll method.
This method is fast, efficient, and doesn’t require top gear. Even for builds with modest power, Ritual is forgiving and rewarding, making it a solid choice for steady currency generation in PoE 2 0.4. If you want to push your profits higher, gradually add more rerolls and tribute-boosting tablets as your budget allows.
PoE 2 0.4 Best Breach Atlas Tree & Farm Strategy
Farming Breach in PoE 2 0.4 offers a strong source of currency, especially after other mechanics like Abyss were nerfed early in the patch. This method works well for a wide range of builds and budgets, with basic and advanced approaches depending on your character’s strength. The main focus is to farm Breach in maps while adding a touch of Abyss for some extra loot, as Abyss no longer demands heavy investment and still brings in useful drops. Breach remains a compelling mechanic because of its monster density and the variety of valuable items it provides. River catalysts, Breach splinters (which practically trade one-to-one with exalted orbs), and Breach rings are all in demand.
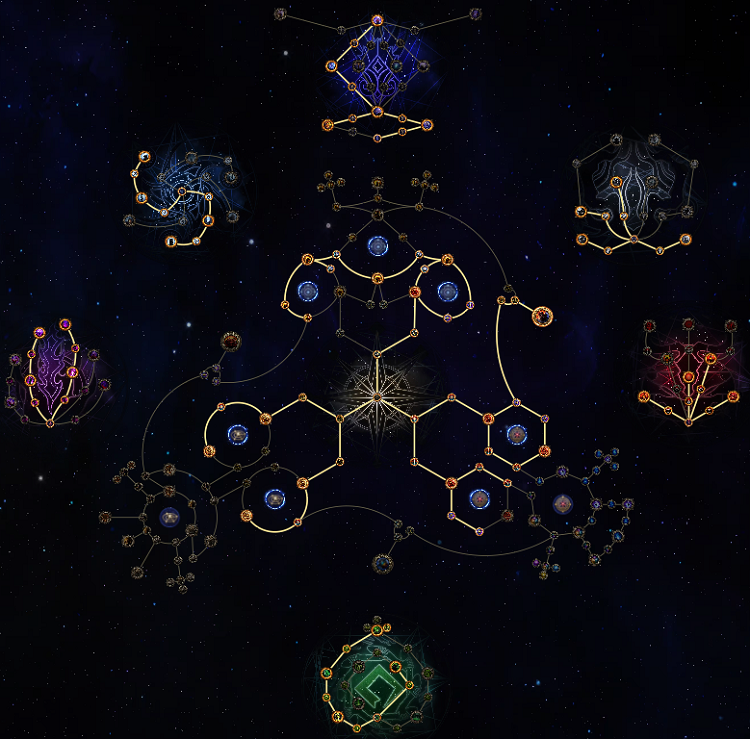
1. Atlas Tree Setup
When allocating atlas passives for Breach farming, there are two main pathways:

Easier, Accessible Path - For players with builds that aren’t exceptionally strong, the left-side path is preferable. This involves selecting Frantic Invasion, Rising P, Grasping Hand, and Waking Nightmare. Taking this route emphasizes Breach splinters, and the amount of splinters you earn can be quite high. Even though Waking Nightmare increases the damage taken, it’s typically manageable unless your build is very fragile. If you lack the full eight atlas points for Breach, it’s recommended to drop Waking Nightmare and run six points instead, focusing only on Grasping Hand and Rising P.
Advanced, High-Power Path - If your character is robust such as builds using Head Hunter or Defiance of Destiny, you can take the right-side path and invest into Zash Madness. This node offers a 50% boost to the effectiveness of rare Breach monsters in your maps, translating into more life, experience, and increased item quantity from those monsters. Zash Madness also provides a 10% chance for catalysts to drop as full stacks and improves the overall rewards from Breach. On the way to Zash Madness, you can pick up Crumbling Walls for increased Breach opportunities per map. This route yields the highest returns but ramps up the difficulty.
Additional Atlas Recommendations - Across both paths, prioritize waystone modifier nodes wherever possible, taking them to the left, right, and in any available spots to further amplify loot. Rising Danger and rare box nodes synergize well with this setup, increasing rare monster spawns and improving drops. Don’t neglect nodes that improve precursor tablet effectiveness and explicit modifiers, as these further boost Breach outcomes.
For those running primarily in swamp and water biomes, Local Knowledge remains useful due to its currency drop boosts. In other biomes, you can respec out of it to save points. Unstable Energies is another consideration, while it can make maps harder, it adds valuable bonuses if you can handle the added challenge. Rarity nodes are also worth considering, especially if your character lacks inherent item rarity
2. Tablet and Map Preparation
Map Rolling - Prepare tier 15 maps with six mods to enable running three tablets at once; if your build isn’t strong enough for this, settle for two tablets and four-mod maps. Use orb of alchemy and double exalted orb to craft maps, ideally prioritizing those with increased rare monster spawns and higher item rarity. This basic approach is effective and affordable.
Tablet Selection - For tablet setup, run double Breach tablets with core bonuses: “breaches in the map spawn two additional rares” and “increased number of rare monsters.” These two mods are key to maximizing returns. If possible, add rarity or an extra chance to contain an additional Breach for even better results. If you can secure double tablets with a 15% chance to contain an extra Breach, you’ll enjoy double Breaches often, leading to even more profit.
The third tablet slot can go to an Abyss tablet, focusing on “additional monsters” and “one additional rare monster spawned from abysses.” This keeps the strategy streamlined and brings extra loot without much effort. However, if you’re investing in expensive Breach tablets featuring rarity, rare monsters, and extra Breach chance, switch the Abyss tablet out for a third Breach tablet to maximize efficiency and value.
If your build struggles with clearing Breach monsters quickly, consider dropping the Abyss tablet for Rayclass Besieged. This tablet keeps Breaches open while any Breach monsters remain alive, removing the timer and letting you clear at your own pace. With lower-tier builds or when running only four-mod maps, run a single Breach tablet (with rare monsters and extra Breach chance) plus Rayclass Besieged for a smoother experience and the flexibility to resurrect if you die.
Tablet prices vary: simple ones with increased rare monsters and extra Breach chance are cheap, while those with high rarity and density can be much pricier. Base your selection on your budget—basic setups work well and are affordable, while high-end setups offer greater returns at a higher cost.
3. Map Running Tips and Loot
Breach farming brings large packs of monsters and plenty of action. If you find yourself getting stuck or overwhelmed, use movement skills and strong area-of-effect attacks to clear space quickly. For melee or slower builds, Rayclass Besieged removes pressure by eliminating the Breach timer, allowing you to clear everything at your own pace. Always keep your buffs active such as Walking Calamity and Lunar Assault and try to circle around Breach packs instead of charging straight in.
If you’re running expensive Breach tablets, stacking three of them per map is the optimal play, as this increases the chances for extra Breaches and maximizes returns from every run. For those on a tighter budget, including an Abyss tablet makes sense, but always keep an eye on your clear speed and survivability.
The loot from this strategy is rewarding: river catalysts, Breach splinters, and Breach rings all add up quickly, and the sheer number of rare monsters means you’ll see plenty of general drops as well. Even with basic maps and modest investments, this approach yields a steady flow of currency and raw loot.
PoE 2 0.4 Best Rogue Exiles Atlas Tree & Farm Strategy
This strategy focuses on farming valuable rogue exile abyss jewels, particularly the diamond jewel, by leveraging specific atlas tree nodes, map setups, and tablet combinations. The approach is built around maximizing the number of rogue exiles and abysses per map, which in turn increases the chances of dropping these high-value jewels. The farm is heavily influenced by RNG, as the drop rates can fluctuate from multiple jewels in a single map to multiple dry runs. However, over a substantial sample size, the method maintains a strong average, often yielding one jewel every two maps, making it a notably profitable approach when the input costs of tablets are reasonable. The process is further enhanced by pathing directly through corrupted zones and sidles, enabling synergy with other loot strategies and optimizing your atlas for future farming.
1. Map Setup
For this farm, the specific map type is not a major concern, any layout can be used, as the type does not affect rogue exile jewel drops. The main requirement is to run six-mod maps, enabling the use of three tablets per map. While map rarity and rare monster density do not directly influence jewel drop rates, running maps with these features can increase raw currency drops, which is a solid bonus, especially since Abyss encounters yield considerable currency. Although not essential, including maps with increased rarity or rare monsters is preferable for extra profit, but any level 61+ map suffices.
2. Tablet Selection
The minimum requirement for tablets is three abyss tablets per map, each providing “map is inhabited by one additional rogue exile.” This is the key modifier, do not confuse it with “increased chance to contain exile,” as the latter is much less effective due to low base rogue exile spawn rates. The next most valuable tablet mod is “chance to contain four additional abysses,” which should be included whenever possible. Ideally, use at least one of these four-abyss tablets, with the remaining being the “one additional rogue exile” types. A third mod, “maps contain additional abyss,” is helpful but not mandatory; you can run setups with just the exile and abyss mods, based on current market prices. Tablet prices fluctuate, so always check if the farm remains profitable before investing, when the cost per setup becomes too high, profit margins shrink.
3. Atlas Tree and Pathing
The atlas tree setup involves maximizing map effect and rogue exile nodes for increased raw currency and exile spawns. All rogue exile nodes are taken, including the jewelry node, which, while not increasing diamond jewel drop rates directly, gives a better chance at valuable items such as Headhunter. You may also choose dexterity, strength, or intelligence exile nodes based on your preference, though the dexterity node offers a higher chance for high-value drops.
Tablet nodes that increase tablet drops are essential, as are map effect nodes for quantity and rarity. For abyss notables, focus on “Shadow on Death” for more exiles influenced by abyss, “Overrun” for a chance to upgrade nearby maps for future strategies, and “Sprawl Rupture,” which increases the odds of exiles inside abyss encounters. While some nodes offer only marginal benefits, collectively they boost your overall returns.
When running maps, the optimal path is to proceed in a straight line, targeting corrupted zones and sidles along the way. This not only supports the rogue exile farm but also sets up future farming opportunities by accumulating a supply of corrupted and overrun maps for other lucrative strategies.
4. Jewel Rolling and Profit Considerations
Jewel drops are highly variable, with the possibility of hitting double “as extra damage” modifiers, which can push a jewel’s value as high as 30 divines or more with the right combination of mods. Using an Abyssal Echo on the first and fourth unveil is recommended, as these unveil stages target prefix modifiers, the area where “as extra” damage rolls appear and are most valuable. You can choose to sell the jewels unidentified for steady income, or roll them yourself for a chance at higher profits, depending on your risk tolerance and market demand.
While the method relies on RNG, farming 29 jewels in 58 maps demonstrates a consistent average of one jewel per two maps, or two divines per two maps, not including additional currency and unique drops from exiles. When tablet prices are reasonable, around six divines for a ten-map setup, the method yields reliable profit. If input costs spike, it may be wise to wait for price corrections before committing to another farm cycle.
PoE 2 0.4 Expedition Atlas Tree & Farm Strategy
As inflation continues to increase in the 0.4 League, many previously lucrative farming methods are yielding less profit over time. However, there is a stable and consistently rewarding approach centered around farming runic splinters through Expedition logbooks. This method is not only simple and reliable, but it also allows players to accumulate currency without the need for intense focus or effort, making it accessible to nearly any build and skill level.
The main focus of this strategy is targeting runic splinters, as they are currently very easy to obtain and trade for excellent returns. At present rates, 86 runic splinters can be traded for a divine, and with 240 exalted per divine, the exchange is highly favorable. This makes farming logbooks specifically for runic splinters a straightforward way to generate a steady income, even as market conditions fluctuate. The process involves purchasing high-level Expedition logbooks (preferably area level 81) and efficiently running them to gather as many splinters as possible, with a secondary benefit of acquiring raw currency and other valuable drops along the way.
1. Choosing and Buying Logbooks
Begin by purchasing Expedition logbooks with the highest area level available, ideally level 81. These can be found on the trade site by searching for Expedition logbooks and sorting by area level. Level 81 logbooks with Baron Atoll or Lush Isle are generally priced around 110 exalted, sometimes up to 120. If prices for level 81 logbooks rise too much, consider dropping to area level 80 for more affordable options, which often cost around 90 exalted and are more plentiful.
2. Selecting Logbook Types
Decide between Baron Atoll and Lush Isle based on your goals. Lush Isle offers more opportunities for raw currency drops, including divines and exalted, especially from specific closed zones accessed with the blow-up mechanism. Baron Atoll, on the other hand, tends to spawn more remnants and runic chests, leading to a higher yield of runic splinters, which is ideal if maximizing splinter income is your priority.
3. Running the Logbooks
When inside a logbook, prioritize collecting all visible remnants, as each one increases your splinter count whenever you open related chests. Pay special attention to remnants that increase the quantity of items found in excavated chests, as this further improves your splinter gains. Although gathering additional currency is possible, especially in Lush Isle zones, your main objective should remain runic splinters for optimal efficiency.
If you come across underground zones, it's beneficial to include them in your run, as they contain extra chests and sometimes runic chests for additional splinters. Speed is important; complete each logbook as quickly as possible by focusing only on chests and remnants, skipping monster buffs and storm boxes, which tend to be time-consuming and less rewarding for this strategy.
4. Looting and Trading
On average, each logbook should yield between 50 and 120 runic splinters, with 90 being a common result if all steps are followed. Even on less fortunate runs, a return of 50 splinters still ensures profit, especially when factoring in other currency drops. Sell your runic splinters for divines at the best available rate, then exchange the divines for exalted if needed. This sequence maximizes your returns and reduces transaction fees.
5. Tips for Efficiency
Focus on speed: Most logbooks can be completed in a few minutes, allowing for up to 20 runs per hour.
Use any build: Lower the area level or avoid monster-boosting remnants if your character is underpowered.
Avoid unnecessary tasks: Skip looting artifacts unless you want to squeeze out every bit of profit, as they are often not worth the extra time.
Monitor market prices: Don’t overpay for logbooks and always check current rates before buying.
PoE 2 0.4 Atlas Tree Strategy for Easy & Fast Currency Farm
If your currency stash isn't overflowing, this farming strategy can quickly turn things around. The beauty of this method is that anyone can jump in, no matter your build power or league progress. The foundation is the "triple threat" strategy, where you run delirium, ritual, and breach in the same map for maximum currency gain, all while keeping the gameplay loop fast and efficient. By combining multiple mechanics and focusing on speed, you can rack up currency at an impressive pace, with solid and reliable profits every hour.
1. Preparing Your Character and Atlas
Before jumping into the farm, make sure your character is ready. It’s cheap and easy to craft or buy some early upgrades, and you don’t need an overpowered build to get started. Once you’re set, focus on clearing your corrupted nexuses, collecting atlas points, and completing a bit of content to open up your options. Even if you haven’t cleared every breach, ritual, or delirium up to higher tiers, you can still use this tactic as soon as you hit endgame.
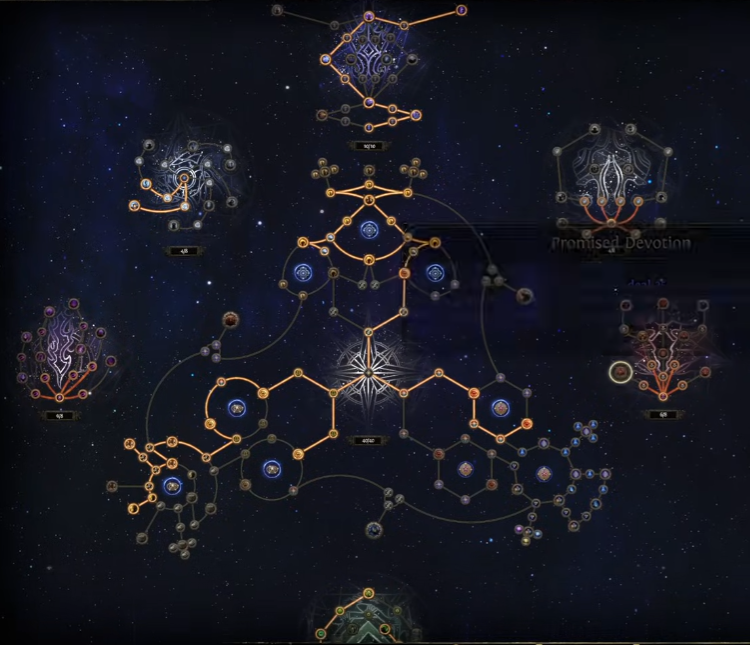
The real setup begins with your Atlas passive tree. For ritual, take Tempting Offers for extra rerolls, Promised Devotion to reduce defer costs, and Petition Splitters to guarantee four rituals per map. Delirium nodes should focus on increasing the number of fracturing mirrors and the monsters they spawn, plus success chance from those monsters. Any extra points can go into unique boss spawns or better boss loot, but these are optional.
For breach, there are two paths:
Interdimensional Assault: Boosts density and speeds up breaches, so you don’t waste time, but you might lose a few splinters if you’re not quick. This is the simpler setup and pairs well with nodes that up splinter quantity and monster density.
Frontal Invasion and Crumbling Walls: Prioritizes extra bridges, letting you clear two breaches in one map. Add Zest Madness for more effective rare breach monsters, which increases their life, XP, and item drops, as well as a 10% chance to drop a full stack of catalysts. If this is too tough, stick with the simpler breach nodes.
You don’t need to invest points in boss nodes unless you want to boost area level or boss loot. For farming locations, any map works, but cleansed areas with map bosses offer the juiciest rewards. Avoid running maps with increased gold area unless you have no choice.
2. Setting Up and Running Maps
To enable all three mechanics, use precursor tablets. After defeating the Arbiter, you’ll be able to upgrade these tablets to four modifiers. Slam an alchemy orb on your maps and tablets, and you’re good to go. While the mods on tablets aren’t too important for this approach, look for ones that boost stack sizes of splinters or increase rare chance in rituals.
When you enter a map, the sequence is simple:
Touch the Delirium Mirror right away and start clearing. Follow the floating delirium particles for the best path, as they show where delirium is most dense, which leads to more rewards.
For Breaches, go in one direction, clockwise or counterclockwise, then double back when density drops. If the breach splits, clear one side, then the other. Focus on rare monsters inside, since they drop catalyst splinters.
For Rituals, clear the area around the circle before starting, since monsters nearby will be included in the ritual and give more tribute points. After each ritual, access the rewards and defer valuable items like petition splinters or omens. Use your rerolls to maximize rewards, especially after the third ritual.
Always keep up the tempo—run, gun, and move to the next mechanic as soon as possible. If you hit a strongbox, only open ornate or researcher types, as these yield the best currency for your time. Skip strongboxes and content that takes too long, like Azurite Temple or monoliths, unless they’re especially rewarding.
3. Loot Management and Efficiency
Efficiency in loot handling is key. Head to Doriani to identify items, disenchant unwanted uniques with Zolin, salvage socketables and quality items, and then stash everything quickly before jumping into the next map. Using a good loot filter helps tremendously, hiding junk and making valuable mods pop out so you don’t waste time.
For essences, always check the market or POE Ninja for values. Valuing essences can turn cheap ones into valuable ones, with a chance to hit high-value types like Hysteria or Haste.
For rituals, defer expensive items or splinters, and only buy them when defer cost drops to near zero.
4. Profit and Results
By combining delirium, ritual, and breach, you generate a stream of currency from splinters, catalysts, essences, omens, and fracturing orbs. In one hour of running this method, you can expect to bring in around four divine orbs worth of currency with an unoptimized Atlas, and up to ten divines per hour with better gear, a fully upgraded tree, and some luck. The strategy doesn’t require gambling on rare drops; instead, it leverages the consistent income from running multiple mechanics at once.
Catalysts, especially, are in high demand as everyone upgrades gear. Catalyst stacks can sell for dozens of exalted orbs, and the same goes for omens and fracturing orbs. Even if you get unlucky with tablets or splinters, the steady flow of loot keeps profits high.
PoE 2 .0.4 Best Atlas Tree Strategy for Endgame Waystone & Maps Farming
As Path of Exile 2: Last of the Druids continues to develop and more players advance into endgame, optimizing your atlas strategy becomes increasingly important for sustaining high-tier waystones and smoothing map progression. By following a focused approach that balances waystone quantity, efficient mechanic selection, and sensible point allocation, you can steadily progress from early mapping all the way to challenging tier 15 content. This method allows both newcomers and experienced players to maintain momentum, efficiently gather currency, and adapt to new mechanics as they unlock more atlas points.
1. Early Atlas Setup for Waystone Farming
As you reach endgame and begin targeting higher tiers of waystones, your initial atlas focus should be on gathering as many waystones as possible. Early points are best spent increasing the quantity of waystones found in maps. Start by investing in Constant Crossroads and Fortunate Path for your first five points. Next, allocate two more points for an additional 4% quantity increase, then take Treasure Cos to reach Precursor Influence, which provides a 30% boost to tablets found in maps. By stacking more tablets early, you open up more content and farming opportunities.
With around 15 atlas points, continue to invest in waystone quantity and add Raising Danger. It’s helpful to ensure your waystones can drop as rare and corrupted, so progress through the quantity nodes and select Higher Road and Twin Threads. While Twin Threads isn’t the most powerful node, it gives you an extra rare for minimal cost, which is quite useful in the early stages. If you’re not aiming for extra map content or pack size, you can consider Ecological Shift, but maximizing tablet bonuses is generally more effective, so prioritize all Tablet Effect nodes available.
2. Choosing Your First Mechanic
After maximizing tablet effects, it’s time to specialize. Early in progression, boosting explicit modifiers on waystones can be frustrating, so it’s practical to focus on Essences or Strongboxes. Strongboxes are often the preferred starting mechanic—invest points into increasing box size, and add shrine nodes to speed up your map clears. Boosting the chance for magic shrines and shrine effects provides additional benefits, though the shrine type selector isn’t a priority at this point.
3. Breach, Expedition, and Other League Mechanics
If you plan on running Breach content, prioritize Rising Fire to increase monster density. Afterward, nodes that make breaches open and close faster are good if your build can handle them; otherwise, opt for nodes that slow breaches for more manageable encounters. Crumbling Walls is a solid addition for breach-focused paths.
For Expedition, always start with Detailed Records to gain an extra logbook level, then invest in Detonation Chain. Depending on your build, you can branch into Legendary Battles for more encounters, or go for one large explosive by picking up Frail Treasures and Extreme Archaeology. The first priority should always be Detailed Records for the best returns.
4. Bosses, Delirium, and Ritual
When facing map bosses, prioritize nodes that increase waystone quantity—Radiant With Stones is a reliable choice. After that, select a mechanic to focus on, such as Essences or Strongboxes. For Strongboxes, Old Pirate Trick is a great pick. In Delirium, head toward nodes that grant more stacks of similar splinters and benefit from the 50% increased fracturing mirrors node.
In Ritual, start by selecting Spreading Darkness for four ritual altars and add Promise Devotion for reduced defer costs. Later on, He Approaches can be added for further upgrades.
5. Abyss and Flexible Investment
For Abyss, seek out nodes that scatter abysses throughout the map and increase monster spawns by 25%. Steer the Swarm gives an additional abyss and a 5% chance to overrun nearby maps. These two points provide a strong foundation for abyss content.
As your atlas grows, you’ll have extra points to allocate. If you’ve moved beyond the early game, consider dropping shrine nodes and investing in explicit modifier nodes for waystones instead. This will improve your waystone gains overall in late-game atlas setups. Focus on waystone effect nodes everywhere. Early on, avoiding these nodes can make map completion easier. If shrines don’t fit your playstyle, you can divert points into rarity nodes or reach Gorillan Journey if your build allows.
6. Essence, Shrine, and Preferred Setups
If you prefer Essences over shrines, select all basic essence nodes and the essence type node that’s most valuable at the time—most often Rarity Essence or Life Essence. Energetic Resonance or Vital Resonance are simple and effective choices. To save points, you can skip some nodes and stick with the core essence setup.
Generally, shrines remain a favorite for early progression, as they help complete maps faster and boost effects. A comfortable atlas for most players will focus on shrines for the initial phase. For farming strategies, Ritual currently offers strong currency returns, with Breach and Abyss looking promising as well.
7. Adapting Your Atlas Over Time
As you gather more points, adapt your atlas to suit both your build’s strengths and the current market values of league mechanics. This approach will keep your waystone supply high and your maps running smoothly throughout your progression in Path of Exile 2.
Stay tuned! More new atlas and farming strategies will be updated here as the new season and league progress!
