The Vaal Temple has been one of the most talked-about mechanics since its debut in Path of Exile 2, and with the arrival of patch 0.5, it has gone through some heavy reworks. Despite repeated nerfs and a developer team determined to shut down certain exploits, the Temple is far from dead. In fact, it remains one of the most profitable and entertaining mechanics in the entire game when you know how to set it up correctly. This guide walks you through everything you need to get back into the Temple in 0.5, including unlocking it, building proper layouts, and choosing the right farm strategy for your playstyle.
PoE 2 0.5 Atziri's Vaal Temple Guide
In 0.5, the Vaal Temple is now a permanent part of the core endgame after originally being introduced as a league mechanic in 0.4. The patch notes brought one major change that scared a lot of players: it is no longer possible to prevent a room from being deleted from the temple. Rooms that must be deleted but have other connections will be turned into simple path rooms. This was meant to kill the snake strategy, along with the removal of the lock medallion from most rooms (it now drops only from Atziri and the Architect), tighter destabilization rates, and limits on duplicate Spymasters. Despite all of this, snaking, Atziri rushing, and hybrid layouts are still very profitable. Now that we know the state of the mechanic, let's walk through how it actually works in practice.
1. How Does PoE 2 0.5 Vaal Temple Farm Work
Before we get into layouts, you need a clear picture of how to access the Temple and what's happening behind the scenes when you place rooms. We'll cover this in two parts.
How To Unlock & Access the Vaal Temple
Vaal Temple Location
The Vaal Temple map zone can be found right next to the Ziggurat Refuge, just outside of the fortress on the Atlas. In the campaign, you won't gain access to it until Act 3, where you'll need to activate a total of six Ancient Beacons before the entrance is revealed.
Activating the Ancient Beacons
The first six beacons appear as Vaal Beacons on the map. Defeating all enemies around each one activates it, lighting one of six red crystals inside and revealing a Vaal Chest with loot. The first six locations are:
Jungle Ruins – the first beacon
The Infested Barrens – the second
Chimeral Wetlands – the third
Matlan Waterways – the fourth, featuring the Stonefist, Royal Sentinel mini boss
Jiquani's Sanctum – the fifth, located underground
Venom Crypts – the sixth, also underground
You can activate them in any order. Once you light the sixth, the temple entrance opens and you should head in immediately. Some players have reported losing access if they log out or disconnect before entering.
Interlude #3 Beacons
After progressing further, Interlude #3 requires you to activate six more beacons:
Ashen Forest
Kriar Village
Glacial Tarn
Howling Caves
Kriar Peaks
Etched Ravine (features Xotolan, High Priest, a fire-damage boss who can burrow underground and reset your damage stacks)
Vaal Temple Maps & Ruins
In the endgame, when you defeat all Vaal Beacons within Vaal maps, you can earn the Atlas point for each map. Sometimes more than one beacon exists per map. Pathing to the middle of the Vaal zone opens access to the Vaal Ruins, allowing you to visit them at any time. Importantly, Vaal Temple maps are also city maps, meaning if you have the Industrial Improvements Atlas node, you can run a fourth tablet on these maps.
How To Setup Vaal Temple Layout and Farm
Vaal Temple Crystals
Each Vaal map contains multiple Vaal beacons, and clearing each one rewards you with crystals. You can carry a total of 60 crystals at a time, with each temple run consuming six. Holding the maximum cap of 60 lets you run 10 temple runs back-to-back.
To gain crystals faster, run three Vaal Temple tablets per map (or four on city maps with Industrial Improvements). Look for the suffix mod "chance to gain an additional crystal from Vaal beacons", three good rolls of this can net you 4-6 crystals per map, meaning roughly one temple per map.
Important map level tip: Always enter the Temple through your Atlas, not via waypoint. Going through the Atlas grants +1 area level (when combined with the relevant Atlas node), making Temple item level 80 instead of 79.
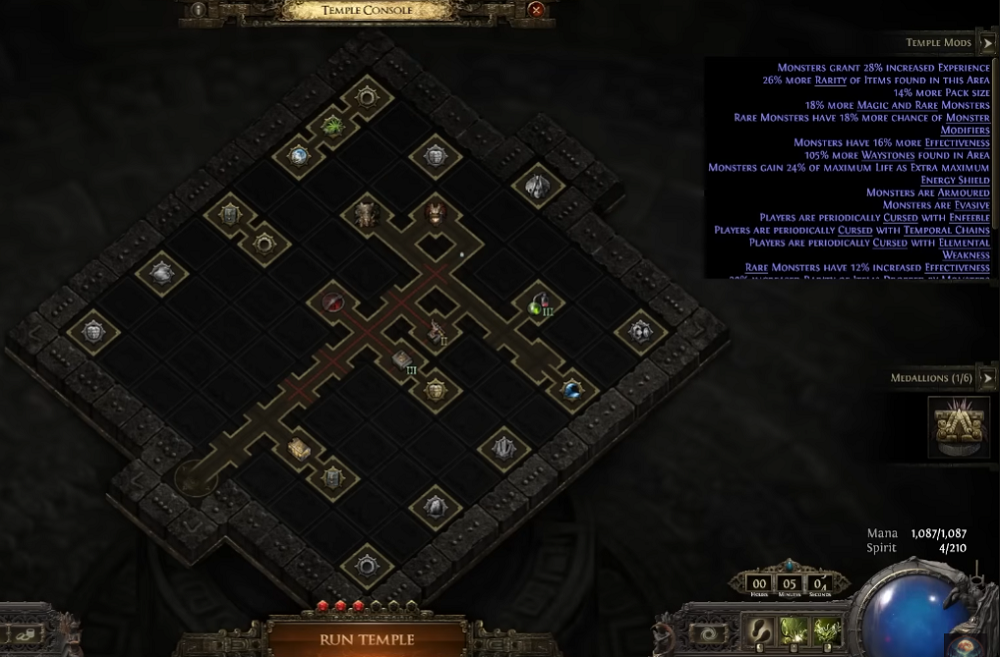
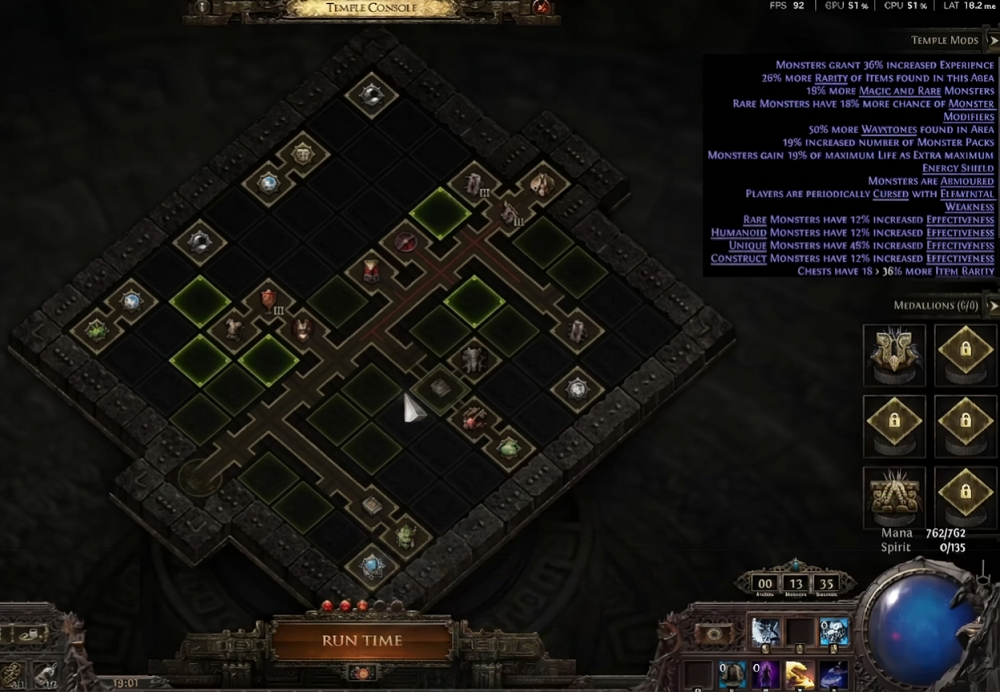
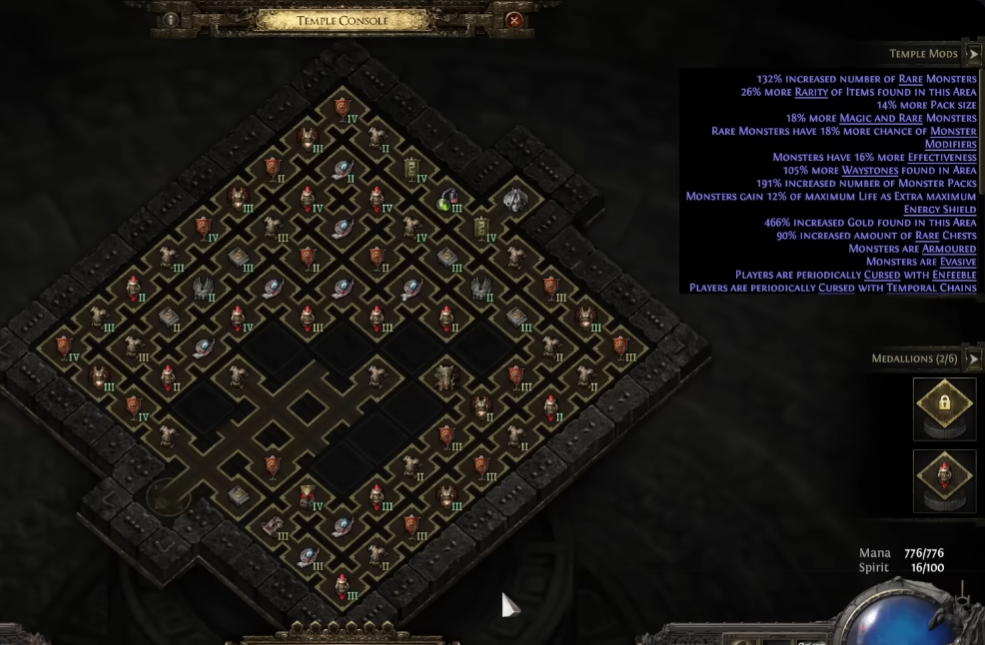
Rooms & Destabilisation
Once inside the Vaal Ruins, you'll find Doryani at the temple console where you place rooms. Compatible rooms give bonuses to each other and increase tiers when placed adjacent. Holding Alt on any room reveals what medallions it drops, what rooms it links to, and how to upgrade it.
After every temple run, some rooms vanish or "destabilize." Without nerf-reducing nodes:
No Architect / Alva run: ~10% of rooms removed
With Architect / Alva run: ~30% removed
Hotfix 0.5.1 tightened these to roughly 12% and 36% respectively. Rooms out in the open destabilize first; chained rooms with stuff after them are protected since destabilization only targets the start or end of paths. Straight chains preserve the middle.
Vaal Temple Medallions
Medallions drop from completed rooms and trigger powerful effects. You can hold up to six at a time. The main types include:
Add a room – an extra placement option
Reroll – rerolls your current room offers
Upgrade – increases a room's tier
Lock – prevents a room from destabilizing (now rare; only from Atziri and the Architect)
Running the Temple
Press V (or your bound key) inside the temple to view the layout. To complete a room you must enter it, defeat the monsters or finish the event, then proceed. The more rooms you place, the harder runs become. After each run, close the temple to destabilize some rooms and reveal new ones to place.
Vaal Temple Bosses
Two bosses live inside: the Architect (mini boss) and Atziri (pinnacle boss).
The Architect drops the lock medallion and gives you a console of restricted rooms — guaranteed-to-destabilize special rooms with strong rewards. The most important is the Royal Access Chamber, mandatory for fighting Atziri. He has one deadly mechanic — a hard-to-see Frost Nova when you hug him, so bait it, then keep your distance.
Atziri is a two-phase fight. The first phase is the harder of the two; the second phase she turns into a snake and shoots lightning. Circle behind her to stay safe. To reach her, first kill the Architect, place the Royal Access Chamber, then on a separate run path to both the Royal Access Chamber and Atziri. Enter the chamber, talk to Doryani, then enter Atziri's room. Defeating her drops her medallion, which you take back to the rewards center for loot.
If you die to either, you can redo the fight, but the rest of the temple is wiped. Save the Architect for last in a run since he's the deadlier of the two.
Atlas Points Priority
Recommended order for spending Vaal Temple Atlas points:
Stolen Authority – more medallions
Offerings to the Queen – more temple currency from rare beacon chests
The four small destabilization reduction nodes
Training and Preparation – +1 area level
Military Reinforcement – more monsters at beacons
Protected Treasures – more loot from Architect rooms
Expanded Design – more restricted rooms per Architect kill
Royal Prerogative – less destabilization on restricted rooms
Bloodright Investments – sacrificial regalia from Atziri
Riches of the Empire – 15% chance to duplicate temple currency
Atziri's Assets – guaranteed extra temple currency from Atziri (or a 20% chance for an extra unique)
Patrolling Legions + Lost Architect – more Vaal mini bosses and modifier medallions
Power Relays, Efficient Arteries, Transcendent Progress, Machinations – more juice per room
Trap node to skip: Secrets of the Ancients adds terraforming research rooms that crowd out reward rooms like Kishara's Vault. Once allocated, you can't respec, so leave it alone unless you're going for a heavily juiced snake build.
2. PoE 2 0.5 Vaal Temple Cheat Sheet
| Aspect | Key Info |
|---|---|
| Crystals per run | 6 (max 60 stored = 10 runs) |
| Stable temple size (with passives) | ~80 rooms |
| Destabilization (no Arch/Alva) | ~12% of rooms |
| Destabilization (with Arch/Alva) | ~36% of rooms |
| Max Spymasters | 1 (extras kill each other) |
| Lock Medallion drops | Atziri & Architect only |
| Tablet to use | Vaal Temple Tablet (3 per map, 4 on city maps) |
| Best tablet mod | Chance to gain additional crystal from Vaal Beacons |
| Atlas Master | Doryani (top-left box) or Jado for travel/anomaly maps |
| Map level | T15 corrupted; enter Temple via Atlas (not waypoint) for +1 area level |
| Trap Atlas Node | Avoid Secrets of the Ancients |
| Atziri Communion price | ~70+ divines |
| Doryani's Thesis | ~33 divines (from Soul Core corruption) |
| Atlas Desire | ~70 divines |
| Best big-ticket items | Atziri's Communion, Atlas Desire, Atziri's Splendor (ES variant), Doryani's Thesis |
| Most valuable T3 rooms | Sacrificial Chamber, Smithy, Thaumaturge, Alchemy Lab, Corruption Chamber |
| Reward room priority | Currency Vault > Tablet Vault > Lineage/Augment Vault |
| Restricted Room priority | Royal Access Chamber > Extraction Chamber > Currency Vault |
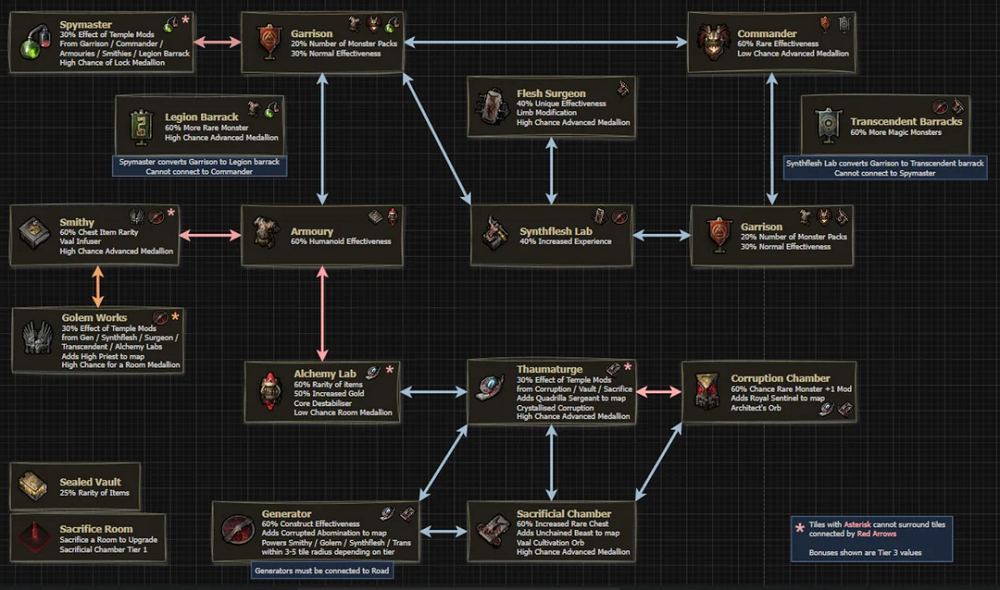
Vaal Temple Room Connection Cheat Sheet
Use this for chaining rooms efficiently. Holding Alt on a room in-game shows the same info, but here's the quick reference:
Spymaster (4 effect of Temple Mods, High Lock Medallion chance) → connects to Garrison / Commander / Armouries / Smithies / Legion Barrack
Garrison (Number of Monster Packs, Normal Effectiveness) → connects to Spymaster / Commander / Armoury / Synthflesh Lab / Flesh Surgeon
Commander (Rare Effectiveness, Low Advanced Medallion chance) → connects to Garrison / Synthflesh Lab / Transcendent Barracks
Legion Barrack (More Rare Monster, High Advanced Medallion) – Spymaster converts Garrison to Legion Barrack; cannot connect to Commander
Transcendent Barracks (More Magic Monsters) – Synthflesh Lab converts Garrison to Transcendent; cannot connect to Spymaster
Smithy (Chest Item Rarity, Vaal Infuser, High Advanced Medallion) → Armoury / Golem Works
Golem Works (Effect of Temple Mods, adds High Priest, High Room Medallion chance) – tiles with asterisk cannot border tiles connected by red arrows
Armoury (Humanoid Effectiveness) – central hub connecting Smithy, Garrison, Synthflesh Lab, Alchemy Lab
Alchemy Lab (Rarity of items, Increased Gold, Core Destabiliser, Low Room Medallion) → Generator / Thaumaturge / Synthflesh Lab
Thaumaturge (Effect of Temple Mods from Corruption / Vault / Sacrifice, adds Quadrilla Sergeant, Crystallised Corruption) → Alchemy Lab / Sacrificial Chamber / Corruption Chamber
Corruption Chamber (Rare Monster +1 Mod, adds Royal Sentinel, Architect's Orb) → Thaumaturge
Sacrificial Chamber (Construct Effectiveness, adds Quadrilla Sergeant, Vaal Cultivation Orb) → Generator / Thaumaturge
Generator (Construct Effectiveness, adds Corrupted Abomination, Powers Smithy/Golem/Synthflesh/Trans within 3-5 tile radius) – must connect to Road
Synthflesh Lab (Increased Experience) – central converter for Transcendent Barracks line
Flesh Surgeon (Unique Effectiveness, Limb Modification, High Advanced Medallion)
Sealed Vault (25% Rarity of Items)
Sacrifice Room – sacrifice a room to upgrade Sacrificial Chamber to Tier 1
Note: Tiles with an asterisk cannot surround tiles connected by red arrows. Bonuses listed are Tier 3 values.
3. PoE 2 0.5 Best Vaal Temple Layout and Farm Strategies
There are now four main approaches dominating 0.5 Vaal Temple farming. Each has its own strengths depending on your time investment, playstyle, and how much risk you want to take. Let's go through them one by one.
Strategy 1: Atziri Rushing (Cheap & Simple)
This is the easiest, lowest-investment approach. Rather than building a complex temple, you rush Atziri as often as possible since she drops the bulk of valuable loot: Atziri's Communion, Atziri's Splendor, raw currency, and Vaal-specific currency.
How it works:
Build a single road straight through the middle of the temple from start to Atziri
Treat all other rooms as "water", destabilization fodder placed around the road
Place rooms on the outermost edges (top and bottom rows) to push Royal Access Chamber spawns toward usable spots
Run 1: path to the Architect, kill him, place the Royal Access Chamber
Run 2: connect the Royal Access Chamber to your path and to Atziri, kill her
Repeat, you'll kill Atziri roughly every second run
Atlas setup: Doryani with a 6-mod corrupted T15 map setup. Use 3 Vaal Temple tablets (4 on city maps) with the additional crystal mod.
Expected loot per ~7 hours: around 100+ divines in raw + temple currency, even without hitting major jackpot drops.
This is the best entry-level strategy and works for any player without massive gear investment.
Strategy 2: Lineage Gem + Atziri Hybrid Farm
A variant of Atziri rushing that combines temple farming with travel toward valuable points of interest like Jade Islands (Rakiyata's Flow), Copper Citadels, and Maytrade Halls. The aim is speed and lineage gem hunting alongside Atziri kills.
Setup:
Atlas master: Jado with Spy Secrets, Unexpected Missions, Unforeseen Threats, Partial Translation, and Untold Histories
Jado helps reveal anomaly maps so you can travel toward lineage gem zones while farming temple crystals
Use 2 Temple tablets + 1 Irradiated tablet
Each map: kill the boss fast, clear Vaal Beacons, exit
Skip energized beacon hunting, grab your 2-3 crystals and move on
Temple build:
Same core idea as Atziri rush, main path through middle from start to Atziri
Don't place Depots, Command Chambers, or Dynamos along the path (they block routes)
Last room before Atziri can be a Depot (it connects)
Always place Kirac's Vault rooms when available, they often drop multiple divines
Expected loot: 4-5 divines per Atziri kill, with lineage gems like Atziri's Communion or Rakiyata's Flow as jackpot drops. Anecdotal reports show roughly 1-in-5 lineage gem rate, though this fluctuates heavily.
This is the strategy of choice if you also want to scout the Atlas for Citadels and other juicy zones during your temple farm.
Strategy 3: Updated Snake Strategy (High-End Layout)
Snaking isn't dead, it just had to evolve. Since the patch only deletes rooms that must be destabilized, you can still build a snake by providing enough "bait rooms" to soak up the destabilization.
Core principles for 0.5 snaking:
Never exceed 60 placed rooms unless you have abundant bait
Always leave room to drop 6+ tiles per round that can be deleted
Bait rooms sit at the end of branches and absorb destabilization instead of your chain
Use only one Spymaster, extras will kill each other unless locked
Stack rooms with four adjacent rooms for the 15% increased effect node
Aim for a balanced split of Alchemy Labs, Commanders, and Golem Works (diminishing returns)
Start your chain on a Generator so any Stone Golem placed becomes powered
Temple Room Layout shape:
A three-wide chain running along the perimeter of the temple, with the Architect tucked into a small "hidey hole" in the middle so he naturally relocates there when moved. Interior chain rooms gain four-adjacent bonuses, and the outer empty tiles serve as bait space.
Building steps:
Run Atziri first to grab all Atlas points
Move the Architect to the center hole using an adjacent reroll
Place rooms one by one in the perimeter chain — no advanced tech required
Use lock medallions only when abundant
Expect 80+ temples to fully build the dream layout
Bug to know: A current bug lets you walk through Tier 3 Alchemy Lab rooms without using the device, which preserves them between runs. Build your lab placement around this until GGG patches it.
Expected loot: 5-10 raw divines per run plus uniques like Callandra's Touch, gold, XP, and temple currency.
Strategy 4: Three-Headed Snake (Spiral Pattern) Vaal Temple Layout
A modernized snake variant that runs three separate snake chains in a spiral pattern instead of one giant chain.
Why it works better:
Three chains pull more value out of fewer rooms — you can lock in T3 Golem Works early on top of a Generator
Sneaking in a third elite Legion Garrison gives 2-3 active rare-monster bonuses per round
Two corruption chambers placed strategically can both hit T3 instantly
Easier to sustain, you're filling three different room types each round, not just one
Less likely to waste cards from your room offers
Build approach:
Don't aim for a complete temple, target around 75-80% filled
Different chains can use different room types, so losing one chain isn't catastrophic
Constantly plug new rooms into chains to maintain them as old ones fall
This layout is more demanding but rewards diligent players with the highest possible loot ceiling within current rule constraints.
4. Is Vaal Temple Still Worth Farming in PoE 2 0.5?
Yes, the Vaal Temple is absolutely still worth farming in 0.5, despite repeated nerfs and the removal of the lock medallion from most rooms. Here's why:
Raw currency is still strong. Even casual Atziri rushing pulls 4-5 divines per kill, and dedicated runs can net 100+ divines over a few hours.
Big-ticket drops are valuable. Atziri's Communion sells for 70+ divines, Doryani's Thesis around 33, Atlas Desire around 70, and the energy shield Atziri's Splendor can hit 300+ divines with the right cultivation.
Temple-exclusive currency holds value. Cultivation Orbs, Architect's Orbs, Crystallised Corruption, Vaal Catalysing Infusers, and Core Destabilizers are all worth divines each, and prices are likely to rise as more players reach late-league crafting.
It's flexible. You can run the cheap Atziri rush for low effort, the lineage hybrid for travel + jackpots, or commit to a full snake build for the highest ceiling.
It pairs well with mapping. Temple farming naturally moves you across the Atlas, letting you find Citadels, cleansed zones, breach fortresses, and ritual areas along the way.
The mechanic does take time to ramp up, building a dream snake temple can require 80+ runs before peak loot, but for players who enjoy the puzzle of layout planning, it remains the most engaging and rewarding loop in PoE 2. If you've been ignoring the temple after the nerfs, now is a great moment to come back and try one of these refined strategies.