With the Legacy of Phrecia event in Path of Exile 3.27, players are buzzing with excitement over the return of alternate ascendancies and a completely revamped mapping system based on Idols. If you’re looking for a deep dive into the most lucrative idol mods, optimal setups, and the most effective farming strategies for this event, we will get you covered with the Top 10+ PoE 3.27 Phrecia Idol Setup & Farm Strats for printing gold and currency!
PoE Legacy of Phrecia 2.0 Farming Guide
The Legacy of Phrecia event kicks off on January 29th and runs until February 19th, offering three weeks of high-octane action. In this event, the entire Atlas system is replaced by the Idol system, where Idols act as customizable jewels that slot into your Atlas window. These Idols come in different shapes and sizes, each with unique mods that directly affect your mapping experience.
You’ll notice that normal Atlas passives are gone, everything is juiced through Idols, which drop from map bosses and are also found in the core loot pool. They are not craftable via currency, but can be recombined for a hefty gold cost, making gold management crucial as you assemble your dream setup. With alternate ascendancies and a completely new trade environment thanks to asynchronous trade, the event promises a fast-paced and volatile economy.
Now, let’s get into the best ways to set up your Idols and maximize your profits during Legacy of Phrecia.
PoE 3.27 Best Idols Setup & Map Sustaining Strategy for Fast Atlas Progression
First of all, let's break down how to optimize your idol inventory, sustain map drops, and quickly progress Atlas in the Legacy of Phrecia vent:
1. Starting Out: Early Atlas Progression
When you begin, your Atlas progression typically starts in the lower regions, moving towards spots that offer the highest Kiraak mission opportunities. As you advance, you’ll proceed through the map nodes, working towards the Unwavering Vision node. This node prevents scarab drops and fragment use (aside from Divine Vessels) but grants a large number of additional Atlas passive points.
Using those extra points, prioritize the 2% chance nodes for monsters in your maps to drop additional connected maps. By picking up all available nodes of this type, you can achieve roughly a 50% chance for a monster to drop a connected map, which greatly increases map sustain. This setup leads to a robust and self-sustaining map pool.
2. Idol Inventory Unlock
In the Legacy of Phrecia event, the idol system replaces the traditional Atlas tree, but many familiar mechanics remain, including Atlas objectives and boss challenges. Your idol inventory fills out as you complete objectives, such as running maps at magic or higher rarity to gain points, which unlock new idol slots.
Completing bonus objectives (like killing the boss of a magic or rare version of each map) contributes towards unlocking idol slots.
Running unique maps and completing rare ones (like Oba’s Cursed Trove or Coward’s Trial) is necessary to reach the maximum number of objectives.
Boss encounters (Elder Guardian, Shaper Guardian, Maven, Eater, Exarch, Uber Elder, and tier 16 bosses) each unlock specific idol slots, similar to favored map slots in previous leagues.
3. Acquisition & Recombining
Getting started in Phrecia means focusing on gathering Idols as soon as you can. Idols begin dropping from map bosses, and you can recombine them to roll for better mods. Early on, you’ll want to slot any Idol that boosts map drops or increases explicit effects to maintain map sustain, since map progression can feel rough in the lowest tiers. As you progress, keep an eye out for single-mod blue idols - these are especially valuable when recombining to craft perfect sets for specialized farming.
Gold is vital for recombinating, so don’t hesitate to convert your gold into higher-tier Idols, especially Conqueror Idols, as these open up some of the most profitable strats in the event.
4. Idol Modifier Priorities for Progression
For the fastest and most consistent map progression, prioritize the following idol affixes:
Connected Map Drops: Focus on minor idols with connected map drop chance. Combining multiple copies quickly raises your chance for extra connected maps, directly supporting map sustain.
Map Tier Upgrades: As noted, minor idols can give up to a 10% chance for maps to drop one tier higher. Stacking these allows you to maintain high-tier maps.
Kiraak Missions and Scouting Reports: Minor and burial/totemic idols can both contribute here, helping you access more Kiraak missions, which in turn provide more map options and progression opportunities.
Boss Map Drops: Kamasan and burial idols can provide chances for Shaper/Elder/Eater/Exarch Guardian maps, helping you reach key progression milestones.
5. Shrine Modifiers: Speeding Up Map Clear
Shrines are extremely valuable for speeding up your map clears and overall progression. You can find a variety of shrine-related modifiers on your idols:
Minor Idols: Up to 10% chance for a shrine to appear, 50% chance for an additional shrine, and increased shrine duration (up to 40%). Stacking these can provide guaranteed shrine presence and extended powerful effects.
Kamasan/Noble Idols: Up to 18% chance for shrines to appear, up to 80% chance for an extra shrine, and increased effect of shrine buffs (up to 35%).
Burial/Totemic Idols: Flat additional shrine (prefix), up to 25% chance for another shrine, and 60% chance for shrines to be guarded by extra monsters, bringing more loot.
Conqueror Idols: Two extra shrines per map, 30% flat chance for shrines, and sometimes an additional random shrine effect.
Having guaranteed shrines means consistent movement speed and action speed boosts throughout your mapping, which benefits all builds and helps you progress faster.
6. Efficient Idol Combination and Management
Idol drops are common, but many will have less useful modifiers. Use recombination to merge the best affixes from multiple idols, aiming to stack connected map drops, map tier upgrades, and shrine effects. Early on, focus on filling your inventory with high-value minor idols rather than chasing rare conqueror idols, as this delivers the fastest returns.
7. Progression Tips and Boss Encounters
Prioritize completing map objectives at magic or higher rarity to quickly open idol slots and progress through Atlas objectives.
Maven, Uber Elder, and similar bosses can be completed via party carries if needed.
Kiraak missions and scouting reports are a reliable way to access missing maps and objectives, so prioritize idols that increase their frequency.
Some idols can accelerate Eater/Exarch progression by offering a chance for double progress towards their invitations, allowing you to reach pinnacle bosses faster.
PoE 3.27 Budget Idol Recombination & Setup Strat
Here we share with you the budget Idol recombine and setup strategy for league start:
Idol Recombining (Rec) in 3.27 Phrecia
Two Recombine Methods
Predictable:
You select one modifier on each idol to keep.
Chance to succeed: 25% to 65%, depending on items.
Success: you always keep your chosen mods.
Failure: item is destroyed.
Cost: Lower than unpredictable (especially after GGG’s announced reduction in 3.27!).
Unpredictable:
No items are destroyed, but mods kept are random—could end up with 2, 3, or 4 mods.
Costs way more and offers no significant advantage for building 2-mod idols.
NOT recommended unless you want to gamble for a high-roll 4-mod idol!
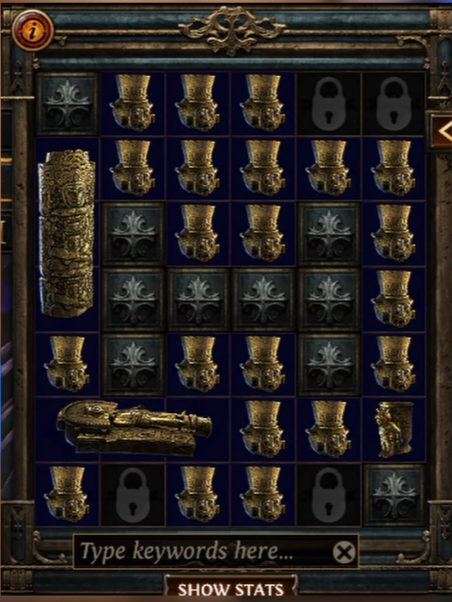
Step-by-Step Idol Setup Guide for League Start
1. Plan Your Desired Idol Setup
Decide which two (or three) modifiers you want to combine.
Look up base idols and mod sources so you know what to hunt for.
2. Gather Materials Efficiently
Gold: ~6,000 per recombine.
Dust: ~25,000 per attempt (cheaper after the 3.27 patch!).
Source: Dust comes from disenchanting unwanted uniques or selling to other players.
Tip: Buy cheap unique items en masse early for dust.
Idols: Collect lots via mapping, campaign, and trading.
3. Save Cost: Always Use ‘Predictable’ Recombine
Disable the unpredictable method in the crafting interface.
This not only slashes costs (in both gold and dust) but ensures you can target specific mods efficiently.
4. Combine Your Idols
Select your bases.
Click ‘Predictable’ rec.
If you succeed, you’ll always get your two chosen mods. If you fail, you lose the idols (so have backups ready!)
Repeat with any backups until you finish your full setup.

5. Tips for League Start
Start farming idols and dust immediately.
Trade cheap idols & uniques for dust while the market is flooded early.
Don’t be sucked in by high cost paranoia! Many get their setup even before day 3, given how accessible materials become as the league kicks off.
Check for GGG Announcements: Confirm post-patch dust costs (promised to be reduced in 3.27!).
Is it really “impossible” to get a full idol setup at league start?
No! With predictable recombine and some planning, most players report being complete by end of day 2.
Do I need crazy amounts of dust and gold?
Not at all. For each rec, expect ~6k gold and 25k dust - far below the “100k-170k dust” cited in some panic posts and videos.
Should I ever use ‘unpredictable’ recombine?
Only if you’re chasing wild Hail Mary rolls. For targeted, efficient setups, always use predictable recombine!
Top 10+ PoE Phrecia 2.0 Farming Strats (Best Idol Setups & Mapping Strats)
Now, let's update the new best meta Phrecia farming strategies for gold and currency farming in Path of Exile 3.27:
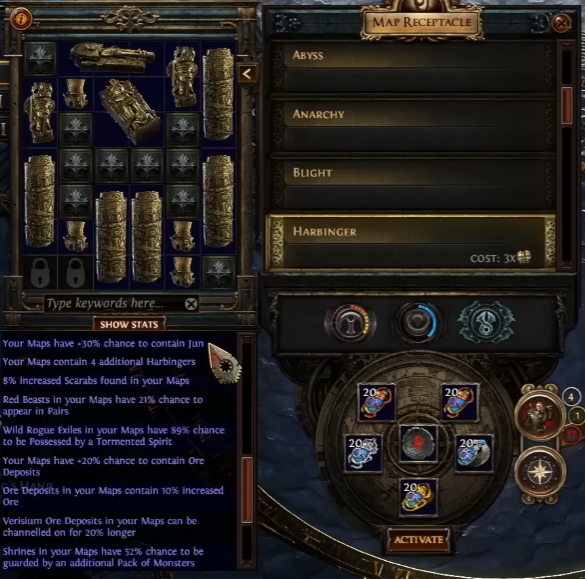
1. Best Phrecia Harginer Farm Strat
The top strategy for the Phrecia League Harbinger farm focuses on optimizing your idol layout and scarab choices to rack up large quantities of currency shards and valuable items. Harbingers, which are groups of blue-themed mobs that drop currency shards, cannot be damaged directly; instead, killing the monsters they summon reduces their health until they perish. By building your setup around idols that alter and amplify harbinger spawns and their rewards, you can transform routine mapping into a highly lucrative activity. The method works by maximizing both the number of harbingers per map and the quality of their loot, ensuring that currency shards can drop as full currency orbs and multiplying the number of bosses present for even greater payouts. Everything is modular, so you can start simple and scale up over time as resources permit—leading to very high currency gains without needing to interact with other players.
Best Harginger Idols To Use:
Secure at least one 2x2 Conqueror Idol with the suffix: “Currency shards dropped by harbingers can drop as currency items instead.” This selector is foundational, allowing shards to drop as full currency orbs.
Prioritize 3x1 (or 1x3) Totemic Idols with the suffix granting up to a 25% chance for harbingers to be replaced by bosses. Using two idols with 25% each gets you to 50%, but you can reach 100% with help from scarabs.
Seek additional 3x1 (or 1x3) idols with the prefix “your maps contain an additional harbinger” to pack as many harbingers into each map as possible.
Round out your slots with 1x1 or 2x1 idols that increase your chance for extra harbingers, boost harbinger cooldown recovery speed, and (optionally) offer increased scarab drops or scarab conversion to harbingers. Cap the chance for extra harbingers at 100%, as exceeding this has no effect.
Scarabs:
Always use Harbinger Scarab of War Hordes (doubles shard drops), Harbinger Scarab of Regency (upgrades harbingers to bosses), and Harbinger Scarab of Obelisks (adds additional mini-harbinger drop-points).
Combine these with two basic harbinger scarabs for a total of six extra harbingers, then add more using your idols for further multipliers.
Map Device and Setup:
Once you unlock all six map device slots (requiring a Maven 10-way and a tier 17 map completion), insert all the chosen scarabs and always select the harbinger option on the device.
Ideal maps, especially early on, include Defiled Cathedral, particularly if you’re on two voidstones. Tier 16+ maps are optimal, but lower tiers work as well depending on your character's strength.
Add chisel and alk as needed for more loot from non-harbinger monsters, but remember harbinger loot doesn't scale with map quantity, rarity, or pack size.
Running the Maps:
Enter the map, defeat harbinger monsters as quickly as possible, higher cooldown recovery rates on idols help speed this up.
Pick up shards and loot. This setup yields strong consistent rewards with low risk, and minimal trading or player interaction required.
Over time you’ll keep swapping in better idols for more efficient harbinger density, more bosses, and cleaner runs, gradually increasing profits as you reinvest. This approach keeps farming efficient and scalable, focusing squarely on the high returns of harbinger content.
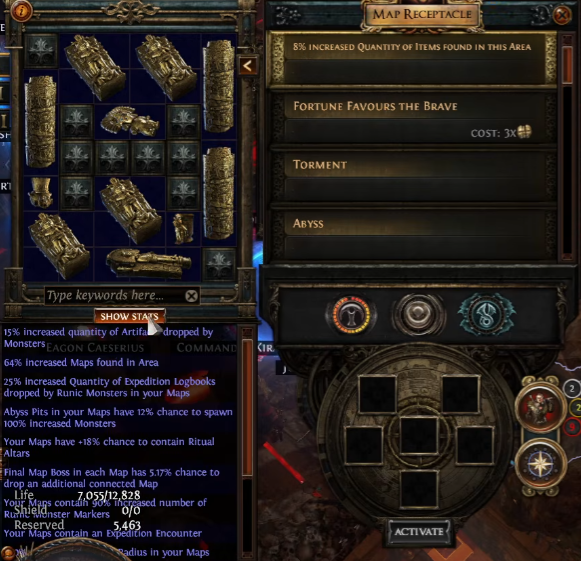
2. Best Phrecia Expedition Farming Strat (Mirror Farm)
The Expedition-focused setup for PoE 3.27 Phrecia League is based on using a Blight of Contagion character to efficiently clear maps and maximize returns from Expedition encounters, steadily scaling up your gear and Idol set as you earn currency. By starting with minimal investment and gradually upgrading life gear, Idols, and character power, you transition from basic mapping to high-reward, high-quantity Expedition maps, eventually resulting in rapid accumulation of rare currencies, reroll tokens, and valuable items, even if tougher maps push the limits of your defenses. This approach thrives thanks to a loop of mapping, haggling with Expedition vendors, and selling spoils, all while being flexible for early-league scaling and massive loot bursts.
Character and Early Mapping:
Begin with a skill setup suited for rapid clear and decent single-target (here, Blight of Contagion is a balanced pick).
Prioritize early survivability through life and resistance gear, keeping your gear cost low at the start.
Focus on unlocking voidstones quickly to access a wider pool of maps, skipping lower-value upgrades in favor of faster progression.
Map Selection and Running:
Run maps known for favorable layouts and Expedition placement, such as Beach and Plateau. Use whatever maps you can sustain if these aren’t available early on.
For early mapping, investment is kept minimal as you gather initial Expedition currency, gear, and Idol bases.
Idol Crafting:
Once you have some gold, start recombinating Idols for Expedition mods. Use the recombinator system to target mods that increase Expedition spawns or improve the quality of Expedition encounters.
If the mods you need are rare or expensive, be prepared for failed attempts; patience and persistent grinding or buying will eventually get you your set.
The central aim is to combine 3–4 key modifiers on your Idols that juice Expedition content, mods that boost monster count, Expedition frequency, or reward quantity are ideal.
Scaling Investment:
As your clear and haggling profits increase, start using Expedition scarabs to “juice” maps for bigger rewards. Only use the Archaeology Scarab if you’re confident in your build’s defenses, since it increases difficulty sharply.
Gradually swap to better gear (e.g., high energy shield items converted to life, powerful wands, and unique accessories for sustain and power).
Use gold from mapping to fund further Idol crafts and Expedition map juicing.
Expedition Mechanics:
Look out for rare Expedition mods that double monster spawns or dramatically increase reward quantities—these are jackpot runs and can net huge currency spikes.
Spend your coinage with the haggling vendors every ~40 coins for steady income (Divines, reroll tokens, logbooks, and high-value Expedition currency).
Focus on maps where you can clear and survive reliably, and pace yourself to avoid burning out.
Loot and Market Routine:
Sell Expedition rewards and valuable finds regularly; don’t hoard (as selling can slow down your farm if you leave it all for “later”).
Constantly cycle between mapping, haggling, Idol crafting, and liquidating your inventory for a steady currency stream.
Fine-tuning:
If maps get too deadly at higher investment, remove one or more powerful Idols to lower the danger until you can handle full juice.
Adjust loot filters as loot explosions increase to avoid missing valuable drops.
Once you scale up gear and currency, consider high-end builds and high-roller investments as your returns will more than cover the cost.
Using this method turns the Expedition mechanic into an efficient engine for rapid currency growth in Phrecia League, even with average gear at the start, and snowballs into endgame riches once your build and Idol set are in place.
3. Best Phrecia Altar Jungle Valley Farm Strat
This classic League Altar Jungle Valley farm method focuses on rapid currency accumulation through the use of Searing Exarch altars in Jungle Valley maps, prioritizing easily liquidated drops like chaos orbs, bubbles, and scarabs. The setup is structured to maximize the appearance of altars and increases pack sizes to fill each map with as many monsters as possible, thereby triggering more altar events for lucrative small-currency payouts. By leveraging specific idol setups and consistently selling all minor currencies—including chaos orbs, glassblowers, and scarabs—you cycle profits efficiently and steadily upgrade your character while keeping the strategy simple and repeatable.
Best Altar Idol Configuration:
Acquire two 1x3 or 3x1 idols, each with the “40–60% chance to spawn a Searing Exarch altar when the influence first appears” modifier. The combined total needs to reach 100% for consistent altar spawns.
Obtain a unique 1x1 Wrath of the Cosmos idol to add more altar rewards, accepting its downside for better payout potential.
Fill the remaining idol slots with 1x1 idols that increase “pack size of Searing Exarch-influenced monster packs” (4–6% each). Additional preferred mods for these are “chance for maps to upgrade by a tier” or “increased scarab drops,” though these aren’t required for baseline effectiveness.
Avoid idols granting Einhar or Jun modifiers, as these raise the difficulty due to dangerous beast or Syndicate spawns.
Map and Scarab Setup:
Influencing Scarab of Hordes: increases total influenced pack size by 40%.
Two magic pack size scarabs: each adds another 40%. With both, that’s an 80% increase.
Run Jungle Valley as it allows you to delay the boss kill, increasing the number of altar options related to mobs rather than the boss (improving chances for better bubblegum currency drops).
Only maps of tier 14 or higher can spawn altars. Start without scarabs if on a tight budget, then add them as you gain more resources.
Equip three scarabs per map:
For higher investment, add Multitude scarabs (when available) for even more monster packs and, in turn, more altars.
If your sustain exceeds your mapping needs, sell surplus Jungle Valley maps for extra gains.
Map Execution and Loot:
Upon entering the map, continue clearing as many monsters as possible, watching for altar spawns. Reading and selecting altar rewards can be paused for clarity, especially in intense situations.
Favor chaos orb altar options above all, then select Grand/Greater/Lesser eldritch currencies, glassblowers, gem cutters, scarabs, and any popular bubblegum currency—these can be sold for chaos quickly.
If you get desirable altar drops near the end of the run, it’s worth backtracking to previous altar nodes to maximize payout.
Boss is optional; generally skip unless your build can handle extreme map mods and you want additional altar spawns.
Regularly liquidate collected bubblegum currency and scarabs for chaos, using efficient bulk trading through in-game vendors or third-party trade tools.
Progression and Scaling:
Start basic, running only on idols if you’re short on currency—this will still net profit due to increased monster and altar frequency.
Once you acquire four voidstones/waystones, move up to T16 maps with full scarab investment.
Monitor juice/investment; if certain scarabs make maps too difficult or expensive, adjust your setup down to maintain profit margins and survivability.
Expect some dry runs without altar spawns—averaged over time, the payouts remain strong.
Sales and Currency Cycle:
Gather currencies like glassblowers, gem cutters, regret orbs, and scarabs. Trade these for chaos orbs, either via vendor recipes or the player market.
The sales process should be repetitive and convenient: price your bulk goods competitively and keep inventory moving.
Use profits to power up your character, invest in more or better idols, or increase your mapping investment as needed.
By repeating this approach, you steadily cycle profits across many maps. The aim is fast runs, bulk loot, and turning minor currency into chaos, keeping gameplay engaging and the upgrade path smooth throughout the league.
4. Best Phrecia Beast Farming Strat
This beast-focused farming setup in PoE 3.27 Phrecia League revolves around crafting an optimized set of idols to scale the number of valuable beasts found in maps, particularly converting yellow beasts into valuable red ones for high returns. By tuning your idol allocation and hunting specific beast families such as Black Morgan, you’re able to enter maps, rapidly identify and capture the right beasts, and channel your profits into powerful crafts or additional idol sets, all with a snowballing effect on your league progression. The process depends more on patience and some market sniping than big upfront investments, and it can fit into nearly any fast-clearing character.
Best Beast Idol Setup:
Select a 2x2 idol with “beasts less common” to help control which beast types appear and to increase the frequency of more valuable variants.
Add additional idols—especially “small” ones (1x1, 2x1)—that specifically target the beast family you want to farm (for example, those increasing the appearance of the Primal, Craicic, or Vivid families, depending on your chosen target).
The goal is a composition that produces many yellow beasts and then converts these into red beasts, drastically improving your chances of finding valuable specimens like Black Morgan.
Take advantage of the idol crafting (recombinator) system: prioritize single-affix blue idols for easier, targeted crafting, but use rare (yellow) ones when they're much cheaper or more available, especially for harder-to-find mods. Utilize mod weightings and pricing to snipe the right idols at a discount.
Crafting and Recombination:
Use PoE1-style recombinators for better control when crafting higher-value idols from blue bases, as this gives you greater odds to keep key mods.
For mods that are very rare or expensive in blue, consider combining rare (yellow) idols instead—especially early in your set crafting, as they're cheaper and much more accessible even if the odds are lower.
Use online search tools and filter out high-weight mods if you want to optimize your process and focus resources on only the most efficient crafts.
Progress by combining cheaper, more available mods first, adding in the best (rare or expensive) affixes last to reduce risk and cost.
Map Selection and Running:
Run maps—Strand or Wretched Defilers are solid options—white (unrolled), as beast spawns do not scale from map quantity or other mods.
Move quickly through maps to find as many beasts as possible; prioritize identifying and targeting valuable ones visually (Black Morgan, for example, stands out with distinctive horns).
Be aware that red beasts in tier 16 maps can be dangerous, so ensure your build is fast and can handle some surprises.
Resource Management:
Accumulate beastcrafting “dust” inexpensively through bulk purchases or efficient beast selling.
Acquire beast gold by joining dedicated map rotations posted in trade communities.
Maintain an active search for valuable or underpriced idols and be ready to act quickly (sniping them before others, especially during your time zone’s peak activity to avoid competition).
Scaling and Iteration:
Once your initial idol set pays off, reinvest profits into improved versions or to branch into more advanced (and pricier) idol strategies.
Optionally, use this beast-based strategy as a launchpad to quickly fund other idol-driven approaches as the league progresses.
Adopting this approach gives you a steady, strong source of income, especially when the right beast family is in demand, and can be done with modest startup capital and little market competition.
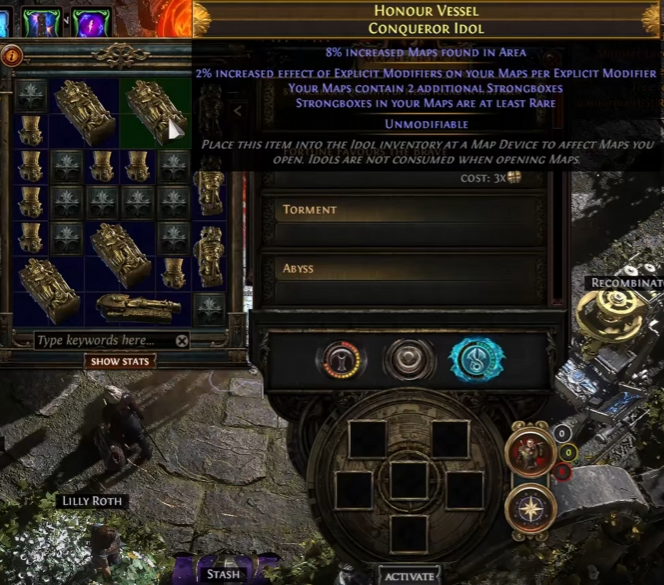
5. Best Strongboxes Farming Strat
Strongboxes are one of the most misunderstood farming strats in the Phrecia league, but when set up correctly they are an extremely consistent way to farm Divines at both low and high investment. This strongbox strategy is built around maximizing Arcanist strongbox spawns and leveraging item and currency duplication modifiers for rapid currency growth, with early gains possible before heavy investment. The focus is on stacking affordable idols to boost both the frequency and value of strongbox rewards, especially Arcanist boxes, leading to repeated bulk drops of valuable currency. By targeting fast maps like Glacier for entry-level runs or shifting to Dunes for sustained farming with scarabs, this approach efficiently creates consistent returns, especially as profits are reinvested to gradually improve idol quality and map juicing, while adapting loot filters to manage the immense volume of small currency drops.
Idol Selection and Placement:
1x1 idols: Choose single-mod idols with “Strongboxes in your maps have increased chance to be Arcanist”. These are foundational as only Arcanist boxes drop piles of currency; buy affordable ones at first, then incrementally upgrade as you re-invest.
1x2 idols: Get idols with “Increased quantity of items in strongboxes”. Start with low rolls (~50%) if budget is tight, then upgrade toward higher rolls (up to 70%) as funds allow.
1x3 idols: Absolutely collect those with “Currency items from strongboxes in your maps are duplicated.” This is key for doubling currency drops and usually inexpensive.
Conqueror idols: Use at least one with “Strongboxes in your maps are at least rare.” For budget, prioritize idols with “Your maps contain two additional strongboxes;” these are much cheaper than those with a “9% chance to be openable again” mod. Use as many “additional strongboxes” mods as you can for more box density.
For higher investment, seek two- or even three-mod idols that combine “currency duplication,” “additional strongbox,” and “divination duplication” for 1x3s; similar principle applies to 1x1s and 1x2s (adding mods such as “chance to contain a strongbox” as a second line, keeping total chance at 100%).
Map Choice:
On a tight budget or with zero scarabs, run Glacier maps for speed and ease.
For juiced strongbox farming, Dunes is ideal due to strong divination card drops, the ability to favorite/cycle maps (Dunes plus Canyon), and the chance to self-sustain maps and pull valuable T17 Fortress drops.
Canyon is a good secondary choice; favor this when Dunes are low.
Scarab Configuration:
Basic (no scarabs): Just run fast maps.
Juiced: Use two regular Ambush scarabs, one Ambush of Potency (boosting strongbox loot), and one Ambush of Discernment (raises special strongbox types, especially Arcanist). If possible, add Ambush of Hidden Compartments for additional box chances, or use map device to add “Ambush” with chaos for even more effect.
Always use Ambush of Discernment when possible; it’s the single most influential scarab for box type.
Preparation and Running:
Corrupt maps for extra item quantity if you can handle the difficulty; otherwise, basic alchemy or chaos tactic is fine. Prioritize 8-mod maps for best returns, but 4-6 mods work as well—just a tilt toward quantity helps.
Open all Arcanist strongboxes as you find them; consider mods like “additional open” for extra attempts. A high volume of loot will drop, so keep a tight loot filter for easy cleanup.
Focus on stacking all bulk currency drops for post-session sales. Even low-value currency (chromatics, fusing, etc.) adds up very fast in Arcanist stacks.
Scaling Up:
As currency accumulates, look for double-mod and triple-mod idols, copying core mods (currency dupe, additional strongboxes, div/box dupe) for exponential returns.
For more advanced setups, target diver strongboxes by building out 1x3 and 1x1 idols to do the same with divination box duplication, and add chance-to-contain-strongbox mods to both 1x1 and 1x2 slots.
Extra Info:
Strongbox drops come in two forms: predetermined chest loot (subject to idol duplication and quantity bonuses) and loot from spawned monsters (only affected by map or altar mods). The main money comes from the former, so running T16 or T17 maps is personal preference, not a requirement for top results.
T17 options can yield slightly higher returns via monster drops and map boss fragments, but the impact is much less for strongbox-focused strategies.
Regularly bulk-sell all the small currency obtained to maximize liquid chaos profits.
This method relies on stacking cheap mods at first, re-investing as you go, and progressing toward higher-quality idols and full scarab loadouts, ensuring steady currency while keeping play fast and engaging. Adjust map choices, scarabs, and idol upgrades as you go to keep the profits flowing.
6. Ultimatum Farm Strat
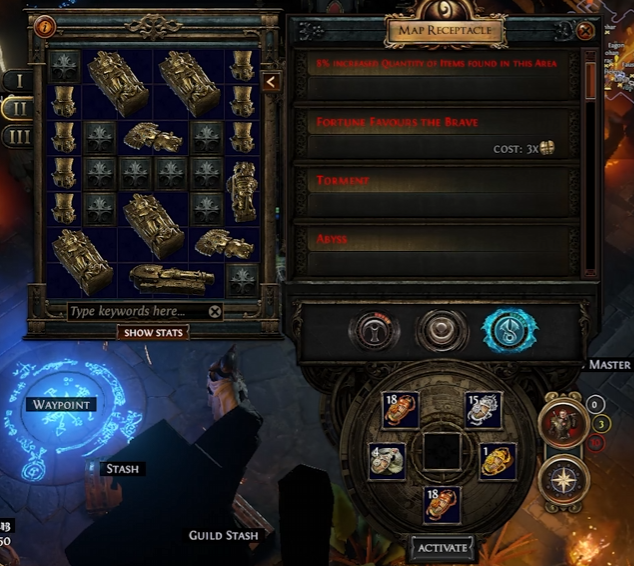
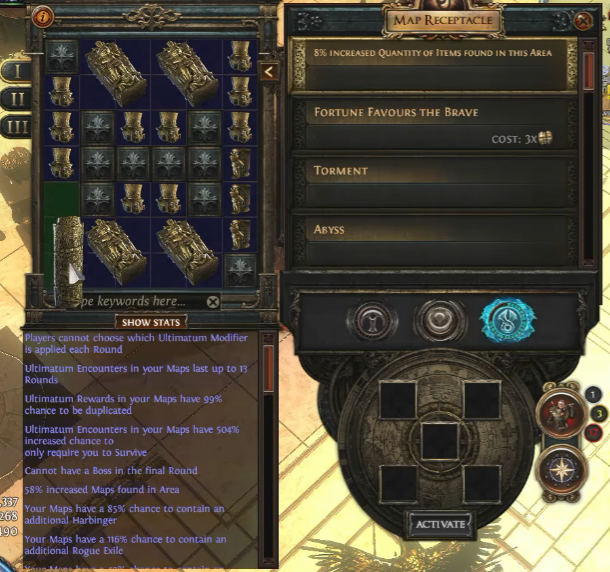
This Ultimatum strategy focuses on maximizing currency and valuable drops from Ultimatum encounters by stacking reward duplication modifiers while tuning the challenge for comfort or maximum payout. The approach recommends high-tier red maps (T14–T16), utilizes idols that boost the likelihood of reward duplication and the occurrence of easier “survive” rounds, and leverages cheap or stacked bribing scarabs to access high-value rewards much earlier within Ultimatums. Survival encounters are prioritized for their ease with most builds, and the use of defensive unique idols further reduces incoming damage. Builds that clear quickly and shrug off hits work best, turning this approach into a steady source of duplicated currency, expensive cards, and high-tier uniques, all while allowing for rapid progression and minimal downtime between encounters.
Idol Setup:
Conqueror Idols (4 required):
Budget: Each needs “Ultimatum rewards in your maps have X% chance to be duplicated” (closer to 20% for early investment, up to 25% for better returns as funds grow).
Premium: Seek the dual-mod version which includes both “chance to duplicate rewards” and “Ultimatum encounters in your maps also grant rewards as though you completed an additional round.” This stacks with bribing scarabs to let you score top rewards sooner in the encounter.
Small Idols: Fill every available slot with “Ultimatum encounters in your maps have X% chance to only require you to survive.” Stack until reaching very high (ideally 500%)—so that the vast majority of rounds are the easy “survive” type.
Ultimatum Chance: Make sure your small idols or additional mods also total up to 100% “chance to contain an Ultimatum.” This can substitute for using an ultimatum scarab or map device mod.
Unique Idol Choices:
Ruinos Wagger: Reduces damage you take from Ultimatum monsters, making the entire encounter safer and more manageable; practice dodging blue telegraphed attacks to avoid ruin stacks.
Twisted Wish: Reduces the chance for cheap and unwanted rewards (maps, blight, heist, etc.), raising odds of worthwhile loot.
Grilling Gauntlet (Advanced Only): Increases max rounds (more rewards) but the Trialmaster picks mods for you, making it harder—recommended only if your build is very durable and you know modifiers well.
Eldritch Gaze: Increases value of altar rewards; pair with influence in your maps (Eater of Worlds highly recommended).
Scarab and Map Device:
Ultimatum Scarab: Guarantees an encounter in each map (these are affordable).
Bribing Scarab: Enables high-value rewards several rounds sooner. Use one for budget setups; use two when you have more available currency for even earlier and more valuable rewards.
Map Device: Alternatively (or in addition), add Ultimatum directly as a map device option if available.
Map Selection:
Only use red maps (T14–T16) as rewards scale with map tier; avoid white/yellow maps.
Beach maps are preferred for their compact layout and quick Ultimatum access, but any small, quick-to-clear map works well. Tier 16 Beach is especially efficient; use Orb of Horizons to target this map if needed.
Running the Strategy:
Enter the map, locate the Ultimatum as quickly as possible, and trigger it.
Always pick “survive” when available, running in circles around the edge of the arena to minimize hits and avoid ruin stacks from special attacks or ground effects.
With “chance to duplicate” across all conqueror idols, enjoy frequent double drops on all rewards; with full investment, every reward will be duplicated.
Use bribing scarabs and dual-mod conqueror idols to bring the best rewards earlier (e.g., Divine Orbs or valuable cards can appear in round 1).
After finishing the Ultimatum, quickly defeat the map boss and move on to the next map.
Repeat this sequence for fast, efficient farming sessions.
Further Tips:
Adjust unique idol choices based on comfort and build power. Beginners should stick to Twisted Wish, while experienced players might opt for Grilling Gauntlet for more loot at higher risk.
Always prioritize defensive layers and movement speed in your build; survivability ensures you complete more rounds and collect maximum rewards.
Inspect all altar rewards quickly—Eater of Worlds altars can add substantial currency value alongside Ultimatums.
Keep bribing, ultimatum, and influence scarabs stocked for constant farming flow.
Following this setup lets you convert every Ultimatum into a source of duplicated top rewards, maintain quick map cycles, and stack up bulk currency and valuable items with minimal friction, all while keeping the challenge manageable for a wide variety of builds.
7. Scarabs & Allflames Farm Strat
This Scarabs & Allflames strategy in PoE 3.27 Phrecia League focuses on speedy mapping with almost no setup, maximizing the loot from Syndicate member “bargain” encounters for a steady stream of scarabs, currency, Allflames, and other valuable rewards. By focusing on bargaining options during Syndicate encounters, skipping any need for intricate board management, and choosing fast maps like Mesa and Strand, you can quickly accumulate rewards, regularly hitting scarab jackpots, with the bonus of periodic safehouse runs that yield Allflame and medallion drops. The approach stays budget-friendly, requiring only a single, cheap scarab and a basic collection of idols to operate at full efficiency.
Idle Layout and Mods:
Conqueror Idols (2x2): Use four, each with two mods: “Immortal Syndicate members in your maps drop 200% more items when bargained with for items” and “Completing your maps grants 13 intelligence for a random Immortal Syndicate safehouse.” These dramatically improve both the loot from bargains and the rate at which you can open safehouses.
Medium Idols (1x2 or 2x1): Slot seven, focusing on “Immortal Syndicate members in your maps are X% more likely to offer to bargain for items” with at least 140%+, ideally 160% to maximize the odds of seeing the reward selection.
Small Idols (1x1): Use two, each with “Members executed get another rank” for rapid member ranking, and “Immortal Syndicate members in your maps are more likely to be accompanied by their leader,” which helps focus on high-value targets, facilitating more safehouse and Allflame drops.
Map and Scarab Selection:
Run only one expendable (often 1c) scarab: “Immortal Syndicate has 50% increased chance to be accompanied by reinforcements.” This boosts group sizes, which helps both ranking and loot.
Stick to speedy, linear, or ring-shaped maps for max pace:
Mesa: Move directly to the boss in the inner ring, then check around the edges to trigger Syndicate spawns.
Strand: Follow the linear path, clearing fast and watching for Syndicate icon prompts.
In-Map Routine:
Always kill the map boss to gain safehouse progress via intelligence.
When Syndicate members appear, prioritize using the “bargain” choice on every member (uniques, maps, items—it all can bring loot).
Rank up syndicate members efficiently, always boosting them to level three if not at max (use execution when available).
For bargains, focus on scarabs, currency, and failed items, but always take the bargain for a shot at jackpot rewards.
Safehouse Runs:
Once you reach 100 intelligence (typically after several boss kills), open your Investigation Board, click to enter the safehouse, and clear it for Allflames, medallions, and bonus loot.
Inside, kill every boss (especially leaders), check and use crafting benches, and always loot stashes for currency or items.
Sell or bulk-convert poor scarab drops using the 3:1 vendor recipe to potentially gain higher-value ones.
Extra Recommendations:
Maintain a tight loot filter since scarab explosions can clutter your screen quickly.
Take time every several runs to combine low-value scarabs for better returns.
Even non-scarab bargains (uniques, maps) add bonus currency and crafting benefits.
For King’s March or similar “dust shipment” quests, save up all those unique items from failed bargains.
This method uses a very minor upfront cost and simple setup to cycle quick, high-reward mapping, amassing piles of scarabs, Allflames, currency, and more, while making regular progress toward additional loot through safehouses, all with minimal hassle.
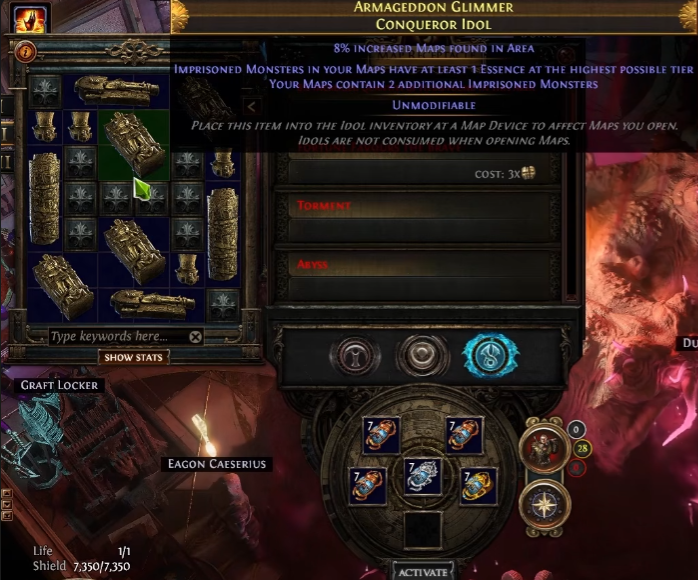
8. Essence Farm Stra
This Essence farming method in PoE 3.27 Phrecia League centers on maximizing the number and value of essences gained per map, using an idol setup and specific modifiers to consistently produce high-tier and occasionally premium essences, while quickly cycling through maps optimized for speed and density. The approach involves running Dunes maps at mid-tiers for pace, stacking both Conqueror and small idols for added imprisoned monsters and higher tier essences, and focusing on corrupting particular base essences (“misery,” “envy,” “dread,” “scorn”) to access top-tier results. Using Scarabs with modifiers that concentrate value (like Stability) raises the chance to transform basic essences into lucrative ones, allowing for fast, repeatable profits from the core mechanic alone without relying on other league content.
Idol Arrangement:
Conqueror Idols (Four total):
Each must have “at least one Essence is the highest possible tier” for all imprisoned monsters. This ensures maximum value from every encounter.
Add “two additional imprisoned monsters” to further boost the number of essences per map.
Small Idols:
Stack “chance for additional imprisoned monster” (second line, up to 50%) across your small idols. This raises the total number of essence mobs.
Fill in with “imprisoned monsters have chance for extra essences” (up to 12%) to multiply the drops per monster.
Arrange for any that offer “chance maps contain extra imprisoned monsters” for more density.
Crafting Idols: Buy whichever idols you can find with the needed single modifier and recombine them for double mods to minimize costs.
Essential Scarabs:
Essence Scarab: Guarantees more imprisoned monsters per map and upgrades their essence tiers by one.
Stability Scarab: Limits corruption outcomes to only “upgrade” or “transform,” making it much more likely a base essence becomes one of the valuable special variants.
Optional Additional Essence Scarabs: If you want quantity over upgraded chances (for example, before Stability is affordable or if you prefer full clearing), replace Stability with another Essence Scarab.
Mapping Choices:
Run Dunes as your primary map, ideally at tier 9 with two voidstones. This provides quick runs, strong sustain, and instant access to each imprisoned monster.
If you have enough damage and durability, Dunes at tier 16 (with all voidstones) adds only a marginal bump (mainly to enable Conqueror idol drops), and is not strictly necessary for bulk essence profit.
When Dunes is exhausted, favor Canyon or Coves on your Atlas, swapping your favorite depending on available map drops; this ping-ponging ensures you never need to buy another map.
Map Running Tips:
Move directly to each imprisoned monster and prioritize “misery,” “envy,” “dread,” and “scorn” bases for corruption. This is remembered with the “MEDS” mnemonic.
Only corrupt these four, as they are able to transform into the top unique variants sought by crafters in this league (such as Remorse or Insanity).
Skip slow mechanics like the bridge or fortress if they slow down clear speed and essence collection. Focus on map bosses for easy sustain, as they usually drop extra maps.
With your scarabs and idols, you’ll get a critical mass of imprisoned monsters per map—kill them fast, collect all essences, and move on.
Build Recommendations:
Aim for very high mobility and enough DPS to quickly dispatch essence monsters, which can be very tanky. Ranged builds with totems (like Ballista or Kinetic) work especially well for this, reducing time spent in dangerous range.
Defense is useful, but full tanking is not needed for tier 9–10 maps; a fast mapper with moderate damage (1–3 million DPS is sufficient) will run this farm efficiently.
Update your gear as profits accumulate, but don’t feel pressured to over-invest at the start.
Summary Routine:
Quick map in, hunt imprisoned monsters, corrupt “MEDS” base monsters, grab essences, kill boss, new map.
Don't waste time with slow extra mechanics.
Turnover is rapid, making profits snowball quickly, and efficiently builds up currency toward top league goals.
Executing this routine, you’ll convert each map into a condensed profit generator, drawing most of your returns directly from essence sales, and avoid the need to chase multiple content types or micromanage other mechanics. It’s built around quantity, consistency, and speed, keeping downtime low and currency flow steady.
9. Giant Rogue Exile + Ritual Idol Farm
Second only to strongboxes, the Giant Exile and Ritual combo is a mirror-printing powerhouse. This method is built around spawning an army of Rogue Exiles, each loaded with high-value loot, and using Ritual altars to multiply their rewards further.
You’ll aim to spawn up to 48 Rogue Exiles per map, leveraging both explicit modifier scaling and Ritual mechanics. Rituals not only grant hefty tribute but also let you re-encounter Exiles, compounding the loot potential. With the right idol setup, this strategy regularly yields stacks of divines, mirrors, and scarabs.
Best Rogue Exile + Ritual Idols & Set-Up
Conqueror Idols: Secure “12% chance to contain 12 additional Rogue Exiles,” “increased effect of explicit modifiers per map quality,” and “your maps with ritual altars always have four rituals.” Add “scarabs found in your maps are more likely to be less common varieties” for more expensive scarabs.
Totemic/Burial Idols: Target “12% increased effect of explicit modifiers,” “10% increased pack size,” and “10% increased quantity” under Fortune Favors the Brave.
3x1 Idols: Make sure at least one has “Rogue Exiles in your maps have 100% increased chance to be possessed by a tormented spirit.”
Minor Idols: Stack “unique monsters in your maps have 100% increased chance to drop scarabs” and enough ritual spawn chance to reach 100%.
Scarab Choices: Run Anarchy Scarab of Gigantification (more exiles), Titanic Scarab, Scarab of Wisps, and a Ritual Scarab for more rituals.
Map Device: Fortune Favors the Brave for influence, and lean towards Searing Exarch or Eater of Worlds based on your build’s tolerance for altar mods.
Tips: This approach requires a robust build, as the exiles can be extremely dangerous with all the scaling mods.
10. Ritual Tribute Idol Farming
Ritual in Phrecia can be an incredible source of profit, rivaling even the top picks when properly scaled. By maximizing tribute, stacking rerolls, and using blood-filled vessels, you can defer and purchase the most valuable items with ease.
The aim is to maximize the quantity of tribute earned, allowing you to reroll the reward window up to 11-12 times per map at no cost. Boss rituals, combined with blood vessels, dramatically increase tribute. Many players have pulled multiple apothecary cards and even mirrors from ritual screens with this setup.
Best Ritual Idols & Set-Up
Conqueror Idols: At least one with “your map with ritual altars always have four rituals,” and the rest with “ritual altars in your maps allow rerolling favors an additional time.” Aim for two additional rerolls per idol for maximum value.
2x1/3x1 Idols: “Ritual altars have a 25% increased number of spawn monsters at once” and “75% increased chance of ritual altars with special rewards.”
Minor Idols: Stack “unique monsters slain at ritual altars in your maps grant 60% more tribute” (ideally ten for 600% more tribute), and “rolling favors at ritual altars cost reduced tribute” (up to 100% for free rerolls).
Scarab Choices: Use Ritual Scarab of Abundance (increased rewards), Selectiveness (free rerolls), and Wisps (tribute boost).
Tips: Run City Square or similar maps where bosses are easily accessible for blood vessel filling. Bring bosses to the first ritual for the biggest tribute boost. Sell excess blood-filled vessels for extra profit.
11. 8-Mod Map & T17 Map Upgrading Farm
If you want to generate a steady flow of high-tier maps and enjoy trading, 8-mod map farming is an excellent strategy. This approach is both accessible and highly profitable, especially for those looking to sell maps or fuel other farming methods.
The core of this setup is maximizing the drop rate of T17 and 8-modified maps. By stacking map upgrade chances and explicit modifier effects, you’ll see T16 maps upgrading to T17 at impressive rates. These maps are in high demand and can be sold for a premium.
Best T17 Map Idols & Set-Up
Conqueror Idols: Focus on “increased effect of explicit modifiers” and “6% increased pack size.” Anything else is filler.
3x1 Idols: Stack as much “increased effect of explicit modifiers,” “quantity,” and “pack size” as possible.
Minor Idols: Four with “Tier 1 to 15 maps found have 10% chance to become one tier higher.” Add “map contains 5% more monster packs of difficult and rewarding monsters.”
Unique Idols: “Singular Focus” for map targeting and “Eldritch Gaze” or “Wrath of the Cosmos” for altar scaling.
Scarab Choices: Cartography Scarab of Corruption (for 8-mod maps), Multitude (extra packs), Escalation, and Beyond Scarab of Corruption.
Tips: Run on Jungle Valley or Strand for best results. Use a tab to roll and highlight maps with at least 100% more maps, and sell them in bulk for currency.
12. Harvest Crop Rotation Idol Farming
For juice farmers, Harvest with crop rotation is back and better than ever. By using the unique Crop Rotation idol, you can upgrade low-tier plants into high-value T3 and T4 crops, multiplying your Life Force returns and ensuring steady profits. With the right idol setup and scarab stacking, players regularly achieve 10–14 Divines per hour, with the potential for much more when running juiced, high-tier maps.
You’ll be stacking as many Harvest encounters as possible, maximizing the chance for crops not to wilt, and focusing on quantity and reward duplication. The Crop Rotation idol enables you to upgrade plant tiers across all three colors, allowing every Harvest to potentially yield multiple T3 crops and bosses. This means more juice, more currency, and more profit per map.
Best Harvest Crop Rotation Idols to Use
Conqueror Idols: Prioritize “Sacred Grove in your maps contains an additional Harvest,” “Harvest crops have a chance not to wilt,” and “Harvest monsters grant increased quantity of Life Force.”
Totemic Idols: Look for “Harvest crops in your maps have increased chance not to wilt,” “Harvest crops grant increased Life Force,” and “Harvest crops can be upgraded to higher tiers.”
Minor Idols: Use “100% chance to contain a Sacred Grove,” “chance to contain additional Harvest,” “chance to not wilt when harvesting crops,” and “increased Life Force quantity.”
Unique Idol: Crop Rotation: “Harvest crops in your maps contain only T1 plants; harvesting crops has a chance to upgrade plants of other colors.” (This unique idol is essential for the strategy.)
Harvest Idol & Mapping Setup
Scarab Choices:
Harvest Scarab of Doubling (doubles rewards)
Harvest Scarab of Monstrous Lineage (more monsters, more juice)
For high investment (T17 maps), use Horned Scarab of Awakening (lets you select the Imbued Harvest map device mod for even more “not wilt” chance).
Map Preparation:
Run T16 maps for low/mid investment, or T17 for maximum returns (but greater difficulty and cost).
Always chisel your maps to increase quantity—more quantity means more Life Force.
Rolling 8-mod maps further increases pack size and rewards, but be prepared for a challenge.
Idol Grid:
Stack as much “chance to not wilt” and “additional Harvests” as possible. Aim for at least four Harvest clusters per map.
Mapping Process:
Simple Approach: Enter the map, go directly to the Sacred Grove, and complete all Harvests quickly for speed farming.
Advanced Approach: Clear the map and kill the boss first, fishing for Searing Exarch or Eater of Worlds altars with Harvest Life Force bonuses. Complete the Harvest last to maximize rewards.
Crop Rotation Technique:
Start with the crop color with the highest number of T1 plants (usually yellow).
Harvest that color to maximize the chance of upgrading remaining crops to T2/T3.
Proceed to the next most numerous color, always prioritizing upgrades and maximizing T3 crops and bosses.
Be aware that even with high “not wilt” chance, you may lose crops from time to time—plan your order accordingly.
T3 crops are the main source of Life Force; T4 (boss) crops provide massive juice and valuable drops.
Loot & Payouts:
Expect 8,000–12,000 Life Force per map on average, with spikes up to 20,000+ in ideal scenarios.
Yellow Life Force is usually the most valuable, but always check current prices.
Even in low-juice maps, you can expect 70–80 chaos per map; well-optimized setups can reach 10–14 Divines per hour.
13. Alva Temple/Double Corrupt Farm
Alva farming focuses on quickly generating double corrupt temples—an essential resource for endgame crafting and gem corruption.
By running small, linear maps and stacking incursion and architect mods, you can efficiently upgrade and itemize temples. The main targets are Locus of Corruption and Doryani’s Institute, both of which are always in demand.
Best Alva Temple Idols & Set-Up
Conqueror Idol: “Your maps with incursions always have four incursions” and “killing resident architects in your maps adds their upgrade tier to the surviving architect's room.”
Burial/Totemic Idols: “Killing non-resident architects in your maps has a 50% chance to add an additional upgrade tier.”
Kamisan Idols: “Chance to contain Alva” and “incursions in your maps have 25% chance for all monsters to be at least magic.”
Minor Idols: “25% chance to contain Alva.”
Scarab Choices: Only Incursion Scarab of Timelines is needed.
Tips: Target small maps like Jungle Valley or Strand. Itemized temples sell for several divines each.
14. Delirium Idol Farming
Delirium farming revolves around stacking Delirium rewards in your maps, using Delirium Orbs and/or Delirium Mirrors, and maximizing the number and quality of reward bars you fill each run. The core mechanic is to trigger as many reward bars as possible, then collect bulk currency, valuable cards, fractured/synthesized bases, and high-value drops from Delirium bosses.
Best Delirium Idols to Use
Conqueror Idols
Increase Delirium Reward Progress: Stack as much "+X% increased Delirium reward progress" as possible. This fills reward bars rapidly and consistently.
Chance to Generate Additional Reward Types: Look for "12% chance to generate 3 additional Delirium reward types" and "50% chance to generate an additional type." These add extra bars, increasing total rewards per map.
Totemic Idols
More Delirium Reward Progress: Seek "+X% increased Delirium reward progress" and "chance to generate additional reward types."
Delirium Mirrors: Use Idols that guarantee or increase the chance for a Delirium Mirror to appear in your maps if you aren't using Delirium Orbs.
Minor Idols
Extra Delirium Reward Types: Use "chance to generate an additional Delirium reward type" and "Delirium monsters grant increased progress."
Map Quantity/Pack Size: "Increased pack size" is always useful for more monsters (and thus more progress).
Unique Idol
Mirror of Delirium: If you can, include Idols that guarantee a Delirium Mirror spawn for free Delirium each map.
Scarab & Map Device Setup
High-Investment (Full Juice)
Delirium Orbs: Apply 4 or 5 Delirium Orbs to reach 80–100% Delirious per map.
Scarab Setup:
2x Delirium Scarab of Mania (increases reward types, cheap and effective)
1x Delirium Scarab of Paranoia (more reward types, pairs well with progress Idols)
1x Domination or Incursion Scarab (for extra monsters)
Map Device:
Use "Increased Quantity" or "Extra Pack Size" if available.
Maps:
Run linear maps with a good layout for Delirium (e.g., Silo, Strand, City Square).
Medium/Low-Investment (Starter)
Delirium Orbs: Use 1–2 (20–40%) or rely on a Delirium Mirror from Idols or Scarabs.
Scarab Setup:
2x Mania Scarab (cheap, reliable)
1x Domination Scarab (more monsters)
1x Incursion/Harbinger/Paranoia Scarab (up to your budget)
No Idols? You can run this strategy without Idols, but profits are lower and more volatile.
Mapping & Gameplay Routine
Prepare map: Chisel, Alch, and quality for max pack size and quantity.
Apply Delirium Orbs (as many as your build can handle).
Slot in your Scarabs.
Activate map device mods (quantity/pack size preferred).
Run the map:
Rush through, killing as many monsters as quickly as possible.
Skip looting mid-map; focus on stacking Delirium reward bars.
Kill Delirium bosses if you can, but it's OK to skip or kite them if too dangerous.
After Delirium ends:
Loot all reward piles.
Watch for: raw currency (Divine, Exalt, Chaos), Eldritch Chaos Sword cards, Simulacrum splinters, cluster jewels, fractured/synth bases, and valuable incubators.
Repeat!
Prepare the next map, maintaining a rapid pace for maximum profits.
Key Drops & Profit Sources
Raw currency: Divines and Exalts drop commonly from Delirium rewards.
Bubblegum currency: Alchs, Fusings, Chromatics, Regrets, Scouring, Chisels—these sustain your mapping.
Eldritch Chaos Sword (divination card): Stack and turn in for 5 Eldritch Chaos Orbs; sell in bulk for profit.
Fractured/Synthesized Bases: Rare, but can be worth several Divines if you hit a good mod.
Incubators: Use Ornate, Skittering, and Map incubators for additional loot.
Delirium Orbs, Simulacrum Splinters, Cluster Jewels: All have good market value.
Profit Expectations
High investment (100% Delirious, good Idols): 1 Divine investment pays back in 4 maps, often earning a Divine per 1–2 maps from raw drops alone.
Low/Mid investment: Still profitable from bubblegum and card drops, but slower. Good to build up currency for better Idols/gear.
Sustainability: Self-sustain maps and currency, with a steady stream of bulk items for trade.
Tips & Variations
Choose maps with layouts you enjoy and can clear quickly.
Don’t force 100% Delirium if your build can’t handle the difficulty; scale up as your gear improves.
Skip Delirium bosses if they’re too dangerous; they’re not mandatory for profit.
If you can’t afford Idols, focus on Scarabs and Delirium Orbs to get started.
Swap between reward progress and extra reward type Idol grids depending on profit consistency vs. gambling for jackpots.
Sample Idol Grid Setups
Consistent Progress Strat:
Stack as much “increased Delirium reward progress” as possible.
“Map contains a Mirror of Delirium” (if available).
“Delirium monsters grant increased progress.”
Gambling Reward Types Strat:
Add “12% chance to generate 3 additional reward types.”
“50% chance to generate an additional reward type.”
Mix with progress Idols for balanced gains.