Path of Exile 3.27 continues to introduce new opportunities for accumulating wealth, with gold now serving as a new layer of in-game currency. Many players are seeking budget-friendly methods to farm gold efficiently without requiring high-investment builds or expensive gear. This guide will showcase the best early and budget gold farming strategies, helping you generate a reliable income for gear upgrades, trading, and progressing your league goals.
Top 3 Path of Exile 3.27 Gold Farming Strategies
Gold farming in this league blends classic loot-focused gameplay with the unique mechanics of gold drops and specialized strategies. The meta has shifted, and while high-investment methods exist, several efficient low-cost strategies remain accessible for new and experienced players alike. By combining map selection, atlas passives, scarab usage, and smart map rolling, you can secure a steady gold income, even on a tight budget.
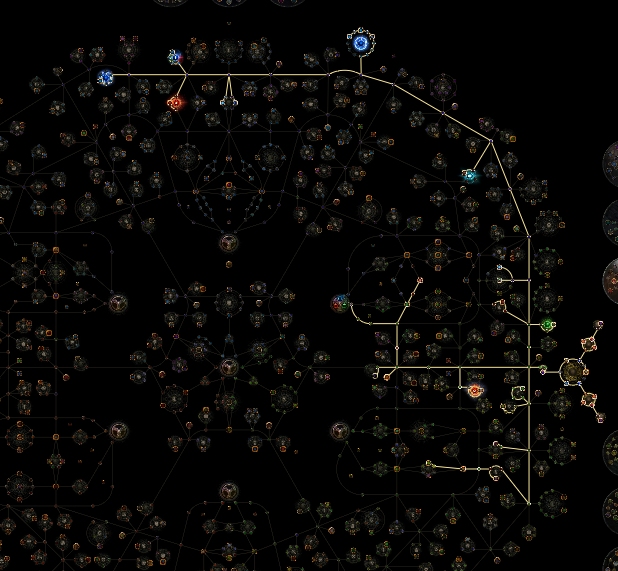
1. Early Strongbox Underground Sea Strategy for Gold Farming
This budget-friendly currency and gold farming approach centers on stacking Beyond and strongbox mechanics within Underground Sea maps. The Underground Sea is chosen specifically for its ability to drop the Doppler Ganger divination card, which can be traded for a Gemcutter’s Prism, fetching more than a chaos orb each. Running 15 to 20 maps with this setup can yield almost 40 GCPs, covering the costs of scarabs, map crafts, and the maps themselves. The strategy also takes advantage of Beyond bosses, which have a strong chance to drop tainted fusings, a highly sought-after item during the league. While Beyond encounters can become hectic, especially when bosses spawn inside fortresses, proper preparation ensures both profit and excitement.
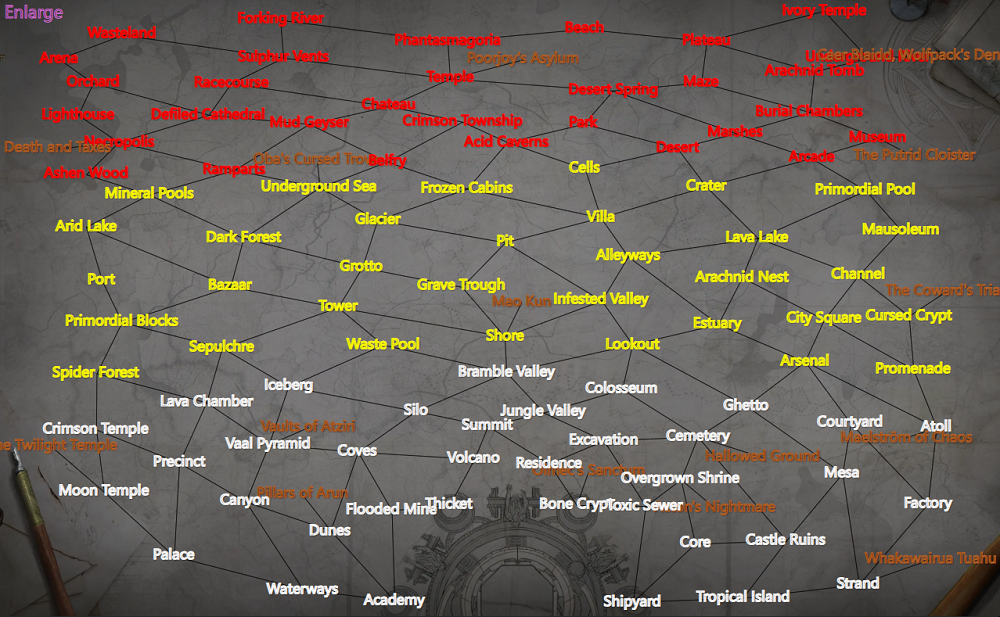
1. Map Choice and Sustain
Use Underground Sea as your map base to farm Doppler Ganger cards.
Apply Singular Focus on the atlas to help sustain Underground Sea drops, filling every favorite map slot with Underground Sea for increased consistency.

You may need to purchase a handful of maps to start, but the investment is quickly returned.
2. Atlas and Modifiers
Allocate all strongbox nodes, including double currency, double divination card, additional strongbox, corrupted strongbox, and openable again. These not only boost loot but also help spawn Beyond bosses, especially when strongboxes can be opened multiple times.
Take the Tomb for increased Beyond unique boss spawns, Swarming Hive for extra divination cards from Beyond demons, and Fish Opponents for more tainted currency from them.
Stack map explicit modifiers wherever possible, including Chisel Perfection, and use nodes that grant increased item quantity and rarity.
Don’t neglect the Eater of Worlds influence; it can provide valuable rewards but also includes risky modifiers, so always check before activating.
3. Scarabs and Map Device
Run one Beyond Scarab, Beyond Scarab of Rashure Gems for increased tainted currency and boss chance (but beware, it also makes bosses more dangerous on low life).
Add Beyond Scarab of the Invasion for 8 to 12 extra Beyond portals, boosting monster and boss spawns.
Use Scarab of Advisory for four extra packs with mirrored rare monsters, further increasing the odds of Beyond bosses.
On your map device, select Ambush, which grants four additional strongboxes and a better shot at getting Onus Corrupt.
4. Map Rolling
Aim for monster pack size of at least 24–26%. This is the main target when rolling maps.
Always chisel your maps to maximize item quantity.
Be cautious with mods that might hinder your build, such as “cannot regenerate,” which is doable but can be annoying.
5. Running the Maps
Clear the entire map before attempting any fortress encounters, as Beyond bosses can spawn inside fortresses, leading to chaotic and difficult fights—especially with additional Beyond monsters emerging from hives.
Open strongboxes in sets of three when possible, maximizing the odds of spawning Beyond bosses and obtaining tainted fusings.
Collect Doppler Ganger cards throughout, aiming to turn them in for Gemcutter’s Prisms for easy currency.
6. Profits and Tips
In just 14 maps, the strategy yielded 11 divines’ worth of loot, or about 0.7 divine per map, which is quite strong for such a low-investment method.
Profits include not only currency and GCPs but also rare scarabs, chaos, unique maps, and tainted fusings.
Using a gold flask with increased item rarity will further boost your gold income and increase the odds of better unique drops.
The strategy is enjoyable, fast-paced, and rewards players who can handle dense packs and chaotic encounters.
While some drops depend on luck, the steady stream of Doppler Ganger cards, tainted currency, and scarabs ensures your investment is covered.
2. Midgame Harvest + Scarab + Dunes Strategy for Gold Farming
This low-investment atlas strategy for gold and currency focuses on running Dunes maps with a simple approach: rush to the boss, clear the map, and collect all harvest rewards, aiming for high-value yellow juice and expensive scarabs. The method leverages cheap map rolling, atlas passives for scarab and harvest rewards, and efficient map clearing. With an average investment of eight to nine chaos per map, it’s possible to recover costs and earn close to half a divine or more per map, even when luck isn’t on your side. The core of this strategy is the combination of strong pack size, scarab stacking, and harvest prioritization, all while keeping your map investment low and returns steady.
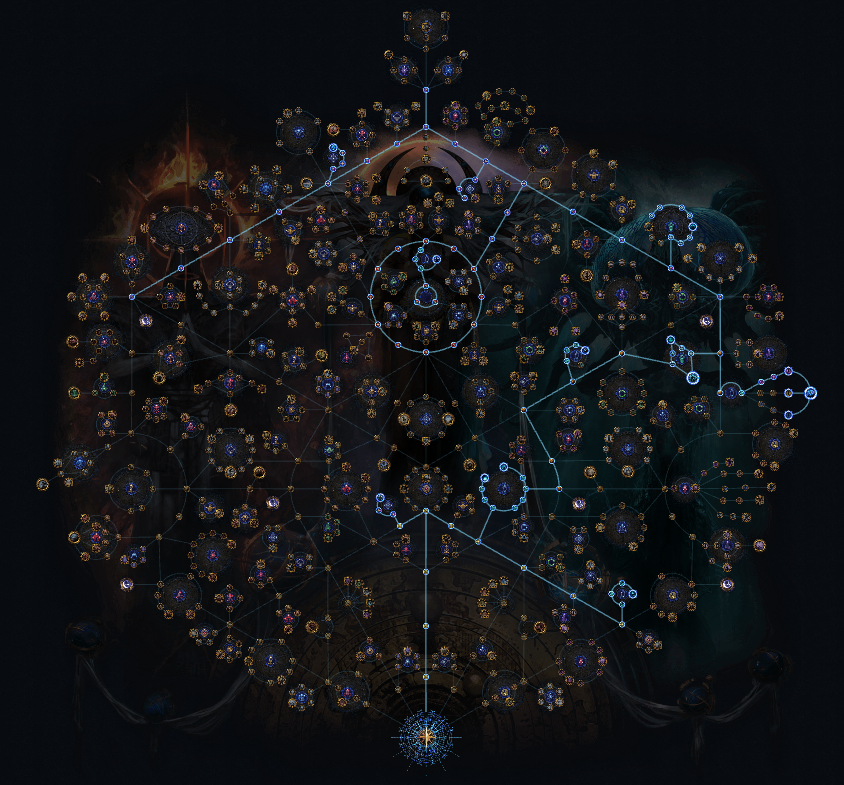
1. Atlas Passive Tree and Harvest Nodes
The atlas tree is built around increasing scarab drop chance, map modifiers, and maximizing harvest rewards.
Key picks include all the major scarab nodes such as Remarkable Relics, Trapping Carapace (for higher Omboo scarab chance), Skittering Swarms, and various 4% scarab drop chance nodes.
Take almost every harvest node except “Call of the Grove,” as cheap harvest crafts are used instead.
Bountiful Harvest, Bumper Crop, Heart of the Grove, and Primal Drought are chosen to increase harvest rewards and reduce blue plant spawns.
Map explicit modifiers and Chisel Perfection are taken for added value.
Crop Rotation is skipped, as testing showed it was not worth the effort; simply click the harvest and move on.
2. Map Rolling and Mods
Use Dunes maps, rolling them for a pack size of 26–28% and always chiseling for extra item quantity.
The focus is on running maps with high pack size and item quantity—most will land around 80–100% item quantity after rolling and chiseling.
While farming, you may find divination cards like Fortunate, which can be exchanged for valuable items, though this is more of a bonus than a core part of the strategy.
4. Scarabs and Map Device
Equip Influencing Scarab of Hordes for increased influence pack size.
Use one Harvest scarab and two Monstrous Lineage scarabs to boost the number of magic monsters, which drop plenty of gold and can yield scarabs.
Adding influence to the map spawns additional monsters—and some are magic—which increases both gold and currency drops.
On the map device, use the 8% quantity craft for extra loot, as other options aren’t needed for this setup.
5. Running the Maps
Enter the map, quickly kill the boss, then clear the rest of the area, collecting harvest rewards as you go.
When using the harvest, always prioritize yellow juice; if unavailable, go for purple, then blue.
Yellow juice is expected to rise in price as demand increases for crafting and gambling, so it can be profitable to save and sell it later.
Each map will also drop a mix of blue, yellow, and purple juice, scarabs, and occasional lucky drops like Nurse cards or high-value scarabs.
6. Profits and Results
Over a set of 25 maps, the method produced 1.4 million gold, along with thousands of blue, yellow, and purple harvest juice.
Even when discounting lucky drops like divine orbs or Nurse cards, the average profit per map was around 0.9 divines.
The strategy produced 173 greater Adriage and 87 grand Adors, showing the strong potential for valuable drops.
Clear speed is the main limit; faster characters will see even better results.
Saving yellow juice for a few days may yield higher profits as the market price climbs.
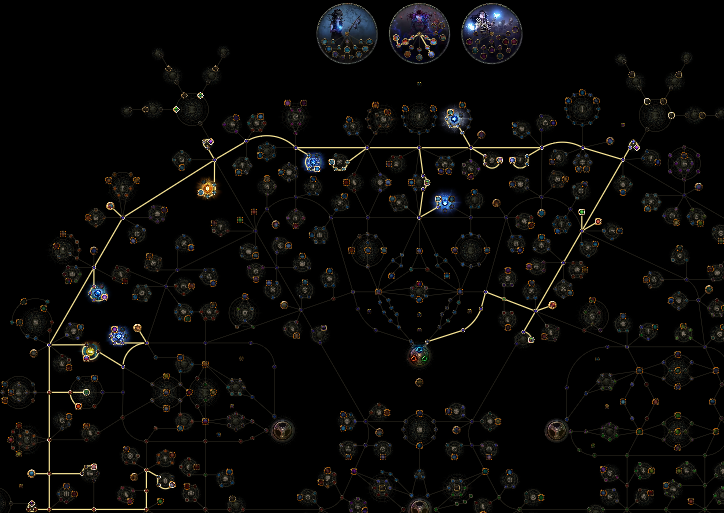
3. Endgame Budget Gold & T17 Map Printing with Ore and Scarabs
This endgame budget farm strategy for gold and T17 maps is centered on efficient map printing using affordable, high-yield T16.5 maps. With careful scarab selection and map rolling, you can generate 40,000 to 60,000 gold per map and consistently see multiple T16.5 and T17 maps each run. The strategy is designed to be accessible for nearly any endgame build, as it does not require high boss damage and remains fast and relaxed. By focusing on ore generation, map quantity, and magic pack size, players can achieve impressive profits and a steady flow of valuable maps.
1. Scarab Selection
The primary scarabs for this method are Cartographer's Scarab of Escalation, Kurgan Scarab of Guarded Riches, Kurgan Scarab, and two Monstrous Lineage Scarabs.
Cartographer's Scarab of Escalation drives map drops by scaling with the number of map modifiers.
Kurgan Scarab of Guarded Riches converts all Kurgan monsters into magic monsters for improved loot, while the basic Kurgan Scarab adds more ores to the map.
Monstrous Lineage Scarabs expand the magic pack size, which not only increases gold drops but also boosts map and altar rates.
If you want to focus on eight-mod corrupted maps, swap one Monstrous Lineage Scarab for a Cartographer's Scarab of Corruption.
2. Map Selection and Rolling
Target T16.5 maps with at least six modifiers and a high “more maps” roll; even 50% is effective, but 100% more maps takes the profits to another level.
The ideal map is a corrupted, eight-mod T16.5 with 100% more maps.
Purchase maps with these criteria using a trade filter for convenience, reducing the need for constant crafting or rerolling.
For the map device, use Settler's Kirac craft (costing five chaos) to add two additional ores, maximizing ore-driven loot and gold.
3. Altars and Map Priorities
Throughout your map runs, prioritize blue altars for map duplication and quantity boosts. Rarity altars are also valuable, as they further increase gold gain.
On some layouts, like Mesa, killing the boss early increases the odds of favorable altar spawns, since boss altars are removed from the pool. Jungle Valley naturally blocks boss altars, which can be beneficial for altar selection.
While layout can help, always prioritize a strong “more maps” roll and high mod count over a specific layout.
4. Ore Management and Side Profits
As you clear maps, collect and refine ores into bars, then ship them in bulk to Nagakanu. This process provides stack decks, tattoos, and the chance at rare items like Enlightened Support.
Some tattoos have high value, and large shipments (over a million in value) can lead to excellent returns.
If you spot bismuth ore during a map, click it early for a buff that increases loot for the remainder of the map—this is optional but can add a bit more efficiency.
5. Atlas Passive Tree Guidance
Focus on nodes that boost map effect, shaping, and pack size. Shaping nodes are key for multiplying map drops.
Prioritize the upper tree for increased pack size, as eater altars rely on pack size for spawning. The additional magic pack size from Monstrous Lineage Scarabs further boosts altar rates.
Invest in ore-related nodes and include Verissium for an extra chance at the Black Knight fight, which can drop valuable unique items.
6. Adjustments for Eight-Mod Maps
If pursuing eight-mod corrupted farming, allocate Singular Focus and set your favorite map slots accordingly, typically all on one map type like Defiled Cathedral, with one connected node.
This approach forces almost all map drops into your chosen map, making farming more targeted and efficient if you are after a specific drop like Apothecary.
7. Results and Profit
Across multiple test runs, the strategy averaged 15 to 25 map drops per run, with T16.5 and T17 maps appearing regularly.
The gold yield per map reached 40,000 to 60,000, and side profits from ores, stack decks, and tattoos added extra value.
Maps with higher “more maps” and eight mods produced the wildest outcomes, single runs yielding up to 65 T16s, four T16.5s, and four T17s.
Entry cost for the maps is low (7–10 chaos), but higher-quality maps will require a bit more investment.
Results can vary based on timing, modifiers, and execution, but the method remains budget-friendly and high-yield.