With the arrival of Path of Exile 3.27: Keepers of the Flame, the endgame mapping experience is set for a major refresh. The new league introduces sweeping changes to the Atlas passive tree system, refines core mechanics like Heist, and brings a dramatic rework to Breach content. It’s time to update our endgame mapping and Atlas tree strategies for Path of Exile 3.27! This guide will walk you through the most effective early, mid, and endgame Atlas passive tree setups and mapping plans for both trade and Solo-Self Found (SSF) modes. Learn how the latest changes—like the Breach rework, Heist overhaul, and new quality-of-life options- affect your farming, currency generation, and map progression in PoE 3.27.
PoE 3.37 Strategy Guide (Early, Mid, End League Atlas Tree & Map Farming Plans)
The Keepers of the Flame update arrives with a fresh theme centered around the Hiveborn and the invasion of Wraeclast. This league marks a substantial shift in Atlas progression and rewards, featuring new mechanics, a Breach overhaul, and quality-of-life improvements across the board. Players will notice more freedom in respecs, easier access to content, and a dynamic economy as a result of these changes.
Main Changes To Atlas & Map in Path of Exile 1 3.27 Keepers Of The Flame League
The 3.27 expansion overhauls both the Atlas passive tree and the mapping process. Here are some of the standout updates:
Atlas Tree Refund with Gold:
The ability to instantly respec your entire Atlas passive tree using gold brings an unprecedented level of flexibility to mapping. Instead of being locked into a single strategy or waiting for a full league reset, players can now freely adjust their approach as new information, loot tables, or community discoveries emerge. This innovation is also extended to the regular passive tree, allowing for even more customization.Major Atlas Tree Layout Shift:
The 3.27 update brings a comprehensive rework to the Atlas tree’s layout. Notable clusters for mechanics like Breach have been removed or re-imagined, making space for new strategic focuses. For example, where Breach mechanics once existed, Beyond nodes have now been placed, offering new opportunities for currency farming and monster density. Other mechanics, such as Heist, retain their presence but may be consolidated or adjusted to fit the new structure.Breach and Beyond Rework:
Breach content has undergone a full transformation, with new encounters, rewards, and integration into the mapping experience. Many of the previous Breach nodes are now gone, and the storylines have evolved to match the new endgame narrative. Beyond, previously reworked to tie in with Scourge content, now occupies some of the prime cluster locations on the tree.Heist Quality-of-Life Improvements:
Heist rogues are now always at maximum level once recruited, eliminating the repetitive early grind. This streamlines the process for players who wish to engage with Heist content early in the league. However, this change also means that valuable Heist drops, such as replica items, specialized orbs, and unique crafting bases, will likely decrease in price due to higher supply as more players farm Heist regularly.Broader Quality-of-Life Changes:
Keepers of the Flame promises additional quality-of-life improvements, such as the ability to fully refund your passive tree with gold and visual clarity enhancements in the Atlas. Other mechanics like Delve, Blight, and Harvest may also receive attention in future updates, keeping the endgame fresh and engaging.
These changes lay the groundwork for new strategies and mapping priorities. With respecs now trivial, you can adapt your approach as the league’s meta and economy evolve.
PoE 3.27 League Start Fast Atlas Progression Strategy
Atlas progression has its own meta and rhythm in PoE 3.27, especially at league start. This guide synthesizes practical advice and original explanations, providing a step-by-step look at how to move from your first map all the way to endgame farming.
1. Early Atlas: White Maps and Initial Points
When you enter maps, the first goal is to start collecting Atlas points. The initial 27 points are targeted in the white map section. These come from completing white maps (tiers 1–5), and you don’t need to worry about doing every tier in order. "It's spam white maps, 27 of them. If you get a completion from a yellow map or two, that's great." Your focus at this stage is simply to reach that 27-point break point, unlocking Unwavering Vision, which gives an immediate boost in Atlas power.
During this phase, it’s fine to run maps as you get them, regardless of tier. "Just draw the white maps. Don't worry about the tier so much." Some players might save higher tier drops, but most will naturally accumulate a few yellow maps while primarily running white ones.
Clearing most of the monsters in your maps, especially early on, is highly recommended: "Clear most of the mobs in your maps, especially in the white map section." This keeps your character level up and avoids getting under-leveled, which can happen if you rush just the bosses.
2. Transition to Yellow Maps and Starting the Questline
After those first 27 points, the next phase is about pushing into yellow maps (tier 6–10). The goal here is to reach tier 8, where the Atlas questline begins. In a tier 8 map, you’ll find the envoy, who drops a compass. This compass starts either the Searing Exarch or Eater of Worlds influence.
Once you have the compass, you’ll follow the quest log, which will direct you to run increasing tiers of influenced maps (tier 9, tier 10, and so on). "You just want to push up. We now it's time to start the quest. And to start the quest, we want to run a tier eight map." Keep your quest log open and follow the instructions for progressing the influence.
While progressing through yellow maps, it's not necessary to fully clear all yellow tiers for points. The priority shifts to quest completion, as "the quest is like then like the only important thing that you care about."
3. Gaining Your First Two Voidstones
To obtain your first two voidstones, you’ll need to defeat the influenced map bosses from tier 11 up to tier 16. When you defeat the boss in a tier 16 influenced map, you'll get an invitation to fight either the Searing Exarch or Eater of Worlds. These bosses are lower level than their endgame versions, but can still be challenging if your character is underpowered.
"To summarize the quest again, you find the envoy in a tier eight. He gives you a compass...then you get to tier 11. You defeat a tier 11 influence and it will drop an invitation to a mini boss. You defeat the mini boss and it says, 'Okay, you're allowed to go forward now.'" Repeat this up through tier 16, then use the invitation and defeat the boss to gain your first voidstone. Repeat for the other influence to get your second.
At this point, you should have around 65 Atlas points and two voidstones, which increase both your map drop tiers and the chance for tier 17s, "which is very good."
4. Approaches After Two Stones: Farming and Upgrading
Once you have two voidstones, the next steps depend on your goals and character power. Some players immediately push for the third and fourth stones (Maven and Uber Elder), while others go back and fill in more Atlas points or focus on building up gear.
"You want to build up your map pool but more importantly you need to build up your character power. Not many builds can defeat Maven and Uber Elder on essentially what I'm going to call a gamble gear." Most players will need to upgrade gear—improving life, resists, suppression, and getting a five-link.
During this time, it's common to self-craft upgrades or buy essentials. "With campaign gear, you can beat the two stones, but you need to upgrade offense/defense for four stones and you will feel it immediately." This is a great stage to use your second Atlas tree (unlocked at 50 points) for crafting mechanics, harvest, or other currency generation nodes.
5. Red Maps and Full Atlas Completion
With two voidstones, you should be able to sustain tier 16s. At this stage, you can focus on running your favorite tier 16 map for currency and experience, using Kirac missions and scouting reports to fill in Atlas completions you’re missing. "You just press alt and skim every map. And so maybe not the reds because you're saying they're expensive, but the other ones are very cheap."
If you’re pushing for all Atlas points, keep running different maps as you acquire them, especially via Kirac missions. Some players will use a "horizontal strat," completing all tier ones, then all tier twos, etc., which is especially safe for newer players. "Just try to complete everything on the way. It is perfectly normal to like do the pyramid, you know, T1 then T2 then T3."
More experienced players will push up tiers quickly, focusing on quest progression, and then circle back for missing completions as needed.
PoE 3.27 Best Atlas Tree Strategies & Mapping Plans for Trade Mode
As everyone knows, GGG has nerfed many of the strategies that were effective last league. The drop rate of the new league mechanic is not very good. GGG stated they will buff or change it to improve the diversity of farming strategies. Below, we will keep updating the most effective farming strategies and mechanics based on the current state of the game:
PoE 3.27 Harvest Atlas Tree & Farming Strategy
In Path of Exile 3.27, Harvest farming is still a steady and reliable way to generate income, especially in a league where many previous strategies have been nerfed and the new mechanic’s drop rates are lacking. Harvest was barely affected by recent changes, and lifeforce remains a consistent profit source. Running Harvest maps yields nearly as much lifeforce per map as in the previous league, and with lifeforce prices likely to rise as the league progresses, holding onto your stock can result in even greater profits. Even with modest gear, this method can generate around 9–10 divines per hour, and with a more optimized setup in higher-tier maps, returns can reach 15 divines per hour.
Steps to Set Up the Harvest Strategy
1. Early League Progression and Gear
In the first two days, progress through the Atlas by running alch-and-go maps and selling early drops like maps and Wombgifts. This helps you gear up and accumulate currency quickly. Once you have your Atlas passive skill points, you can start to pivot toward more focused strategies.
2. Transitioning to Harvest
Switch to Harvest farming once your build is able to handle T16 or T17 maps, as Harvest was barely affected by the nerfs and still provides reliable returns. Lifeforce remains valuable and is not impacted by mechanics like Breach, which remove monsters from maps. At first, you may notice that lifeforce drops are slightly lower than last league, but this is still acceptable for the profits you can make.
3. Managing and Selling Lifeforce
Track the amount of lifeforce you get per map. It’s wise to hold onto as much lifeforce as possible, since the price will likely increase over time. Only exchange lifeforce for currency when you need to buy upgrades; otherwise, stockpile it for greater returns later. If you choose to sell immediately, expect around 9 to 10 divines per hour at current market rates. More optimized setups running T17s can see up to 15 divines per hour, especially when using efficient map and scarab strategies.
4. Map and Scarab Setup
Focus on running Citadel maps, as they are affordable and your build can handle the bosses. For scarabs, instead of using the more expensive Ambush Scarab of Containment and Ambush Scarab of Discernment combo, opt for three Ambush Scarabs: Ambush Scarab of Hidden Compartments, Ambush Scarab of Potency, and the Ambush map device. This setup is much cheaper while still allowing you to spawn 13 strongboxes and maintain the natural mob density of the map.
With the new trade system, you don’t need to roll your maps manually. You can filter out map mods that your build cannot handle, and aim for at least 90% scarab coverage in the listings. Even if you pay a slightly higher price for traded maps, it still comes out cheaper and more efficient than rolling them yourself.
5. Atlas Tree and Optimization
Check detailed Atlas tree recommendations for the best passive nodes to take, prioritizing Harvest and strongbox bonuses. Running at least 50 maps with this approach can provide a reliable sample of your average income. If you’re experimenting with different ideas between maps, keep a spreadsheet of your results for accurate tracking.

6. Market Predictions
Lifeforce prices are expected to rise after upcoming buffs, based on current trends and GGG’s stated intentions to improve strategy diversity. It may also be worthwhile to hold onto other drops like Hivebrain Glands in anticipation of changes to Breach boss loot. While this isn’t investment advice, monitoring the market and adjusting your selling strategy can boost your returns.
PoE 3.27 Blight Atlas Tree & Farming Strategy for T17 Maps, Scarabs, Currency & Gold
Blight farming in Path of Exile 3.27 remains an accessible, rewarding approach for generating maps, currency, scarabs, experience, and gold, all from a mechanic that’s both simple to set up and scalable to the highest map tiers. Blight's efficiency allows you to farm everything possible, making it one of the most reliable methods for building wealth, whether you’re working towards Mageblood or other high-value goals. Regular runs, especially in optimal layouts like Toxic Sewer, can produce a steady flow of valuable loot, and the strategy can be ramped up for T16.5 and T17 maps if your build is strong enough.
Steps to Set Up the Best Blight Strategy:
1. Map Choice and Layouts
For the best returns, run Toxic Sewer maps, as this map has the ideal layout for Blight encounters. While T17 maps can also be used due to their layouts, avoid maps with wide-open areas like Dunes, which are less effective. Always set all 12 favorite maps to Toxic Sewer, since this applies to blighted maps as well, and Blighted Toxic Sewer and Blight Ravaged Toxic Sewer are the most valuable maps you can obtain.
2. Tower Defense Tactics
Blight is a tower defense mechanic with six types of towers. The core tactic involves creating combinations of green towers and the fist tower to produce permanent area-of-effect stuns. Using a rank three green tower with a rank two or three fist tower will permanently stun all monsters in the punchy tower’s radius. Build these near choke points to maximize their effect. You can further improve your towers by anointing rings with the “your empowering towers have 25% increased range” enchantment, using verdant and black oil, which is very affordable.
Pay attention to lane icons, as these indicate which immunities the monsters have—cold lanes are immune to cold towers, fire lanes to fire towers, and so on. Having a tanky build helps, and Toxic Rain is a strong choice since it offers built-in slows and excellent area control, allowing you to stack damage at choke points where monsters are stunned.
3. Passive Tree and Atlas Setup
Use a map-oriented passive tree, allocating every small and large node that increases the chance for tier 1 to 15 maps to drop a tier higher. This works even with all four voidstones and increases the amount of T16.5 and T17 maps you find. Avoid Singular Focus, as it prevents non-favored blighted maps from dropping, which is detrimental. Prioritize nodes that give more scarab drops and take both blue altar and blight passives.
 When it comes to altars, blue ones generally offer more quantity and better player modifiers, like chances to duplicate maps, currency, and scarabs, while being easier to survive. However, red altars can also be chosen if you prefer monster modifiers or are running on a lower investment.
Take almost every Blight node on the tree. Immune Response speeds up spawns, Epidemiology is very effective, and Sturdy Construction increases your pump’s durability. Fungal Horizons and Blight Spawn further boost map and reward chest generation. Templar Ingenuity changes how you approach blight: now you want to build one of every tower type and upgrade them all, as towers convert into chests with better rewards when upgraded. Try to diversify your towers as much as possible, and always aim to have at least a rank three green and fist tower for stuns.
4. Scarabs and Blight Mechanics
Blight Scarab of Blooming is the main scarab to use. It adds three extra unique bosses per blight, doubles boss life, and causes all tier 14 blighted maps found in the area to drop as blight ravaged maps instead—including those from Blight Reach. This makes Blooming the most valuable scarab for this method, and its price is reasonable compared to the profit potential.
Other scarabs, like Blight Scarab of Invigoration, increase monster difficulty and rewards but are too expensive for this strategy. Blight Scarab of Blightart is cheap but not recommended since it spawns a huge number of monsters, creates only one reward chest, and greatly reduces your chance to get blighted maps from chests.
Also equip Cartography Scarab of Escalation, Influencing Scarab of Hordes, and two Monstrous Lineage scarabs to increase map drops, pack size, and monster density, all of which contribute further to currency, experience, and gold gain.
5. Running the Maps and Loot
Blight reward chests are the primary way to get maps and profit, including valuable blight ravaged maps which can be sold for large amounts of chaos. Toxic Sewer typically features fewer lanes, making it easier to control the encounter and maximize blighted reward chests. When using Blooming, every T14 blighted map dropped will be a blight ravaged map, and T16 Toxic Sewer blight ravaged maps are among the most expensive.
If your build is powerful, you can run corrupted eight-mod maps or push into T16.5 and T17s for even more rewards. However, T17s do not produce T17 map drops, so the best value remains in T16s and T16.5s.
You can expect to run 10 to 12 maps per hour with this approach, and profits can swing dramatically, sometimes you’ll leave a map with several blight ravaged maps worth multiple divines.
PoE 3.27 Blightheart Scarab Atlas Tree & Farm Strategy
This farm strategy is centered on Blight encounters amplified by Blightheart scarabs, with the goal of generating an abundance of unique monsters and maximizing scarab drops in each map. The strategy demands a powerful character due to the high difficulty of the encounters, particularly as Blight bosses become more challenging and gain additional modifiers. Profitability remains strong even after recent nerfs, especially when focusing on open layouts and optimizing both map setup and Atlas passives for scarab yield. The method relies on rolling high-scarab maps, employing a specific tower setup, and carefully selecting which scarabs and passive nodes to use, all while maintaining quick map completion times to keep profits high.
Map Choice and Rolling
Dunes T16.5 is the primary map used, favored for its T7 proest drop and open layout. However, switching to other maps can lower costs and potentially increase profits, depending on the economy. The aim is to roll maps with at least 90% scarab effect, since reaching 100% is usually too costly or difficult. Use regular chisels and the BL map device craft. Map cost generally averages around 10 chaos, although this can vary based on the build’s ability to handle tougher mods or higher map rolls.
Scarab Selection and Tower Setup
The scarab configuration includes one Blightheart scarab and one Blight scarab, which allow empower towers to affect additional enemies and raise monster density. Additionally, use one Blight Scarab of Blooming to introduce more unique monsters, one Titanic scarab to increase the quantity and rarity of loot from unique monsters, and one Tan Scarab of Legends to add two extra modifiers to unique monsters, making them tougher but more rewarding. The tower strategy involves building one chill tower, one stun tower, and filling the rest with empower towers to maximize monster empowerment and loot potential.
Atlas Passive Tree Optimization
Key nodes are chosen to boost non-unique monster spawns, lower tower construction costs for rapid empower tower deployment, and increase scarab drop rates. Blocking low-value scarabs, such as those from Blight, Expedition, Legion, Delirium, and Ritual, removes them from the drop pool, improving the odds of receiving scarabs with higher market value. One crucial node grants unique monsters a 200% chance to drop monster scarabs, which fits perfectly with the focus on farming unique monsters. Nodes that increase the number of Blight bosses per lane are also taken, further amplifying unique monster farming. Blight chest nodes are skipped, as only one chest spawns at the end and these passives add little value. For altar investments, red altars are selected for compatibility with most builds, while blue altar investment is generally skipped. Additional passives are allocated toward map quantity, extra ambush chances, and increased odds of rare scarab drops.

Running the Maps and Blight Encounter
Each map is run with the scarab setup and the chosen map device craft. During the Blight encounter, focus on empowering monsters to maximize loot. Expect the run to be challenging, unique Blight bosses are especially tanky due to added modifiers, and T16.5 maps bring additional difficulty. Completion times average around 5.5 minutes per map, though with a strong build, this can drop to 5 minutes or less. The faster you clear, the closer you get to the optimal profit rate.
Profit Calculation and Results
Over the tested sessions, the net profit reached 83 divines, with an average map time of 5.5 minutes, translating to approximately 18 divines per hour. This calculation excludes valuable unique drops, so actual profit may be higher. Item pricing was tracked manually, with originators averaging 20 chaos, random originators at 8 chaos, and fortresses at 70 chaos each. The costliest aspect is the configuration scarab, which fluctuates between 50–60 chaos and should be monitored closely. Despite the increased difficulty and added tankiness of unique monsters, the strategy remains highly profitable and quick compared to previous league versions.
PoE 3.27 Alch & Go Atlas Tree Strategy for Headhunter & Currency Farm
When aiming to gather the currency needed for a Headhunter, a direct and efficient "alch and go" strategy proves highly effective, especially as prices stabilize in the league. Focusing on T16 yellow maps, this method uses chaos scarabs and leverages new mechanics to maximize profit from content that many players tend to overlook. The approach emphasizes running maps quickly, selling heist contracts and blueprints, collecting valuable Calgore ore rewards, and utilizing red alters, all while maintaining a low investment per map and ensuring a steady flow of income.
Steps to Set Up the Alch & Go Strategy
1. Map and Scarab Selection
Stick to T16 yellow maps—Jungle Valley is a strong choice because the boss doesn't spawn and you can always access all minion nodes on every altar.
Use a one chaos scarab per map to boost rewards.
For each map, chisel and alch, then check the mods to ensure you can run them (avoid "cannot regen" if using leech).
Add heist as the map mod, costing about 5 chaos, and use a single sulfite scarab for one chaos.
2. Atlas Tree Construction
Focus your tree on content that other players tend to avoid, including maps, heist, and Calgore ore.
Red alters are included for consistent currency drops.
The central profit comes from heist contracts, as one-wing heist contracts sell for about 9 chaos and are a reliable income source.
Invest points in the section of the tree where Smuggler's Caches have a chance to drop fully revealed blueprints—these sell for 40 chaos for three out of three wings revealed, and even more (around 60 chaos) if you find a four out of four.
Deception contracts are also valuable, selling at about 4 chaos each.
Async trade has made bulk selling of heist contracts and blueprints much easier, streamlining this part of the farm.
3. Calgore Ore and Tattoos
Send your boats in King's March to Nanu for tattoos, aiming for expensive tattoo drops such as the chance to poison tattoo, which can sell for a divine orb.
The process is simple: set up your crew, choose your shipping port, and send out your props. In a couple of hours, you'll receive a batch of new tattoos.
4. Map Running Process
Each run costs roughly 9 chaos: map (3C), scarab (1C), and map mod (5C).
Blast through the map, picking up Smuggler's Caches, road markers, and contracts as you go.
Minion nodes on alters are preferable since Jungle Valley lacks a boss, making it easy to click every altar for maximum value.
Sulfite veins now yield petrified amber ore instead of sulfite, thanks to a specific node on the Calgore ore tree.
Red alters supplement your currency income, and graph blood accrues rapidly due to the speed of this strategy.
Any blueprints or valuable contracts instantly pay for the map cost, making the remainder of the map pure profit.
5. Loot Management and Sales
Regularly search for deception contracts and blueprints by typing "dece" or "83" in your search bar, then list the items in your async trade tab for the current going price.
Always double-check blueprint wings—fully revealed ones fetch much more, so avoid underpricing by mistake.
Regular invitation drops every 24 maps can be sold for extra income.
6. Graph Blood and Crafting
Store up graph blood and use the Genesis tree, targeting uniques (specifically belts and jewels) while blocking strength and dexterity requirements to increase jewelry drops.
If unique crafts are unavailable, switch to currency crafts for extra profit.
Using equipment crafts early on helps with gearing and can provide additional value.
PoE 3.27 Beast Atlas Tree & Farm Strategy
The Beast farming approach has become much smoother with recent updates in patch 3.27, making it a top choice for generating currency, especially early in a league. Thanks to improvements like asynchronous trade and streamlined beast management, it's now far easier to extract and sell valuable beasts. The main focus is to maximize the appearance and duplication of profitable red and yellow beasts within maps, while also leveraging opportunities to profit from Heist blueprints and valuable ore nodes. This strategy is designed for quick mapping, prioritizing beast collection and efficient selling, with the added bonus of solid experience gains along the way.
Preparing for Beast Farming
Start by visiting your menagerie, where you can easily manage your beast collection. With the new interface, you can control-click to remove unwanted beasts or itemize those you intend to sell. This change removes the tedious process of using orbs and lets you rapidly sift through your collection. Red beasts, which tend to have unique icons and generate rewards like unique items, and yellow beasts, which are easier to sell in bulk, should be your primary targets for trade. Price checking beasts is now quick and convenient, letting you list them for sale with minimal effort.
Scarab Selection and Map Choice
For optimal beast farming, select two key scarabs: the Bestiary Scarab of Herd, which adds five extra red beasts, and the Bestiary Scarab of Duplication, which creates copies of red beasts in your map. Scarab prices can fluctuate, but they are generally affordable, making the cost per map manageable. Popular map choices include Burial Chambers—favored for its layout and the chance to hunt for the Nameless Seer, and Dunes, depending on your goals.
Building the Atlas Tree
Focus your Atlas passive points on nodes that boost beast encounters and rewards. Prioritize the major beast wheels that increase the number of beasts, raise the chance for red beasts, and improve the odds of encountering Einhar. Additional nodes should provide more yellow beasts, allow yellow beasts to be replaced with reds, and boost the percentage chance for beasts not to be consumed when used. The “Two-Hearted Hunt” wheel is especially valuable, as it grants a chance for beasts to survive crafting, increasing their sale value.
Specialize your beast hunting by selecting nodes for specific beast families: Feral (dogs and wolves, including Black Morgans), Kraken (frogs and vivid watchers), Phenomus (spiders), and Sagal (vivid vultures). The “Natural Selection” node always deserves a spot, as it increases the likelihood of rare beasts. Adjust your focus based on market demand and personal preference, switching between different beast family nodes as prices fluctuate.
Integrating Ore and Heist Mechanics
Expand your profit potential by investing in Atlas nodes that increase ore deposits and smuggler’s caches. More ore deposits raise your chances of finding valuable Starfall Craters, while extra caches and heist nodes reward you with blueprints and rogue markers, both of which sell well. Seek out fully revealed blueprints for higher profit, and remember that rogue markers are easily traded for chaos or divine orbs.
Running the Maps
When entering a map, your goal is speed and efficiency. Move quickly, capturing red beasts and any valuable yellows you encounter. Learn to recognize profitable beast types by their appearance, such as spiders with white dots, bears and dogs with red spikes, certain frogs, birds, and squids. Over time, identifying these will become second nature.
If you’re aiming to maximize income, avoid unnecessary combat and ignore content that doesn’t contribute directly to your goals. However, do kill the boss every 28th map to gain invitations, which can be sold for extra currency. Running a fast-moving character with good damage will help maintain high efficiency.
Selling and Profiting
After your farming session, itemize and price check your beasts. List high-value red beasts and bulk yellow beasts for sale. Take advantage of asynchronous trade to offload your stock with ease. Also, sell blueprints and rogue markers you’ve accumulated, and don’t forget to price check synthesis maps and sanctuary maps, as these can fetch a good amount.
Beast farming not only provides steady currency but is also a strong source of experience. By focusing on quick map completion and valuable drops, you can maintain a constant stream of profit with minimal downtime.
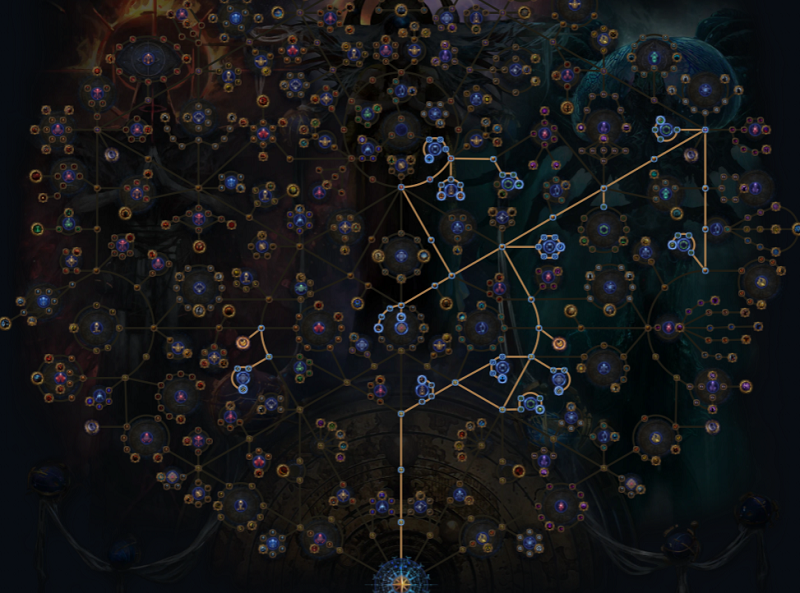
PoE 3.27 Wisped Hive Breach Atlas Tree & Farming Strategy
This strategy focuses on harnessing the power of hives and maximizing their loot potential by combining high-tier maps, specific scarab combinations, and an optimized Atlas tree. While hives are rare, the approach aims to extract reliable profit from fortress encounters and Breach content, with hive encounters serving as extraordinary windfalls when they occur. The method has shown excellent returns over extended mapping sessions, but due to considerable loot variance, it’s best suited for well-built characters and those willing to run a large number of maps to smooth out fluctuations in profit.
Map Selection and Scarab Setup
Begin by selecting tier 16.5 maps that can drop the fortress, such as Canyon, Mesa, and Dunes, all of which offer open layouts and high monster density. Beach is another attractive choice, as it drops the abomination and can be horizon-orbed for efficiency. For each map, use a combination of five scarabs: Cartography Scarab of Escalation for more maps, Horn Scarab of Nemesis to juice rare monsters, two Wisp Scarabs to increase monster rewards, and a Calguran Scarab to boost bismuth ore chances. Additionally, apply the Settler’s craft on the map device. This setup focuses on fortresses as a reliable source of income, while the rest of the scarabs ramp up monster density and loot potential.
Rolling and Running the Maps
Roll high-quantity maps whenever possible, using regular chisels and one daily orb per map. Aim for a combination of high-scarab and high-map rolls, but achieving both at once is not always necessary. Costs per map can be managed by buying cheaper layouts and horizon-orbing into preferred maps, keeping the investment reasonable—typically around 35 chaos per map. This ensures profitability even outside of hive encounters, as fortress farming alone delivers steady returns.
Handling Hive Encounters
When a hive does appear, clear the entire area before starting the hive event. This will generate about two dozen rare monsters, with an additional five or so spawning during the event. As you exit the area, more rares may respawn along your path, adding another five to ten. This sequence leads to the massive loot explosions that characterize the strategy’s most lucrative moments. If you ever manage to line up Wildwood Wisps or bismuth ore with a hive, expect even larger rewards.
Optimizing the Atlas Tree
Travel up the center of the Atlas passive tree, picking up nodes that boost scarab effect, map modifier effect, and map drops. Take all available scarab nodes and increase your chance for extra ore deposits. While some players choose to avoid certain scarab-related nodes (such as those believed to reduce bismuth ore rates), you may want to include them for broader benefit. Additional passives should increase the chance for ambush and cartography scarabs, improve map quantity, and boost blue altar rewards for additional duplication and currency opportunities. Blocking less valuable mechanics like Blight may also help focus your rewards on more lucrative outcomes.
Expected Returns and Variance
Over an 80-map sample, the approach has generated around one divine per map on average, with some stretches yielding three divines in 10 maps and others spiking to 16 divines over the same number. Even during less fruitful streaks, steady fortress farming keeps profits above average for the league. The method’s high variance means that some runs will be exceptionally profitable—especially when hives and bismuth ore align—while others may be more modest. On a 50-map trial, net profit reached about 43 divines after accounting for all investment.
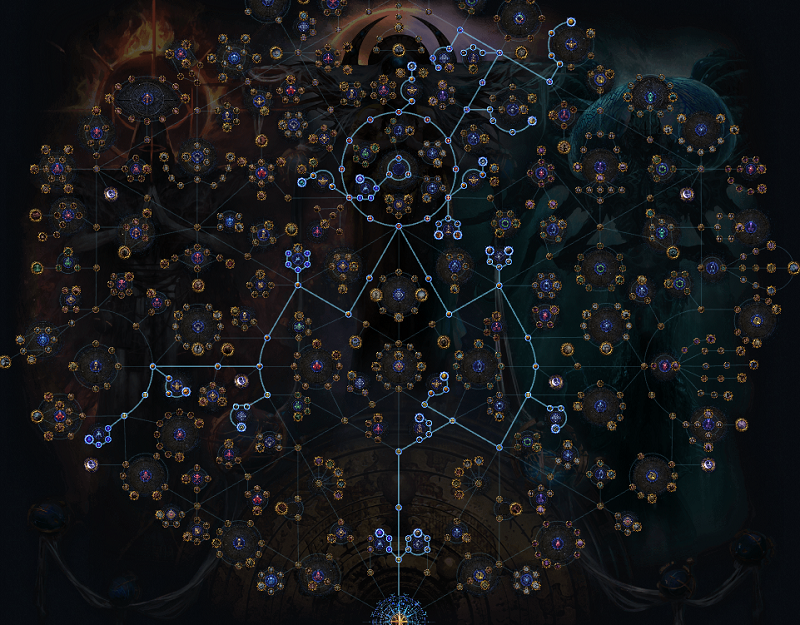
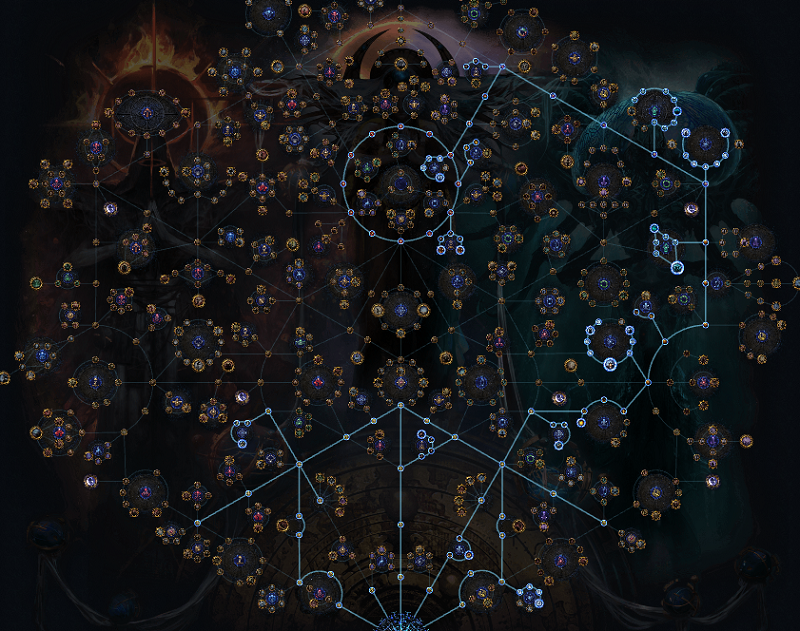
PoE 3.27 Best Heist Atlas Strategy for League Start Currency Farm
Heist remains one of the most consistent and accessible league start currency strategies in PoE 3.27. With recent buffs, Heist has become even smoother: all rogues now start with max-level skills, removing the grind of leveling, and asynchronous trade lets you buy and sell contracts or blueprints effortlessly without interrupting your gameplay. Heist can be run on a shoestring budget before Act 10 is finished, with fast-moving builds able to rack up chaos and other basic currency quickly. By focusing on speed, prioritizing blueprint drops, and leveraging early demand for contracts, blueprints, and thief’s trinkets, Heist offers a reliable way to fund your early progression and catch up on gear or supplies before diving deep into mapping.
Steps to Set Up the Heist Atlas Tree Strategy:
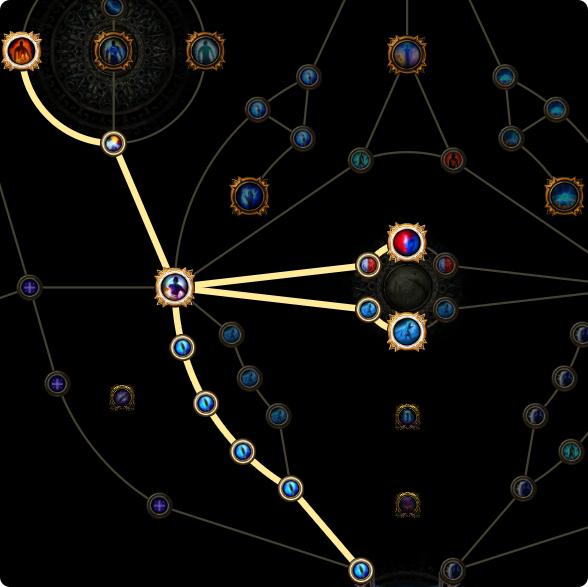
Path to Heist Clusters: On your Atlas passive tree, head to the left side where all four Heist clusters are located. These are easy to reach and require only a handful of points.
Take Secret Stash: Allocate the Secret Stash notable and its connected nodes for increased chance to spawn Smuggler’s Caches in your maps. This raises your Heist encounter rate from the base 8% up to nearly 48%, ensuring frequent contract and blueprint drops.
Pick Up Casing the Joint: Invest in Casing the Joint for 100% increased blueprint drop chance and a 10% chance for blueprints to drop fully revealed. This node is a core moneymaker—fully revealed blueprints sell for much more, especially early league.
No Honor Among Thieves: Allocate this node to multiply blueprint drops and snag additional Smuggler’s Caches, which synergizes well with the map device craft for guaranteed Caches.
Leave Blocker Node Untaken: Ignore the Heist mechanic blocker node—you want Heist spawns to keep flowing, especially now that asynchronous trade lets you profit by selling contracts and blueprints you don’t want to run.
Optional: Friends in High Places/Beautiful Soldier: If you plan to self-run contracts for rogue markers, take these notables for improved marker drops and Huck’s XP/move speed bonus in maps.
Combine with Other Strategies: Because Heist passives require so few points, you can easily blend this setup with other farming approaches on the Atlas.
With this setup, you’ll have a steady flow of Heist content in your maps, early access to high-value blueprints, and a low-effort way to generate league start currency—perfect for funding your build or flipping early drops for profit.
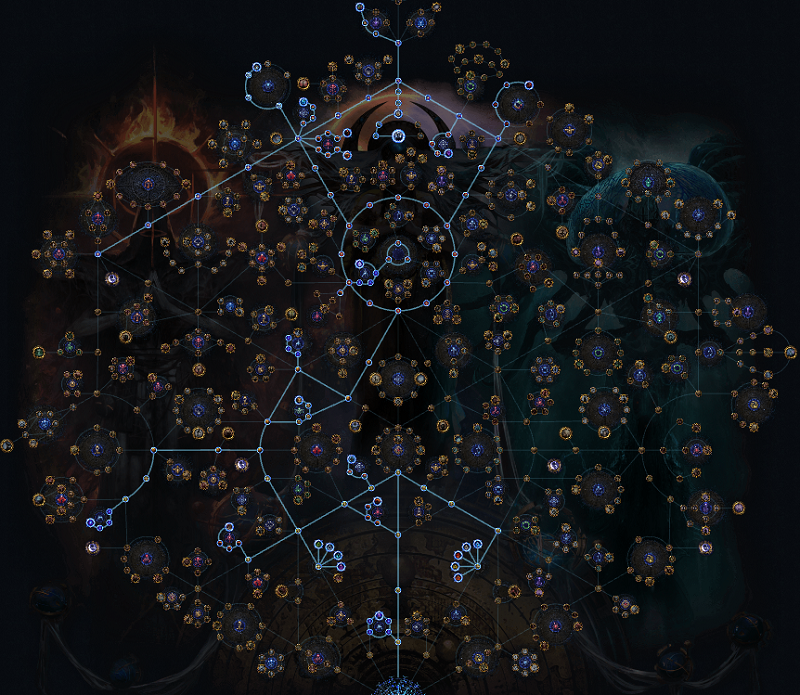
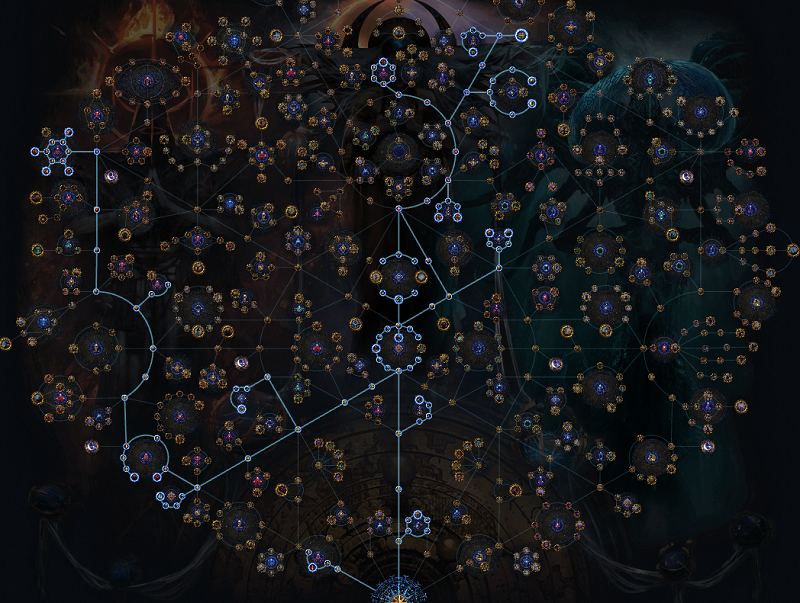
PoE 3.27 Best Destructive Play Atlas Strategy for Early & Endgame
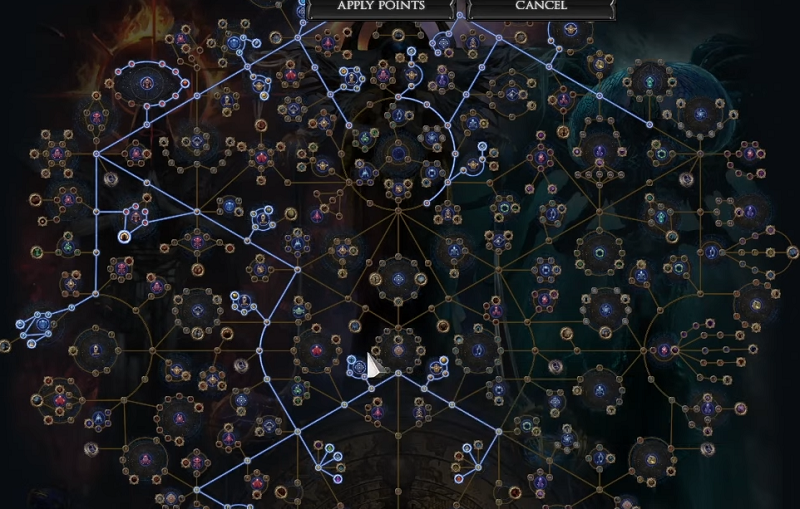
Destructive Play shines due to its straightforward nature: simply roll your maps and go, with scarabs being completely optional. By leveraging Maven instead of Eldritch influence, map dangers are reduced for a more comfortable experience. Running T14+ maps with a wide variety of layouts, this setup is ideal when your map pool is still diverse and random, especially early in a league. After every ten different map layouts, Kiraak grants a special boss encounter that offers unique loot, and two voidstones are all you need to get started.
Steps to Set Up the Destructive Play Strategy:
1. Map Selection and Preparation
Focus on T14 and higher maps, aiming for ten different layouts in rotation.
This method is especially convenient early in a league, when your map pool is varied.
You won't need four voidstones; two from the starter tree will do, and the Maven questline will naturally guide you toward a third.
Roll your maps for basic mods you can handle. Scarabs can be added for extra juice but aren't necessary.
2. Atlas Tree Construction
The central principle is taking the Destructive Play keystone, which provides a steady supply of extra bosses.
Alongside Destructive Play, invest in nodes that increase the chance for synthesis, conqueror, Shaper, and Elder guardian maps to drop from map bosses.
Always select Maven influence on your maps. This makes the experience safer and fits the strategy's tempo.
Use shaping nodes to support map sustain.
Add shrine nodes for extra monsters and easier map clearing.
Expedition is included, with Extreme Archaeology making it fast and rewarding—just drop the explosive and clear for quick loot.
Delirium is an option for additional rewards, especially cluster jewels, though it can increase difficulty. If your build struggles, consider swapping Delirium out for Heist or Strongboxes for a faster, easier experience.
The main goal is to move quickly through maps, clearing aggressively toward the boss room and not worrying about backtracking or full clears.
3. Running the Maps
Prioritize speed: clear directly to the boss and avoid backtracking, even if you leave 50+ monsters alive.
Builds that scale well for bossing are recommended, as the more monsters you clear before entering the boss room, the more bosses will spawn—up to five is possible.
For extra value, favor maps with multiple bosses, such as City Square.
Every ten different maps trigger a Maven invitation, granting special boss arenas that drop valuable awakened support gems.
Special map drops, like Shaper, Elder, and Conqueror maps, are easily stacked—running four of a kind, such as Shaper Guardians, sets up a more lucrative Kiraak boss fight.
4. League Mechanics and Additional Rewards
Expeditions are fast and profitable, especially with builds that provide explosions, making the mechanic nearly instant to clear.
Delirium layers further rewards, with clusters dropping at the end of the run—just remember to manually end the fog before leaving to collect everything.
Breach is included passively, as high map throughput lets you experience this mechanic frequently for extra loot.
Keep an eye on awakened support gems from Maven arenas, as some are quite valuable and sought-after by various builds.
5. Flexibility and Progression
This tree is designed for league start and early progression, making the maps as approachable as possible.
As you farm, you'll naturally progress toward more voidstones and tougher strategies, enabling you to shift into higher investment or more challenging content as your character improves.
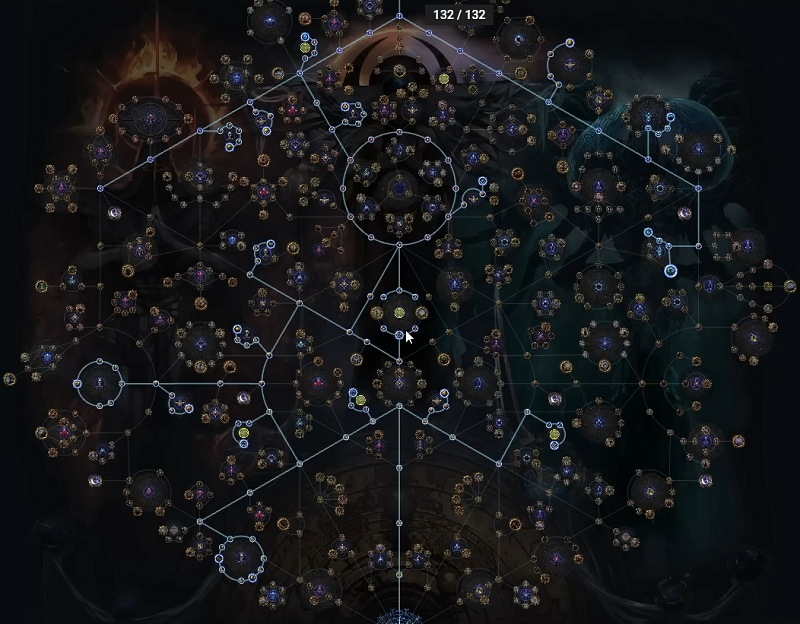
If you have more Atlas skill points, you can expand on the core principles, but the strategy works well with 124 out of 132 points.
PoE 3.27 Cheap & Easy Essences Atlas Tree Strategy
Essence farming remains one of the most reliable ways to stockpile currency and valuable crafting bases, especially in the opening days of a league. The Essences Atlas tree setup is designed to maximize both the quantity and the tier of Essences that drop, while also making the monsters easier to defeat. This approach is fast, repeatable, and fits comfortably into any mapping routine.
Steps to Set Up the Essences Strat:
1. Essence Node Priority
Begin by allocating every Essence node available, focusing on nodes that increase the number of Essence encounters in your maps.
Invest in upgrades that improve the tier of Essences dropped and add additional remnant modifiers to the monsters.
Take nodes that make imprisoned monsters easier to defeat, ensuring you can clear them quickly even on a league starter.
Boost Essence duplication chances where possible, multiplying your profits each map.
2. Mapping Routine
Choose maps with layouts that make it easy to locate and clear Essence monoliths.
This tree setup naturally fits into regular alch-and-go mapping, without requiring any special investment.
All you need to do is identify and defeat Essence monsters as you encounter them, collecting and selling the valuable Essences and crafting bases that result.
PoE 3.27 Shaper Guardians Essences Atlas Tree & Farm Strategy
This method focuses on efficiently farming Shaper Guardian maps paired with essences for consistent profit each hour, ideal for those who prefer steady returns over high-variance jackpot farming. By combining the linear layouts of Shaper Guardian maps with destructive play and strategic use of essences, the strategy ensures you collect all valuable essences and benefit from extra boss spawns and loot. Supplementing with heist content and lab trial nodes maximizes the range of drops, from special maps and awakened gems to valuable offerings and blueprints. The approach is fast-paced, relies on a strong bossing build for Tier 16 content, and incorporates several tricks for maximizing and selling your gains.
Map Selection and Setup
The core of the strategy is running only Shaper Guardian maps, as their linear design allows for easy collection of every essence on the map. Unlike Sirus or Elder Guardians, which feature random layouts and scattered essences, Shaper Guardians ensure no essence is missed, optimizing the value of your essence scarabs. If you need a specific Guardian map, use an Orb of Horizons on a different Guardian map to convert it as needed. Always run one of each Guardian (Minotaur, Chimera, Phoenix, Hydra) for invitation progress.
Scarab and Essence Optimization
For each map, apply one Essence Scarab and one Scarab of Ascent, which raises the tier of the essences present. This ensures that the essences you collect are higher value and more numerous. When encountering a purple essence (such as Scorn, Misery, Envy, or Horror), use a Vaal Orb via the map device interface to attempt an upgrade into a special, more expensive essence. The map device now allows you to place Vaal Orbs directly, so there's no need to carry them in your inventory. This step is key to maximizing currency from essences.
Atlas Passive Tree Choices
The Atlas tree focuses on destructive play, which causes Maven to spawn additional bosses in your Guardian maps, increasing the chance for special influence maps and more loot. Nodes are also taken for higher drops of Conqueror, Elder, Shaper, and synthesized maps, as well as better odds for lab trial offerings and heist content. Nodes that increase general map quantity and rarity are included for better loot overall. All other league mechanics are blocked to increase the chance of finding heist smuggler's caches and maintaining fast, focused gameplay. Consider avoiding the Crystal Resonance node unless your build is extremely strong, as it makes already tough Guardian bosses much more dangerous in exchange for more essences.
Running the Maps and Using Maven
Apply Maven to every Guardian map. After completing four different Guardians, open the Maven Invitation in the Maven Arena via Kiraak for additional loot and Maven splinters. If your build is strong enough to handle all modifiers, apply a Vaal Orb to the invitation for even more rewards; otherwise, use chaos orbs to roll manageable mods. The goal is to complete as many invitations per hour as possible, maximizing your steady income of splinters, awakened gems, and fragments.
Efficient Map Play and Boss Tips
Move quickly through each map, clicking and collecting essences and heist contracts as you go. The linear layout means you won’t miss any valuable nodes. For the bosses, especially Minotaur, watch for lethal mechanics such as the burrow attack. Place totems or use your build’s strengths to clear these encounters swiftly and safely. Improved lab trial nodes will occasionally reward you with valuable offerings (Gift or Dedication to the Goddess), which are highly profitable, especially when sold in bulk.
Selling and Upgrading Essences
Deafening essences can be further optimized by using the Fortification Station in Betrayal to swap cheap essences for more valuable ones. When selling, gather essences in bulk and list them for slightly less than the market average to ensure quick and profitable sales. Avoid selling individual essences for chaos orbs; instead, price them in divines in bulk for better returns. Patience is rewarded, as even slightly undercutting the market leads to reliable sales.
Build Requirements and Profitability
The strategy requires a strong bossing build capable of handling Tier 16 Guardian encounters, as both essence monsters and map bosses can be extremely tanky. Following this method offers guaranteed returns, with most essences valued at two to three chaos and higher-tier essences or bulk sales yielding even better profits. Additional loot from invitations, lab offerings, and heist content ensures a steady flow of currency, making this approach both fast and reliable throughout the league.
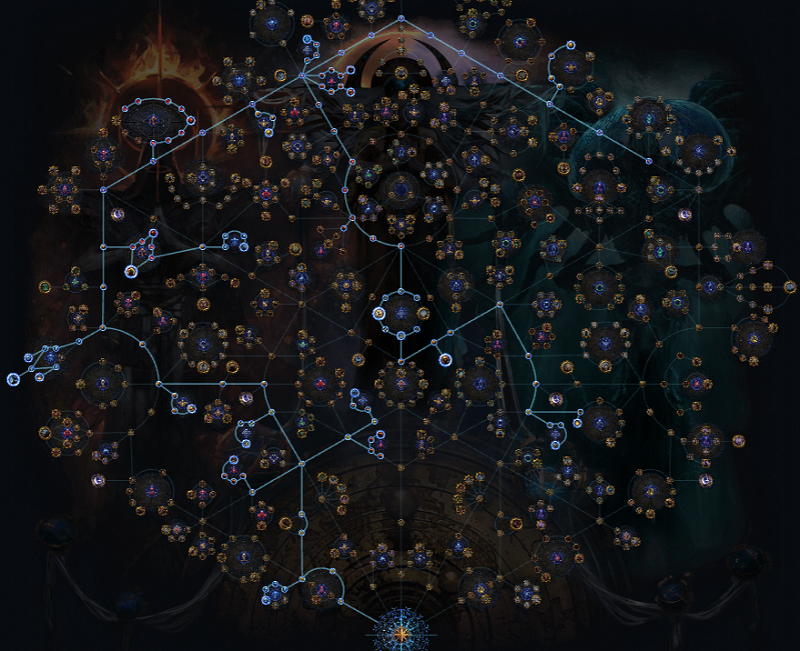
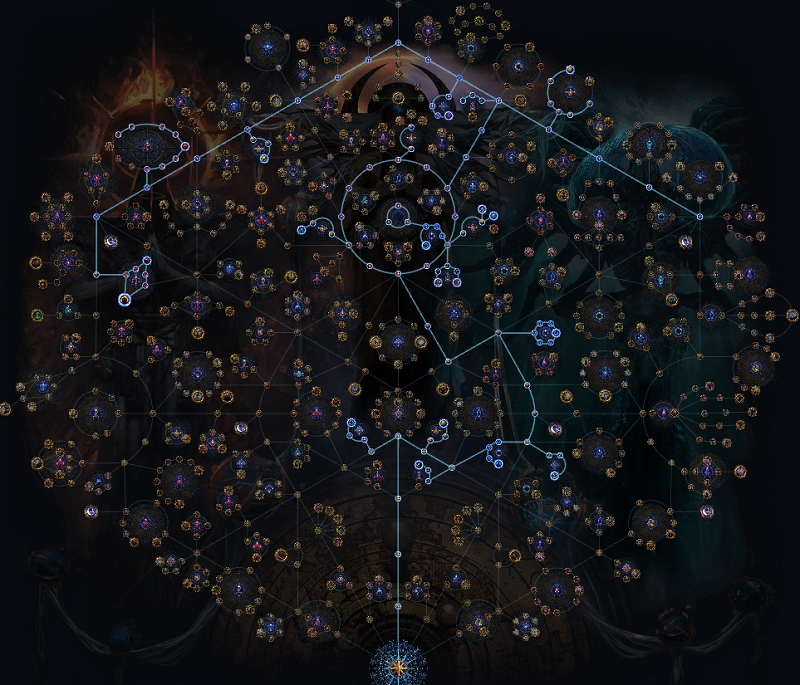
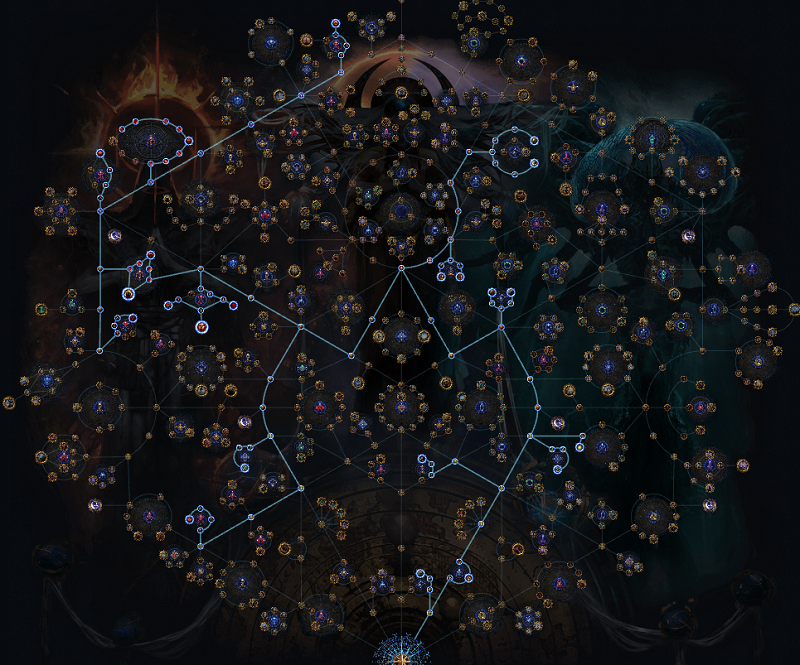
PoE 3.27 Best Abyss & Harbinger Atlas Strategy for League Start Farming
For the start of the 3.27 league, Abyss and Harbinger nodes form a reliable and profitable foundation for early mapping, especially with demand for powerful abyss jewels and the benefits of asynchronous trade. Five or six mod abyss jewels are expected to be a hot commodity, driven by both wanderer builds and the ease of bulk-listing items for sale. Early on, Harbingers provide horizon orbs that assist with map completion, while Abyss delivers strong experience gains and the chance for valuable jewel drops. The synergy between these two mechanics ensures steady currency income, strong character progression, and a constant flow of high-demand items to sell or use.
Steps to Set Up the Abyss & Harbinger Atlas Tree Strategy:
1. Path Through Shaping and Progression Nodes
Start your tree by heading toward Supplication, followed by Underground Kingdom and Ominous Arrival. Then, move through Shaping the Mountains and into Cryptic Gateway to reach Shaping the Skies. These shaping nodes are always a priority during league start because they help raise map tiers and maintain progression. Picking them up early ensures access to higher tier maps as you advance.
2. Prioritize Harbinger for Early Map Completion
Allocate points into Harbinger clusters early since Harbingers provide horizon orbs, which are invaluable for filling in your Atlas with new map completions. This combination of Kirac missions and Harbingers makes it possible to finish your Atlas in the first day or two, especially when pushing through white and yellow maps. Harbinger Scarabs can be added later if your build is strong enough to handle the extra monsters.
3. Invest in Kirac and Scouting Nodes
Move toward Expert Reconnaissance and Commissioned Officer to benefit from Kirac mechanics. These points allow you to stockpile scouting reports and boost the number of missions available, which smooths out map sustain and lets you maintain steady progression through the Atlas. Kirac’s shop and missions are especially valuable in the early days of a league.
4. Add Shrine and Pack Size Clusters
Take nodes such as First Wave, Synchronism, and Drawn to Power. These shrine-related nodes offer powerful buffs every map, extending shrine duration and increasing their impact. Shrines not only make your character much stronger, but also help you clear content faster.
5. Focus on Abyssal Army and Experience Nodes
Prioritize Abyssal Army, as this cluster is a key source of character experience and monster density. Abysses are known to provide excellent experience per hour, making them ideal for fast leveling. Inspired Darkness is also valuable, allowing Stygian Spires to drop higher item level bases, which is useful when pushing into yellow and eventually red maps.
6. Target Darkness Enthroned and Scarab Generation
Plan for Darkness Enthroned, since the belt is popular among wanderers and minion builds and will likely be valuable, especially with favorable rolls. Ancient Conflict and troves can help generate abyss scarabs, which are needed because the maximum abyss chance per map never reaches 100%, even with full investment, it only gets to 76%. By supplementing with scarabs, you can ensure abysses appear in every map.
7. Adjust for Difficulty and Scarab Use
Abyssal Depths bosses can be tough, especially before you have sufficient damage or defenses. Consider skipping Awakened Depths until you can comfortably handle those encounters, as shrine buffs are lost in depths and that can make the fight more dangerous. You can also use nodes or gear that grant crowd control, such as freeze, to manage difficult abyss bosses later on.
8. Scarab Management for Sustained Farming
Once you have some starting currency, begin using an abyss scarab and a harbinger scarab in every map. This setup ensures at least one abyss (often more) and a minimum of four harbingers per map. If you can sustain scarab drops from your mapping, you won’t need to buy many, but harbinger scarabs may need to be purchased depending on your supply and the market.
9. Jewel Farming and Selling
The big ticket items from this strategy are abyss jewels with five or six modifiers. Jewels with triple damage mods, or multiple minion mods, are especially valuable for trade. Even generic jewels with life, resist, and crit will be in demand early league. Darkness Enthroned belts, especially with good rolls, can also fetch a high price.
10. Progress at Your Own Pace
This strategy is designed for 77 Atlas points, which is easily achievable and ideal for players operating in white, yellow, or even red maps. Loot quality and quantity improves as you progress, and you can adapt your node selection based on your build’s survivability and damage.
PoE 3.27 Cheap & Easy Harbinger Atlas Tree Strategy
Harbinger farming is a tried-and-true method for generating raw currency and shards, especially with the potential for Exalted shards and Harbinger orbs. The Harbinger Atlas tree focuses on maximizing Harbinger spawns and improving their rewards, turning each map into a steady stream of currency fragments and valuable orbs. This strategy is fast, satisfying, and works well for players who want to keep their mapping loop simple.
Steps to Set Up the Harbinger Strat:
1. Harbinger Specialization
Allocate every Harbinger node on your Atlas tree to increase both the number and the pack size of Harbingers in your maps.
Pick nodes that improve Harbinger drop rates and add more valuable shards, such as Exalted and Annulment shards.
Focus on upgrades that enable Harbingers to drop their unique orbs and currency, boosting your overall returns.
2. Map Running and Loot
Select maps with good open layouts to maximize Harbinger clearing speed.
This tree is ideal for rapid, repeatable mapping sessions—simply roll your maps and go, collecting the currency and shards that drop.
Keep an eye out for rare Harbinger orbs and Exalted shards, as these can quickly add up to big profits over many runs.
PoE 3.27 Best Expedition Atlas Strategy for League Start Farming
Expedition offers a powerful way to generate currency at league start, even on a very modest budget and minimal Atlas progression. For early farming, you don’t need an expensive build; something around level 90 and roughly one divine in investment is enough. Damage-over-time builds and mines tend to excel in Expedition, since they handle tightly packed monsters well. The main goal is to run maps quickly while focusing on Expedition encounters, aiming for at least 800 chaos per hour if you keep up a good pace. Currency comes from a mix of logbooks, exotic coinage, burial medallions, and artifacts, which can be sold or haggled with the Expedition NPCs for profit.
Steps to Set Up the Expedition Atlas Tree Strategy:
1. Allocate Expedition Atlas Nodes
Focus your Atlas tree by taking all Expedition nodes, as these are mandatory for boosting your Expedition encounter frequency and rewards. Make sure to also allocate the small nodes that increase adjacent map drops to help maintain your map pool. Blue altar nodes are highly recommended for additional rewards and should be included whenever possible. Shrine and Niko nodes, as well as the quantity nodes in the center of the tree, are optional; reserve these for extra points or if your character needs more strength or speed.
2. Select and Favorite Maps
Target maps that are connected and allow for efficient sustain. Use Jungle Valley, Underground Sea, and Mesa as your main pool, as they drop into each other. In 3.27, verify the Atlas for any map connection changes and adjust accordingly. Use your favorite map slots—two on Jungle Valley, one on Underground Sea, and one on Mesa—to maximize your chances of sustaining these maps.
3. Prepare Your Maps and Gear
Before you start running maps, chisel and use alchemy orbs on them for increased pack size and rewards. For gear, prioritize lightning and gold resistance to help offset downsides from altar effects during mapping.
4. Run Maps Efficiently
When mapping, rush to the boss and defeat it, except in Jungle Valley, where you skip the boss to control altar and Expedition spawns. Trigger Eater influence and always prioritize altars that increase item quantity, especially those affecting Expedition. Focus on engaging with all Expedition encounters in every map.
5. Use Scarabs Strategically
Use two Expedition scarabs, one of Rune Finding, one of Powder, and two of Monster’s Lineage in your map device. If you don’t have all map device slots available at league start, unlock the fifth slot by completing a Maven invitation or using a carry service.
6. Sustain and Grow Your Currency
As you complete maps, gather logbooks, exotic coinage, burial medallions, and artifacts. Logbooks with valuable modifiers can sell for 40–50 chaos each, while coinage and medallions are easily sold in bulk. Artifacts can be used to haggle with Tujen or Dannig for additional profit, or simply traded for quick currency. By following these steps and moving quickly, you can maintain your map pool, achieve a steady flow of valuable Expedition loot, and set yourself up for a successful league start.
PoE 3.27 Cheap & Easy Expedition Atlas Tree Strategy
Expedition offers a lucrative and reliable income in nearly any league, providing not only valuable logbooks but also consistent currency and vendor rerolls. This strategy focuses on boosting the number and quality of Expedition encounters in your maps, allowing for fast, repeatable profit with minimal downtime. The nodes taken also help simplify the mechanic, so you can complete each Expedition in seconds and move on quickly.
Steps to Set Up the Expedition Strat:

1. Expedition Focus
Prioritize all Expedition nodes on the Atlas tree to maximize the frequency and rewards from each encounter.
Take Extreme Archaeology, which makes Expeditions much simpler by allowing you to drop the explosives and kill everything within seconds, speeding up each map’s loop.
Stack additional nodes that increase Expedition encounter chance and improve their rewards, making every map feel rewarding.
The strategy is all about fast, reliable Expedition clears, so aim to move through them efficiently and consistently without lingering.
2. Map and Playstyle Tips
Aim for maps that have easy layouts for Expeditions, letting you quickly access and clear the mechanic.
Expeditions are especially profitable early in the league, so this tree is perfect for building up your first currency stacks.
The approach is straightforward: roll your maps, enter, clear the Expeditions, and move on.
Vendor rerolls, raw currency, and logbooks will form the backbone of your profits here.
PoE 3.27 Bestiary Atlas Strategy for League Start Farm
Bestiary offers a practical approach for early league currency and gear progression in Path of Exile 3.27, especially in solo self-found environments. The Atlas passive tree didn’t undergo major structural changes for this method, so the core framework remains reliable for consistent map progression and early access to useful uniques. By focusing on Kirac nodes for map sustain and incorporating Bestiary nodes for guaranteed unique item access and valuable crafting options, this strategy provides a smooth path through white, yellow, and red maps. Players can expect to quickly fill out their Atlas and equip their characters with both essential rares and desirable uniques by following a streamlined plan.
Setting Up Your Atlas Tree for a Bestiary Start:
1. Start with Kirac and Map Progression Nodes
Begin your Atlas journey by investing in Kirac-related nodes. These are the foundation for seamless map progression, as Kirac missions and his shop provide continuous access to maps you haven’t completed yet. Resetting Kirac’s shop with missions and using scouting reports, especially comprehensive ones—consistently fills in Atlas completion. This approach ensures that, within a couple of days, most players can complete all white, yellow, and red maps, with only a few unique maps remaining.
2. Prioritize Ambush and Domination
After establishing your basic progression, consider nodes for generic content that boosts pack size and gives extra loot. Ambush (strongboxes) and Domination (shrines) are favored here, as shrines grant substantial buffs that last over a minute, and strongboxes reliably drop extra currency. By picking up nodes that increase shrine and strongbox spawns and improve their rewards, you consistently gather currency items like alterations, alchs, and vaals, small gains that add up quickly early in the league.
3. Use Unwavering Vision for Early Power
Picking up Unwavering Vision early provides a surge of Atlas points. This jump-starts your progression, letting you invest heavily in your chosen mechanics from the outset. With these points, round out your shrine and strongbox clusters, then move toward the league mechanic you want to focus on.
4. Invest in Bestiary Nodes for Uniques and Crafting
For players targeting specific early uniques or crafting options, Bestiary is extremely effective. Allocate points into all Bestiary nodes except “Deadly Prey,” which doesn’t contribute meaningfully. Focus on tier four and five beasts, as these are common and provide access to useful early uniques for many builds. For example, when playing Flicker Strike, targeting bronze lith, carnage heart, darkray vectors, and tanu ahi can be achieved by prioritizing the Wilds, Sands, and Caverns beast families—avoiding Deep, which offers little for this purpose.
Understanding which beast family corresponds to your desired unique is important: spiders for Caverns, Farric for Wilds, and Sackawans for Sands. Removing points from families you don’t need increases your chances of finding the beasts you want. This targeted approach means you’ll obtain most necessary uniques quickly, while rarer tier three or two items may take longer.
5. Efficient Rare Item and Weapon Acquisition
Early on, there’s little need to craft rare gear thanks to the influx of item drops from mapping and Bestiary. Aggressively identify all boots, gloves, helms, and accessories to find life and resistance rolls, ensuring your character is capped on resistances and has enough stats. This identification process gears you up organically within a day or two, making manual crafting unnecessary until later. For weapons, other mechanics like Heist blueprints or recombinators can be useful, but Bestiary’s unique drops often suffice for many builds.
6. Avoid Blocking Mechanics Early
There is no need to block any league mechanics at the start, as Unwavering Vision prevents scarab drops anyway and the early benefit of scarabs is minimal. Instead, focus entirely on progressing your Atlas and maximizing the benefits from Bestiary and generic loot nodes.
7. Continue Progression and Adjust as Needed
Stick with the Kirac-focused Atlas tree until you’ve completed your initial mapping goals. Once you have more Atlas points, you can branch into small nodes that improve map connectivity, or pick up extra quant and life nodes as needed. The first tree is more than enough for stable progression; don’t worry about swapping to a second or third tree until your Atlas is fully filled out and you’re ready to specialize further.
PoE 3.27 Best Atlas Tree Strategies & Mapping Plans for SSF
Below are the three SSF Atlas Tree strategies, allowing you to choose between gearing efficiency, flexible league mechanic farming, or accelerated Atlas and invitation progression. They are built to be practical, easy to adapt, and effective for solo play, ensuring you can advance through SSF content on your terms.
PoE 3.27 SSF Ritual & Searing Exarch Atlas Tree Strategy
This approach centers on maximizing the value of Ritual encounters in SSF, making it an outstanding option for early gearing and steady progression. Ritual is chosen for its strong rewards and synergy with SSF needs, while the addition of Searing Exarch and several utility nodes further strengthen your character and loot. The strategy sacrifices some Atlas progression speed for reliable access to useful items and powerful crafting bases, aiming to get you six-links and other essentials faster.
Steps to Set Up the Ritual & Exarch Strategy:
1. Core Ritual Focus
Begin by allocating virtually all Ritual nodes, since Ritual offers a robust starter mechanic and aligns well with most SSF builds.
Always grab the four Betrayal nodes first, as they provide immense value for minimal point investment, yielding excellent gear from failed modifiers.
Take the path through Alva for occasional Temples, which can offer extra items and crafting opportunities.
Move towards the cluster that increases Ritual spawning chance, picking up nodes for rerolls and reduced favor cost.
Arbitrary Tenants is included to randomize the board costs, so half of the valuable rewards become cheaper, simply choose the lower-cost options for maximum benefit.
Continue along nodes that further boost Ritual spawn rates and complete the wheel that ensures every Atlas Ritual encounter has four altars for greater rewards.
2. Transition to Searing Exarch and Utility
Gradually pivot your tree as you progress, incorporating Searing Exarch influence, which is more rewarding in SSF than blue altars due to the abundance of valuable red currency.
Pick up nodes for player power and strongboxes, including those that double currency and divination card drops from strongboxes.
Add shrine nodes for temporary buffs and increased clear speed.
Instead of Alva, route through Niko to access Delve when needed.
Packed with Energy and other power-boosting nodes further reinforce your character’s ability to handle harder content.
This setup enables you to comfortably farm gear and crafting materials, gearing up for late-game content while keeping your map sustain manageable through supplemental mechanics like Delve or Temple runs.
PoE 3.27 SSF Blight & Searing Exarch Atlas Tree Strategy
For those who prefer not to run Ritual, this variant swaps Ritual for Blight while maintaining the foundation that makes the SSF tree efficient. Blight is favored by many players for its rewarding chests and oils, especially early in the league, and fits seamlessly into the same robust structure as the Ritual-focused tree.
Steps to Set Up the Blight & Exarch Strategy:
1. Switch to Blight Nodes
Replace Ritual clusters with Blight clusters on the Atlas tree, taking every available node to increase Blight spawn rate and rewards.
The rest of the tree remains essentially unchanged, preserving strongboxes, shrines, map sustain, player power, and the Searing Exarch influence.
Continue to benefit from doubled strongbox rewards and shrine effects, making your mapping both safer and more profitable.
2. Maintain Core Structure
Still route through Betrayal nodes for the gear and crafting bonuses.
Searing Exarch remains the preferred influence for SSF, as it supplies the most useful red altars and currencies.
If Blight isn’t your preference, the same structure lets you swap for another league mechanic on the left side of the tree, such as Delirium, depending on what you enjoy or need at the time.
This strategy gives you a powerful and flexible SSF tree, allowing for strong early and mid-game progression while offering the option to easily pivot into other mechanics as needed.
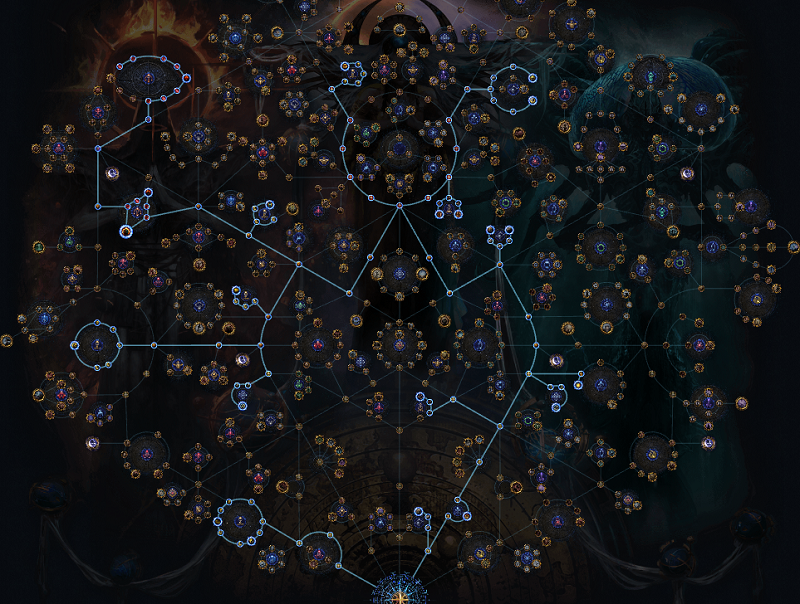
PoE 3.27 SSF Destructive Play Maven Boss Rushing Atlas Tree Strategy
The Maven Boss Rushing approach is designed for rapid Atlas progression and access to invitations, making it the optimal choice for players who want to reach two and four voidstones quickly. By focusing on boss encounters and minimizing time spent on slower mechanics, this tree supports fast map clears, boss farming, and consistent map and invitation drops.
Steps to Set Up the Maven Boss Rushing Strategy:
1. Destructive Play and Boss Nodes
Take the Destructive Play keystone, which causes Maven to witness the map boss and adds three more bosses, making every boss room a valuable loot event.
Allocate all nodes that grant additional drops from map bosses, including conqueror, elder, shaper guardian, and synthesis map drops.
Prioritize map sustain nodes and Kirac missions, maximizing your chances to fill out the Atlas and collect invitations for further progression.
2. Fast Mapping and Lean League Mechanic Choices
Design your tree to avoid time-consuming or slow league mechanics, allowing you to move quickly from start to boss each map.
Heist is included as the perfect companion to this style: Smuggler’s Caches, Huck bonuses, and blueprints are all fast and easy to grab during a map run.
Further points can be invested in Betrayal for speedy rewards or Delve for quick completion mechanics.
Gear missions and map nodes remain essential, as they provide both player power and sustain for your mapping loop.
This configuration is ideal for SSF players who want to rush Atlas completion, invitations, and voidstones without spending time on mechanics that slow down bossing. You can easily transition from this tree to the more loot-focused Ritual or Blight versions with minimal respec cost.
More PoE 3.27 atlas tree builds and mapping strategies for curreny & loot farming in Keepers Of The Flame will be updated here continuously, alongside the new league's progress! Stay tuned!